The policy that is described in this scenario uses multiple rules to generate the pre-Windows 2000 user login name for users with the same name, to avoid the need for relying on a uniqueness number. These rules are as follows:
-
The user name is generated from the first character of the user's first name, followed by the user's last name.
-
If a user with the same name already exists, the user name is generated from the first two characters of the user's first name, followed by the user's last name.
-
If two users with the same name already exist, the user name is generated from the first three characters of the user's first name, followed by the user's last name.
-
The length of the generated name cannot be longer than 8 characters under any circumstances. If the name is longer than 8 characters, the trailing characters are truncated as needed.
The policy that is following these naming rules generates names as follows for users named "Jordan Smithson":
-
JSmithso, if the name is unique within the scope of the Policy Object.
-
JoSmiths, if JSmithso already exists.
-
JorSmit, if JSmithso and JoSmiths already exist.
For the steps of creating this policy, see Configuring a User Logon Name Generation Policy Object with multiple rules. When ready, the Active Roles user interface displays a Generate button to create login names that meet the configured policy rule. In case of a naming conflict, clicking Generate causes the policy to apply a subsequent rule.
You can create the User Logon Name Generation policy described in Example: Using multiple rules with a User Logon Name Generation Policy Object with the New Provisioning Policy Object Wizard.
To create and configure a User Logon Name Generation Policy Object to use multiple rules
-
In the Console tree, navigate to Configuration > Policies > Administration.
-
To open the New Provisioning Policy Object Wizard dialog, right-click Administration, then select New > Provisioning Policy.
-
On the Name and Description page, provide a unique Name for the new Policy Object. Optionally, also provide a Description. To continue, click Next.
-
Select the User Logon Name Generation policy type for configuration. Click Next.
For more information, see Configuring a User Logon Name Generation policy.
-
In the User Logon Name (pre-Windows 2000) Generation Rules step, click Add.
-
To configure the policy so that it includes the first character of the user's first name, set the Configure Value dialog with the following steps:
-
To open the Add Entry window, click Add.
-
Under Entry type, click User Property, then click Select.
-
In the Select Object Property window, in the Object property list, click First Name, then click OK.
-
Under Entry properties, select The first, and in the field enter 1.
-
To apply the value setting for the entry, click OK.
-
To configure the policy so that it includes the user's last name, set the Configure Value dialog with the following steps:
-
Under Entry type, click User Property.
-
Under Entry properties, click Select.
-
In the Select Object Property window, in the Object property list click Last Name, then click OK.
-
To apply the value setting for the entry, click OK.
-
To close the Configure Value dialog, click OK.
-
To configure the policy so that will include the first two characters of the user's first name, set the Configure Value dialog with the following steps:
-
To open the Add Entry window, click Add.
-
Under Entry type, click User property.
-
Under Entry properties, click Select.
-
In the Select Object Property window, in the Object property list click First Name, then click OK.
-
Under Entry properties, select The first, and in the field enter 2.
-
To apply the value setting for the entry, click OK.
-
To configure the policy so that it includes the user's last name, set the Configure Value dialog with the following steps:
-
Under Entry type, click User Property.
-
Under Entry properties, click Select.
-
In the Select Object Property window, in the Object property list click Last Name, then click OK.
-
To apply the value setting for the entry, click OK.
-
To close the Configure Value dialog, click OK.
-
Repeat the previous three steps and their substeps, with the difference of setting The first entry property to 3 instead of 2. This will include the first three characters of the user's first name, respectively.
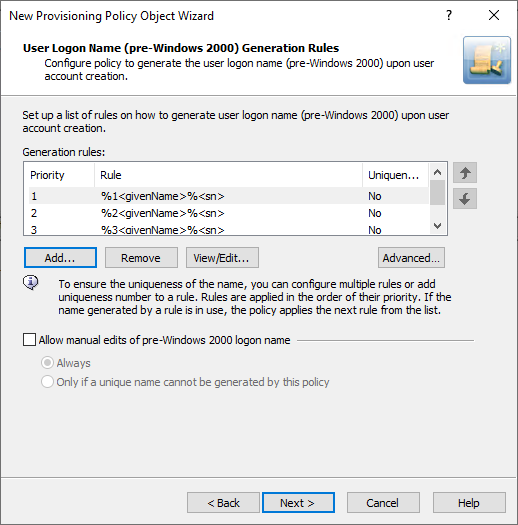
After you complete these steps, the list of entries in the Configure Value dialog must look like as the following image.
Figure 25: Generation rules
-
Click Next, then follow the instructions in the wizard to create (and optionally, immediately apply) the Policy Object.
-
To apply the Policy Object:
-
Use the Enforce Policy page in the New Policy Object Wizard.
-
Alternatively, complete the New Policy Object Wizard, then use the Enforce Policy command on the domain, OU, or Managed Unit where you want to apply the policy.
For more information on how to apply a Policy Object, see Linking Policy Objects to directory objects.
E-mail Alias Generation policies automate the assignment of the email alias when designating a user as mailbox-enabled on Microsoft Exchange Server. By default, Microsoft Exchange Server provides the following recipient email address format: <email-alias>@<domain-name>.
For a detailed description of this policy, see Concept: E-mail Alias Generation in the Active Roles Feature Guide.
You can configure a new E-mail Alias Generation policy with the Active Roles Console.
To configure an E-mail Alias Generation policy
-
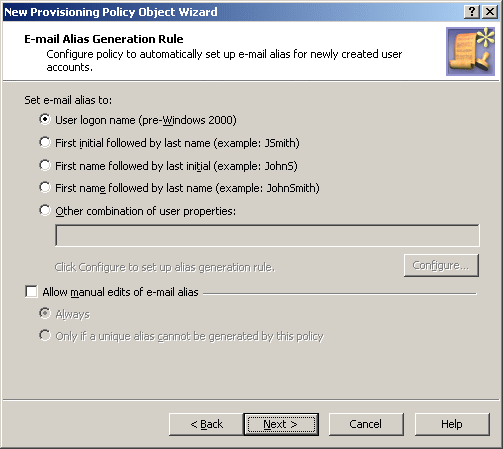
On the Policy to Configure page, select E-mail Alias Generation, and click Next.
-
On the E-mail Alias Generation Rule page, do the following:
-
Select one of the preconfigured generation rules, or create a custom alias-generation rule. To create a custom rule, click Other combination of user properties, click Configure, and complete the Configure Value dialog as described later in the procedure.
-
If you want the email alias to be allowed for manual edit, select Allow manual edits of e-mail alias. Then, do one the following:
-
Click Always to authorize the operator who creates or updates the user account to modify the email alias.
-
Click Only if a unique alias cannot be generated by this policy to allow manual changes only in the situation where a policy-generated alias is already assigned to a different user account.
Click Next.
-
On the Enforce Policy page, you can specify objects to which this Policy Object is to be applied:
-
Click Next, then click Finish.
To complete the Configure Value dialog
-
Click Add.
-
Configure an entry to include in the value. For more information, see Configuring entry types.
-
In the Configure Value dialog, add more entries, delete or edit existing ones, and click OK.