Chat now with support
Chat mit Support

One Identity Management Console for Unix 2.5.3 - Administration Guide

One Identity Privileged Access Suite for Unix Introducing One Identity Management Console for Unix Installing Management Console for Unix Preparing Unix hosts Working with host systems Managing local groups Managing local users Active Directory integration Authentication Services integration Privilege Manager integration Reporting Setting preferences Security Troubleshooting tips
Auto profiling issues Active Directory Issues Auditing and compliance Cannot create a service connection point Check Authentication Services agent status commands not available CSV or PDF reports do not open Database port number is already in use Elevation is not working Hosts do not display Import file lists fakepath Information does not display in the console License information in report is not accurate Out of memory error Post install configuration fails on Unix or Mac Privilege Manager feature issues Profile task never completes questusr account was deleted Readiness check failed Recovering from a failed upgrade Reports are slow Reset the supervisor password Running on a Windows 2008 R2 domain controller Service account login fails Setting custom configuration settings Single Sign-on (SSO) issues JVM memory tuning suggestions Start/stop/restart Management Console for Unix service Toolbar buttons are not enabled UID or GID conflicts
System maintenance Command line utilities Web services Database maintenance

Performing a basic search

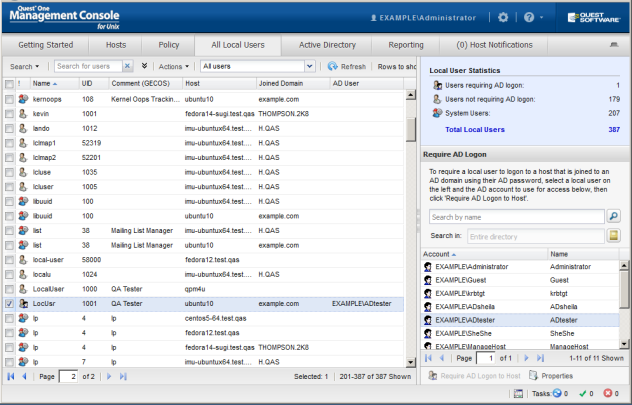
To search for hosts on the All Hosts view based on the values in any of the mangement console columns, use the Search for hosts box under the toolbar. To search for users on the All Local Users tab based on the values in any of the columns on that view, use the Search for users box.

To perform a basic search

  1. Place your cursor in the Search box and enter one or more characters. As you enter characters into the search field, the mangement console displays only the items that contain the search criteria. For example, if you enter the letter "a", the console displays all items that have the letter "a" in one of the columns.

    Note: You cannot use wildcards in basic search strings.

  2. Optionally, to sort within the displayed items, click a column title to arrange it into either ascending or descending order.
  3. To clear the search and display all items, click the to the right of the Search for hosts box.

Using the advanced search options

Use the Advanced Search Options to search for hosts or users based on various property values.

To use the advanced search options

  1. Click the arrow icon next to the Search box to open the advanced search options.
    Note: The advanced search button toggles to expand or collapse based on its current state.

    All Hosts view Advanced Search Options

    When you expand the All Hosts view advanced search options, it displays four search fields.

    By default, the search field labels are the first four column titles:

    • Host
    • IP Address
    • OS
    • Version

    Each search field has a drop-down menu that allows you to change the search criteria to search for information in another available column:

    • Joined to Domain
    • Version
    • Joined to Policy Group

    All Local Users tab Advanced Search Options

    When you expand the All Local Users tab advanced search options, it displays four search fields. By default, the search field labels are the first four column titles:

    • Name
    • UID
    • Comment (GECOS)
    • Host

    Other available advanced search options on the All Local Users tab are:

    • AD User
    • GID
    • Home Directory
    • Joined Domain
    • Login Shell

    Note: You can choose to display or hide these columns from view. Open any column menu, navigate to Columns, and select the columns you want available. If you do not see the items you searched for, it may be because that column is hidden.

  2. Set the search field labels and enter search criteria into the text boxes.

    Note: SEARCH TIPS

    Wildcards: You can use wildcards in text strings, such as * and ?. If the text string actually contains one of these characters, precede the character with the backslash (\) escape character.

    Ranges: You can specify a range of positive or negative numbers using a colon (:) as a range separator character. For example, to search for all users with UIDs from 0 to 499, enter 0:499 in the Search box. You cannot use wildcards in numbers.

    Groups: You can search for more than one text string or more than one number range. For example,

    • From the All Hosts view, you can find all hosts that match these strings:

      Separate multiple names with a comma; do not add extra spaces.

    • From the All Local Users tab, you can find all the users in the following UID ranges on all managed hosts:

      Separate multiple number ranges with a comma; do not add extra spaces.

  3. Optionally, to sort within the displayed items, click a column title to arrange it into either ascending or descending order.
  4. To clear the search, click the to the right of the Search box.

Note: As you type search criteria into the text boxes, the top-level Search box reflects the values you specify for searching.

Note that spaces display as question marks (?), as in:

As you become more familiar with the search query syntax, you can type your query directly into the Search box instead of using the search fields. For example,

  • On the All Hosts view, to search for hosts with "red" as part of the operating system, type os=red* into the Search box or to search for hosts that have Authentication Services 4.0 installed, type qasversion=4.0*.
  • On the All Local Users tab, to search for users with a Group Identification Number (GID) of "100", type gid=100.

Saving search criteria

You can save search criteria for reuse later and manage the list of saved searches. The mangement console saves searches on a per-user basis; it does not save system-wide searches.

To save search criteria for reuse later

  1. Open the Search menu and choose Save search.
  2. Enter a name for the search and click OK.

    It adds the new search to the Search menu.

To use a saved search

  1. Open the Search menu and choose a saved search.

Removing saved searches

To remove a saved host search

  1. Open the Search menu and choose Saved searches.
  2. From the Saved Searched dialog, select one or more saved searches and click Remove.
  3. Click OK to save your changes and return to the mangement console.
Verwandte Dokumente

The document was helpful.

Bewertung auswählen

I easily found the information I needed.

Bewertung auswählen