Chat now with support
Chat mit Support

One Identity Management Console for Unix 2.5.3 - Administration Guide

One Identity Privileged Access Suite for Unix Introducing One Identity Management Console for Unix Installing Management Console for Unix Preparing Unix hosts Working with host systems Managing local groups Managing local users Active Directory integration Authentication Services integration Privilege Manager integration Reporting Setting preferences Security Troubleshooting tips
Auto profiling issues Active Directory Issues Auditing and compliance Cannot create a service connection point Check Authentication Services agent status commands not available CSV or PDF reports do not open Database port number is already in use Elevation is not working Hosts do not display Import file lists fakepath Information does not display in the console License information in report is not accurate Out of memory error Post install configuration fails on Unix or Mac Privilege Manager feature issues Profile task never completes questusr account was deleted Readiness check failed Recovering from a failed upgrade Reports are slow Reset the supervisor password Running on a Windows 2008 R2 domain controller Service account login fails Setting custom configuration settings Single Sign-on (SSO) issues JVM memory tuning suggestions Start/stop/restart Management Console for Unix service Toolbar buttons are not enabled UID or GID conflicts
System maintenance Command line utilities Web services Database maintenance

Filtering All Hosts view content

By default, all of the managed hosts display on the All Hosts view regardless of their status or state. You can filter the hosts listed in the All Hosts view by using filters.

Each column has a drop-down menu from which you can choose which columns you want to view on the mangement console. In addition, the drop-down menus for the two state columns (represented by the exclamation points), Joined to Domain, and Status columns allow you to filter the items displayed by various criteria.

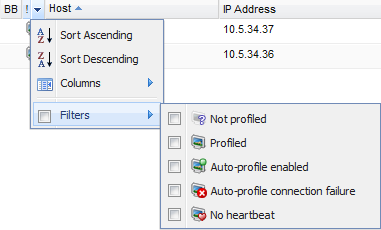
  • Use the Host state column drop-down menu to filter the hosts by profiled or heartbeat state.
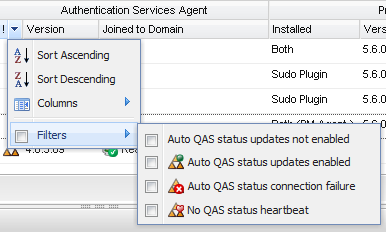
  • Use the Authentication Services state column drop-down menu to filter the hosts QAS agent status.
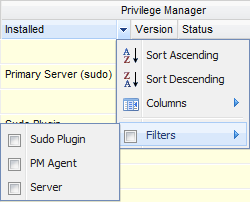
  • Use the Installed state column drop-down menus to filter the hosts by type of Privilege Manager product.
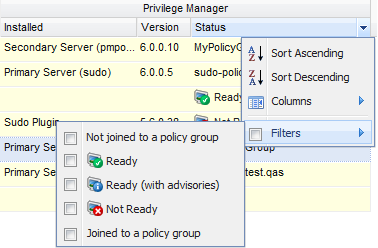
  • Use the Status column drop-down menus to filter the hosts by "joined" or "ready" state.

Note: When you set a filter for one of these columns, the mangement console italicizes and bolds the column heading.

  1. To filter the hosts by profiled or heartbeat state, open the Host status column drop-down menu, navigate to Filters and choose one of the following options:

  2. To filter the hosts by QAS Agent Status, open the Authentication Services state column (next to the Version column), navigate to Filters and choose one of the following options:

  3. To filter the hosts by the type of Privilege Manager product installed: Sudo Plugin, PM Agent, or Server, open the Installed column drop-down menu, navigate to Filters and choose one of the following options:

    Note: When you select a filter, only the hosts that match that criteria display. However, when you install the Privilege Manager Policy Server it installs all three Privilege Manager for Unix packages on that host. Thus, if you filter by either the PM Agent or the Sudo Plugin, the console displays all the server hosts, as well.

  4. To filter the Privilege Manager hosts by "joined" or "ready" state, open the Status column drop-down menu, navigate to Filters and choose one of the following options:

Note: When you select a filter, only the hosts that match that criteria display. It is important to understand that when you set multiple filters, the console only displays the hosts that meet all of the criteria you have selected.

If you want the mangement console to temporarily ignore the filter options for a column, clear the Filters option box in the drop-down menu. Then, re-select the Filters option, to re-enable those filter settings.

To clear host filters, deselect the individual options or click the Clear column filters button in the View pane of the task bar.

Reviewing host properties

Once you add and profile a host you can review the system, user, and group information, as well as the current status of the host.

To review host properties

  1. Select the host and click the Properties toolbar button from the Host panel of the toolbar.

    Note: You can also double-click a host name to open its Properties or right-click the host and choose Properties from the context menu.

  2. The mangement console adds a tab to the All Hosts view for the selected host with these tabs:
    • Details
    • Users
    • Groups
    • Readiness Check Results
    • Software
    • Host Access Control (console must be configured for AD and host must be joined to AD)
  3. To close a host properties, click the close button in the right-hand corner of the host's properties.

Removing hosts from Management Console

Removing a host means that you will no longer be able to access information about the host or manage the host's local users and groups from the mangement console. The host is removed from the database, but this does not change the configuration of the Authentication Services Agent, PM Agent, or Sudo Plugin host, or prevent further Active Directory log on.

To remove hosts from mangement console

  1. Select one or more hosts from the All Hosts view and click the Remove Host toolbar button.
  2. Confirm you want to remove the selected hosts from the mangement console.

    Once removed, the mangement console no longer lists the Unix hosts on the All Hosts view. In addition, associated users and groups for these hosts are removed from the mangement console and you will lose the system user markings identified for any of these users.

Importing SSH host key

You can upload a new SSH key and replace the one that is cached for a host on the server by importing an SSH host key.

To import SSH host key

  1. Select a managed host from the All Hosts view and click the Import SSH Host Key toolbar button.
  2. At the Import SSH host key from file dialog, browse to select an SSH host key file.

    See Known_hosts file format for details.

For more information, see Managing SSH host keys.

Verwandte Dokumente

The document was helpful.

Bewertung auswählen

I easily found the information I needed.

Bewertung auswählen