Configuring a merge sync rule
A merge sync rule allows you to merge attribute values between the source and the target data system. As a result these values become identical.
To create such a rule, follow the instructions in Modifying attribute values by using rules to select the Merge Sync Rule type. Then, configure your rule by using the options in the dialog box that opens:
- Source item. Allows you to specify an attribute in the source data system. Click the Attribute button to select an attribute.
- Target item. Allows you to specify the attribute in the target data system. Click the Attribute button to select an attribute.
- Merge Settings. Allows you to select a method to merge the values of two multivalued attributes. This link is only available if both the source and the target attributes you have selected are multivalued.
When running a workflow step that has a merge sync rule configured for the first time, One Identity Quick Connect Sync Engine synchronizes attribute values from the source to the target. In each subsequent run of the workflow step, the synchronization direction depends on which attribute value (source or target) is more recent, as follows:
Table 9: Synchronization direction
|
Source |
Source => Target |
|
Target |
Source <= Target |
|
Source and target are equally recent |
Source => Target |
Using value generation rules
To configure a list of rules for selecting an attribute value or generating a value, you can use the Configure Generation Rule dialog box that looks similar to the following:

To add a new rule entry
- Click Add.
- Configure the rule entry as appropriate. For more information, see Configuring a rule entry.
To remove an existing rule entry
- From the Rule entries list, select the entry you want to remove, and then click Remove.
To edit an existing rule entry
- From the Rule entries list, select the entry you want to modify, and then click Edit.
- Configure the rule entry as appropriate. For more information, see Configuring a rule entry.
Configuring a rule entry
This section provides instructions on how to configure a rule entry in the Define Entry dialog box that looks similar to the following:
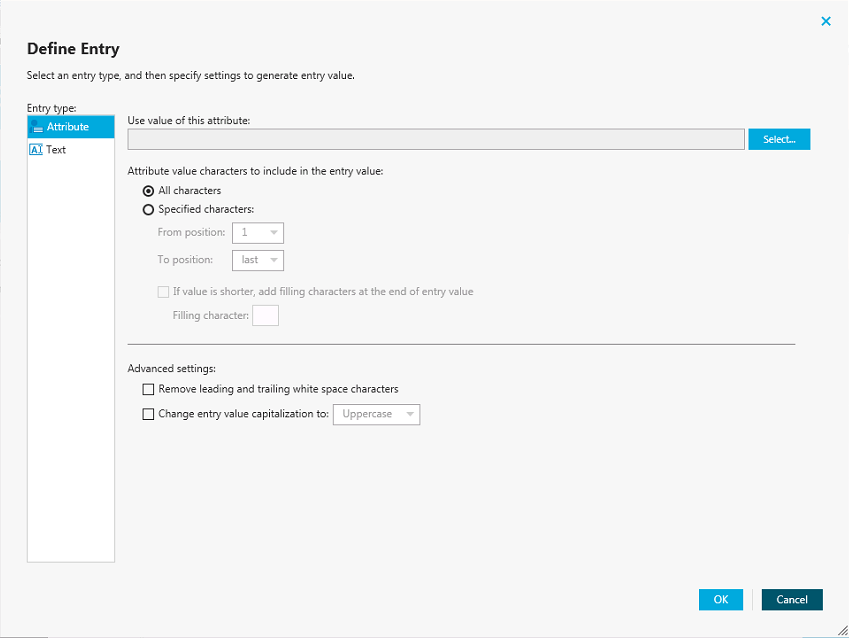
To configure a text entry
- Under Entry type, select Text.
- In the Text value box, type the value.
- Click OK.
To configure an attribute-based entry
- Under Entry type, select Attribute.
- Click Select to select the attribute whose value you want to use, and then click OK.
- If you want the entry to include the entire value of the attribute, select the All characters option. Otherwise, click the Specified characters option, and then specify the characters to include in the entry.
- Optionally, click the If value is shorter, add filling characters at the end of entry value option to specify a character to add to the entry.
- Optionally, specify Advanced settings.
- When finished, click OK.
Using workflow step handlers
Workflow step handlers allow you to automatically perform custom actions either before running a workflow step or after the workflow step run results have been committed (written) to the data system. Out of the box, One Identity Quick Connect Sync Engine includes a single predefined handler type that can automatically execute your custom PowerShell script and thus perform the desired action.
You can also develop and implement your own handler types. For more information, see the Software Development Kit (SDK) supplied with this One Identity Quick Connect Sync Engine version.
To create, modify, or delete handlers for a workflow step, you can use the Step Handlers tab in the workflow step properties.
To create a workflow step handler
- In the Quick Connect Administration Console, open the Workflows tab.
- Click the name of the appropriate workflow.
- Click the name of the workflow step for which you want to create a handler, and then click the Step Handlers tab.
- Click Add handler, and then follow the steps in the wizard to create your handler.
To modify a workflow step handler
- In the Quick Connect Administration Console, open the Workflows tab.
- Click the name of the appropriate workflow.
- Click the name of the workflow step whose handler you want to modify, and then click the Step Handlers tab.
- Click the name of the handler you want to modify.
- Modify the handler settings as necessary. When you are finished, click OK.
You can also do the following:
- Change the order in which handlers are activated. One Identity Quick Connect Sync Engine activates handlers in the order in which they appear in the list. To move a handler in the list, use the Move up and Move down links below the handler.
- Disable or enable the handler. You can enable or disable existing handlers. To do so, use the Enable or Disable link below the handler.
- When you are finished, click Save.
To delete a workflow step handler
- In the Quick Connect Administration Console, open the Workflows tab.
- Click the name of the appropriate workflow.
- Click the name of the workflow step whose handler you want to delete, and then click the Step Handlers tab.
- Click Delete below the handler you want to delete.
