Enterprises usually design their Organizational Unit-based (OU-based) network structure on geographical or departmental boundaries, restricting the ability to delegate administration outside these boundaries. However, they may face situations that require directory objects to be grouped together by logic that does not align with the OU structure.
Both Active Directory (AD) and Azure Active Directory (Azure AD) offer a comprehensive delegation model. However, since the scope of delegation is defined using OUs, distributed administration is constrained by the OU structure. For example, in AD, without changing the directory structure, you cannot regroup objects so that new groups support inheritance for their members when delegating control or enforcing policy.
To solve this problem and provide more flexibility in managing AD and Azure AD resources, Active Roles provides special administrative views that can meet any directory management needs. These securable, flexible, rule-based administrative views, known as Managed Units or MUs, allow configuring distributed administration independent of the OU hierarchy. As such, MUs are dynamic virtual collections of AD or Azure AD directory objects, and may include them regardless of their location in the organization network.
While Managed Units allow organizations to implement OU structures on a geographical basis, it distributes administration on a functional basis. This means that, for example, all users or Azure users of a particular department could be grouped into a single MU to delegate access control and enforce administrative policies regardless of their location in different OUs. However, grouping said users or Azure users into an MU still keeps the geographically-defined OUs of the users intact, leaving the OU-based structure unaffected.
As such, MUs make it possible to organize an enterprise by any custom logic without changing the underlying domain and OU structure, resulting in a secure and easy-to-manage administration environment.
MUs can include:
-
AD objects from different domains, trees, or forests, provided that they are configured in Active Roles.
-
Azure users, Azure guest users, Azure contacts, Microsoft 365 (M365) groups, Azure distribution groups and Azure security groups from any Azure tenant configured in Active Roles.
NOTE: MUs do not support any Azure mailbox types and dynamic distribution groups.
MU membership is not exclusive: You can include AD or Azure AD objects in an MU even if they are already members of another MU.
Managed Units (MUs) use membership rules to determine whether an object is a member of a specific MU. For example, you can specify an MU membership rule which states that all users or Azure users who are geographically located in the United States can belong to a certain MU. The configured membership rule then works as a query in Active Roles, searching for users or Azure users located in the United States, and populating the MU accordingly. Active Roles stores the MU membership rules as part of the MU properties, ensuring that:
-
Whenever a new directory object that meets the membership requirements is created, it is added to the MU.
-
Whenever an existing member object changes in a way that it does not meet the membership requirements, it is removed from the MU.
Active Roles allows configuring MU-level permissions and policy settings, with their inheritance also working seamlessly across the Active Directory (AD) and Azure Active Directory (Azure AD) environment. Similarly to the MU membership of directory objects, these object permissions and policy settings can also change as well, so that the MU can dynamically adapt to the changing organization, simplifying administration maintenance.
Once configured, MUs are ideal for delegated administration for several reasons:
-
When using MUs, delegated administrators no longer have to browse OUs to search for managed objects.
-
You can delegate the administrative control of MUs to specific users or groups, similarly to OUs.
-
With MUs, you can locate all objects managed by the same user or group in one place.
You can create a new Managed Unit (MU) in the Active Roles Console.
Prerequisites
To create MUs in the Active Roles Console, you must use an Active Roles Administration Service account. For more information, see Configuring the Administration Service account in the Active Roles Quick Start Guide.
To create a new Managed Unit (MU) in the Active Roles Console
-
In the Active Roles Console, on the Console Tree, navigate to Configuration > Managed Units.
-
To open the New Object - Managed Unit wizard, right-click the Managed Units node, then click New > Managed Units.
TIP: If you need to manage a large number of MUs in your organization, One Identity recommends creating separate MU containers for your specific MUs.
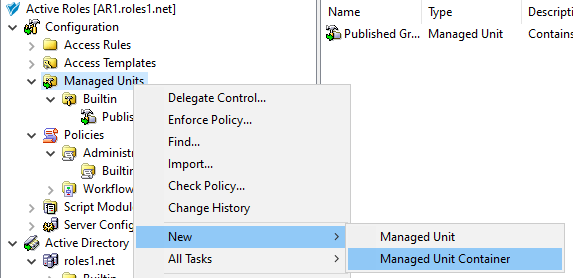
To create a new container for the configured MU, right-click on the Managed Units node, then click New > Managed Unit Container.
Figure 7: Active Roles Console – Launching the Managed Unit Container dialog
Once the new container is created, right-click it in the Console Tree and select New > Managed Unit to create a new MU in the container. To move an existing, non built-in MU to the container, right-click the MU, and select Move.
-
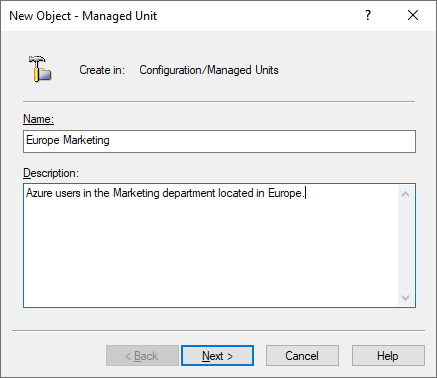
In the Name step, specify a Name and optionally, a Description for the new MU. This name and description will appear in the Active Roles details pane when selecting the MU.
Figure 8: New Object - Managed Unit wizard – Specifying the Name and Description
To continue, click Next.
-
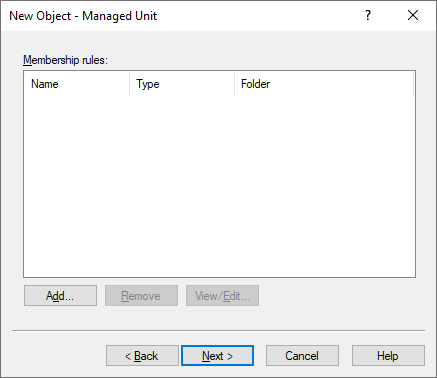
To specify a new membership rule for the MU, in the Membership rule step, click Add.
Membership rules define which directory objects get assigned to the MU. Active Roles populates the MU dynamically based on the configured rules, adding objects that match their criteria and removing those later that no longer do.
Figure 9: New Object - Managed Unit wizard – Membership rule list
-
In the Membership Rule Type dialog, select the rule type used to populate the MU. A membership rule can be a search query, a static object inclusion or exclusion rule, or group membership inclusion and exclusion rule.
Figure 10: New Object - Managed Unit wizard – Membership rule type selection
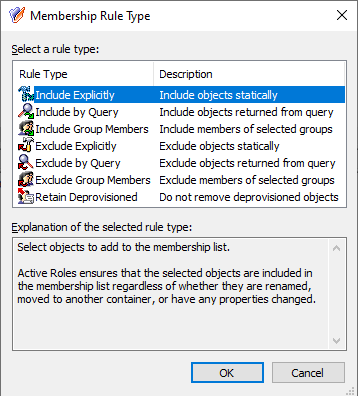
Active Roles supports the following membership rule types:
Table 8: Managed Unit membership rules
| Include Explicitly |
Includes the Active Directory (AD) or Azure Active Directory (Azure AD) objects you select in the wizard.
Once selected, Active Roles will keep the objects included in the MU even if they are updated, renamed, or moved elsewhere within your organization directory. |
| Include by Query |
Lets you define a custom query that the AD or Azure AD objects must match to be included in the MU. The query editor dialog lets you select the object type and location (such as AD domain or Azure tenant), then dynamically populates the dialog with settings according to the object type you selected.
The dialog also offers Advanced query settings to configure queries by specifying the following elements to check:
Once you configure a query, you can test it with the Preview Rule button.
NOTE: Consider the following when configuring a custom query:
-
The Include by Query membership rule does not support Azure contacts and Azure distribution groups. To include Azure contacts or Azure distribution groups in an MU, use the Include Explicitly rule type.
-
The contents of the Condition drop-down list are static, and may contain logical conditions that do not work with the selected object attribute (for example, selecting Greater or equal for the edsaAzureManager Azure AD attribute returns no results). Always make sure to select a logical condition against which Active Roles can enumerate the value of the selected Azure attribute.
-
When querying Azure object attributes, the Ends with condition returns results only if you specify whole words. The only exceptions to this behavior are the mail, otherMails, userPrincipalName and proxyAddresses attributes, which you can also query with the Ends with condition by specifying them partially.
-
You can query the edsaAzureManager attribute with the Is not condition only if the query rule is used in an AND relationship with another query rule. Querying the edsaAzureManager attribute with the Is not condition returns no results if the query rule is used alone or in an OR relationship. |
| Include Group Members |
Includes the members of the selected AD or Azure AD groups.
Once selected, Active Roles will keep the MU membership dynamically up-to-date: if new members are added to the selected groups, Active Roles will also include them in the MU; and likewise, members removed from the included groups will also be removed from the MU. |
| Exclude Explicitly |
Excludes the AD or Azure AD object you select in the MU.
Once selected, Active Roles will keep the objects excluded from the MU even if they are updated, renamed, or moved elsewhere within your organization directory.
NOTE: Consider the following when selecting this membership rule:
-
The Exclude Explicitly rule takes precedence over all other membership rule types. Because of this, Active Roles will exclude the objects specified with this rule, even if another rule specifies that Active Roles must include them in the MU.
-
This rule excludes only objects that match one of the inclusion rules of the MU. |
| Exclude by Query |
Lets you define a custom query that the AD or Azure AD objects must match to be excluded from the MU. Once configured, Active Roles will automatically exclude objects that meet the query conditions.
The query editor works and functions the same way as it does when configuring an Include by Query rule, and also shares the same limitations listed there.
NOTE: This rule excludes only objects that match one of the inclusion rules of the MU. |
|
Exclude Group Members |
Excludes the members of the selected AD or Azure AD groups.
Once selected, Active Roles will keep the MU membership dynamically up-to-date: if new members are added to any of the selected groups, Active Roles will exclude them from the MU. Likewise, if a member is removed from all specified groups, Active Roles will add them to the MU, provided that the member meets a configured inclusion rule.
NOTE: This rule excludes only objects that match one of the inclusion rules of the MU. |
|
Retain Deprovisioned |
Configures the MU to also include and keep deprovisioned objects that meet the membership rules.
If this rule is not selected, Active Roles automatically removes deprovisioned objects from the MU. |
NOTE: The exclusion rules affect only objects that match one of the inclusion rules configured for the MU.
For example, if a container is explicitly included in an MU, then all objects held in that container are also included in the MU. However, you cannot exclude any of those objects themselves with exclusion rules, as it is their container that meets the inclusion rules in this case. To exclude the objects of the container, you must configure an exclusion rule for the container instead.
-
Configure the selected membership rule:
-
If you selected the Include Explicitly or Exclude Explicitly rule type, the Select Objects dialog appears. Select the objects you want to include or exclude from the MU, click Add, and then click OK.
-
If you selected the Include Group Members or Exclude Group Members rule type, the Select Objects dialog appears, listing the available groups. Select the AD or Azure AD groups you want to include, click Add, and then click OK. All members of the selected groups will be included or excluded from the MU.
-
If you selected the Include by Query or Exclude by Query rule type, the Create Membership Rule dialog appears. Use the dialog to configure your inclusion or exclusion rule.
-
(Optional) To configure additional rules, click Add again.
NOTE: If you add several membership rules to an MU, Active Roles runs them in the order you configured them. If some of the configured rules conflict with each other, Active Roles resolves the conflict by prioritizing the configured Exclude rules over the configured Include rules.
-
Once you finished adding all membership rules, click Next.
-
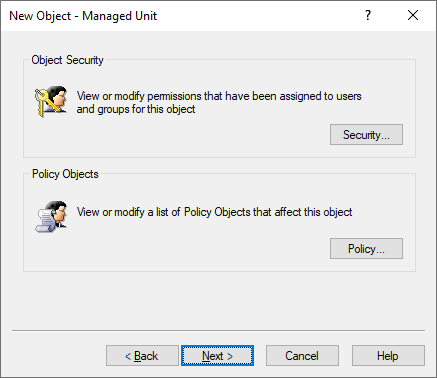
(Optional) In the Object Security / Policy Objects step, specify the permissions and policy objects related to the configured MU.
Figure 11: New Object - Managed Unit wizard – Access Template and Policy Object links
-
To finish configuring the MU, click Next and Finish.


