You can reset the password of a Active Directory user account with the Active Roles Console.
To reset a user password
-
In the Console tree, locate and select the folder that contains the user account whose password you want to reset.
-
In the details pane, right-click the user account whose password you want to reset, then click Reset Password to display the Reset Password dialog.
-
Type and confirm the password, or click the button next to the New password box to have Active Roles generate a password.
-
Configure the available password options with the appropriate check boxes. For example, if your organization requires users to change the reset password during their next login, select User must change password at next logon.
-
When finished, click OK.
NOTE: Consider the following when resetting a user password:
-
To spell out the specified or auto-generated password, click the Spell out password button.
-
Services that are authenticated with a user account must be reset if the password for the service’s user account is changed.
-
To locate the user account whose password you want to reset, use the Find function of Active Roles. Once you found the user account, reset its password by selecting it in the list of search results, right-clicking it, and clicking Reset Password.
To add user accounts to groups, select the accounts, right-click the selection, and click Add to a group. This displays the Select Objects dialog where you can select the groups to which you want to add the accounts.
In the Select Objects dialog, you can select groups from the list or type group names, separating them with semicolons. Click Check Names to verify the names you type. If Active Roles cannot find a group, it prompts you to correct the name.
You can also add a user account to groups by modifying the group membership list on the Member Of tab in the Properties dialog. To display the Properties dialog, right-click the user account and click Properties.
The Member Of tab lists the groups to which the account belongs, as shown in the following figure. If the Show nested groups check box is selected, the list also includes the groups to which the account belongs owing to group nesting.
The Temporal Membership Settings button can be used to specify the date and time when the user should be added or removed from the selected groups. For more information about this feature, see Using temporal group memberships.
Figure 9: Adding user accounts to groups
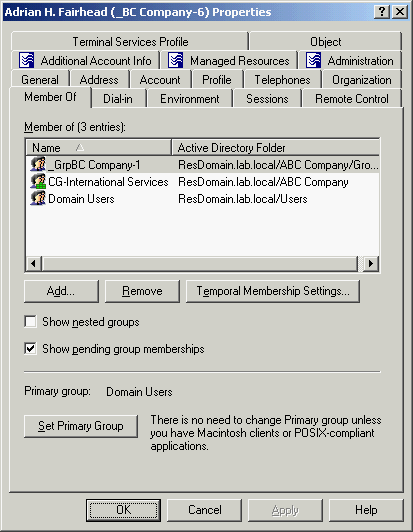
On the Member Of tab, you can manage groups directly from the list of groups. To manage a group, right-click it, and use commands on the shortcut menu.
You can add the user account to groups by clicking Add on the Member Of tab. This displays the Select Objects dialog, allowing you to select the groups to which you want to add the user account.
NOTE: When you select multiple user accounts, the Member Of tab lists the groups to which all the selected accounts belong. If one of the accounts does not belong to a given group, that group does not appear in the list.
You can add user accounts to a group with the Active Roles Console.
To add a user account to a group
-
In the Console tree, locate and select the folder that contains the user account you want to add to a group.
-
In the details pane, right-click the user account, then click Add to a Group.
-
Use the Select Objects dialog to locate and select the group to which you want to add the user account (you can select more than one group).
NOTE: Consider the following when adding a user account to a group:
-
You can add multiple user accounts to a group at a time: Select the accounts, right-click the selection, and click Add to a Group. To select multiple accounts, press and hold down CTRL, then click each account.
-
You can also add or remove user accounts from groups by using the Properties dialog: Select one or more accounts, right-click the selection, click Properties, and go to the Member Of tab in the Properties dialog.
-
To locate user accounts you want to add to a certain group, use the Find function of Active Roles. Once you found the user accounts, select the accounts in the list of search results, right-click the selection, and click Add to a Group.
-
By adding a user to a group, you can assign permissions to all of the user accounts in that group and filter Group Policy settings on all accounts in that group.
To remove a user account from groups, right-click the user account, click Properties, and go to the Member Of tab. On the Member Of tab, select groups from the list and click Remove.
