Chatta subito con l'assistenza
Chat con il supporto

Active Roles 8.0.1 LTS - Synchronization Service Administration Guide

Synchronization Service Overview Deploying Synchronization Service Getting started Connections to external data systems
External data systems supported with built-in connectors
Working with Active Directory Working with an AD LDS (ADAM) instance Working with Skype for Business Server Working with Oracle Working with Exchange Server Working with Active Roles Working with One Identity Manager Working with a delimited text file Working with Microsoft SQL Server Working with Micro Focus NetIQ Directory Working with Salesforce Working with ServiceNow Working with Oracle Unified Directory Working with an LDAP directory service Working with IBM DB2 Working with IBM AS/400 Working with an OpenLDAP directory service Working with IBM RACF connector Working with MySQL database Working with an OLE DB-compliant relational database Working with SharePoint Working with Microsoft 365
Creating a Microsoft 365 connection Modifying a Microsoft 365 connection Microsoft 365 data supported for data synchronization
ClientPolicy object attributes supported for Microsoft 365 data synchronization ConferencingPolicy object attributes supported for Microsoft 365 data synchronization Contact object attributes supported for Microsoft 365 data synchronization DistributionGroup object attributes supported for Microsoft 365 data synchronization Domain object attributes supported for Microsoft 365 data synchronization DynamicDistributionGroup object attributes supported for Microsoft 365 data synchronization ExternalAccessPolicy object attributes supported for Microsoft 365 data synchronization HostedVoicemailPolicy object attributes supported for Microsoft 365 data synchronization LicensePlanService object attributes supported for Microsoft 365 data synchronization Mailbox object attributes supported for Microsoft 365 data synchronization MailUser object attributes supported for Microsoft 365 data synchronization PresencePolicy object attributes supported for Microsoft 365 data synchronization SecurityGroup object attributes supported for Microsoft 365 data synchronization SPOSite object attributes supported for Microsoft 365 data synchronization SPOSiteGroup object attributes supported for Microsoft 365 data synchronization SPOWebTemplate object attributes supported for Microsoft 365 data synchronization SPOTenant object attributes supported for Microsoft 365 data synchronization User object attributes supported for Microsoft 365 data synchronization VoicePolicy object attributes supported for Microsoft 365 data synchronization Microsoft 365 Group attributes supported for Microsoft 365 data synchronization Changing the display names of synchronized Microsoft 365 licenses and services
Objects and attributes specific to Microsoft 365 services How the Microsoft 365 Connector works with data
Working with Microsoft Azure Active Directory Configuring data synchronization with the SCIM Connector Configuring data synchronization with the Generic SCIM Connector
Using connectors installed remotely Creating a connection Renaming a connection Deleting a connection Modifying synchronization scope for a connection Using connection handlers Specifying password synchronization settings for a connection
Synchronizing identity data Mapping objects Automated password synchronization Synchronization history Scenarios of use
About scenarios Scenario 1: Create users from a .csv file to an Active Directory domain Scenario 2: Use a .csv file to update user accounts in an Active Directory domain Scenario 3: Synchronizing data between One Identity Manager Custom Target Systems and an Active Directory domain Scenario 4: Deprovisioning between One Identity Manager Custom Target Systems and an Active Directory domain Scenario 5: Provisioning of Groups between One Identity Manager Custom Target Systems and an Active Directory domain Scenario 6: Enabling Delta Sync mode between One Identity Manager Custom Target Systems and an Active Directory domain Example of using the Generic SCIM Connector for data synchronization
Appendix A: Developing PowerShell scripts for attribute synchronization rules Appendix B: Using a PowerShell script to transform passwords

Deleting a step

To delete a sync workflow step

  1. In the Synchronization Service Administration Console, open the Sync Workflows tab.
  2. Click the name of the sync workflow in which you want to delete a step.
  3. Click Delete below the step you want to delete.
  4. When prompted, confirm that you want to delete the step.

Changing the order of steps in a sync workflow

When you run a sync workflow, its steps are executed in the order they are displayed in the Synchronization Service Administration Console. If necessary, you can change the order of steps in a sync workflow.

To change the order of steps in a sync workflow

  1. In the Synchronization Service Administration Console, open the Sync Workflows tab.
  2. Click the name of the sync workflow in which you want to change the order of steps.
  3. Use the Move up and Move down links to arrange the steps as necessary.

Generating object names by using rules

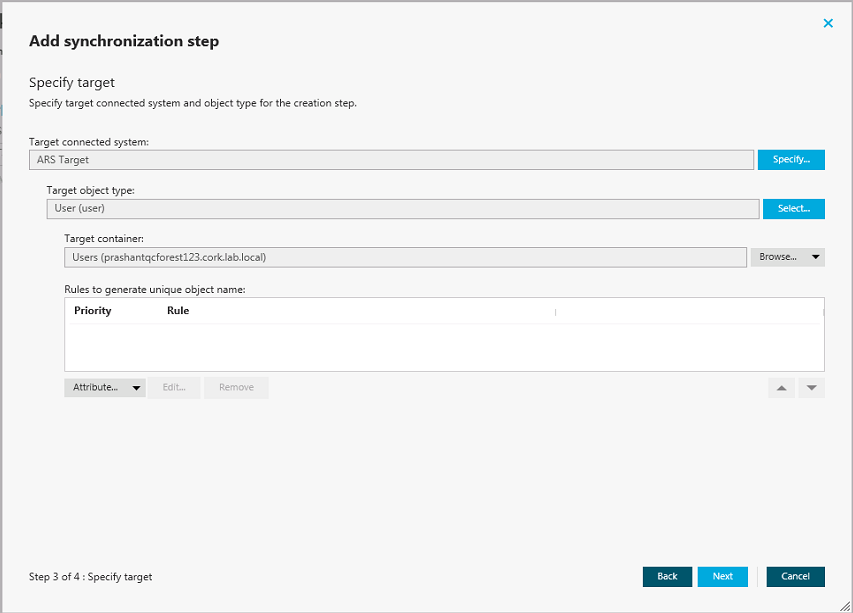
When configuring a synchronization step, you can use the Rules to generate unique object name list to specify rules for creating or modifying object names in the target connected system. The Rules to generate unique object name list looks similar to the following:

Figure 9: Add synchronization step


To configure rules for generating object names

  1. Click the down arrow on the leftmost button provided below the Rules to generate unique object name list.
  2. Select a list item:
    • Attribute. Allows you to select the target object attribute whose value you want to use as the object name.
    • Rule. Allows you to configure a rule to generate target object names. For details, see Using value generation rules.
    • PowerShell Script. Allows you to type a PowerShell script to generate target object names.

When the Rules to generate unique object name list includes two or more entries, Synchronization Service uses the uppermost rule in the list to generate the target object name. If the generated object name is not unique, Synchronization Service uses the next rule in the list, and so on.

To copy and paste an existing rule

  1. In the Rules to generate unique object name list, right-click a rule, and then select Copy from the shortcut menu.
  2. In the rules list, right-click an entry, and then select Paste from the shortcut menu.

Modifying attribute values by using rules

In a sync workflow step you can configure a set of rules to automatically modify attribute values during the step run. By using these rules, you can select or generate an initial value, transform this value if necessary, and then assign the resulting value to the object attribute you want.

To create a rule to modify attribute values

  1. In the Synchronization Service Administration Console, open the Sync Workflows tab.
  2. Click the name of the appropriate sync workflow, then click the name of the sync workflow step.
  3. Depending on the workflow step type, complete the corresponding actions:
    • Creating step. Click the Creation Rules tab, and then expand the Initial Attribute Population Rules element.
    • Updating step. Click the Updating Rules tab, and then expand the Rules to Modify Object Attributes element.
    • Deprovisioning step. Click the Deprovisioning Rules tab, and then expand the Rules to Modify Object Attributes element.
  4. In the element you have expanded, click the down arrow on the leftmost button to select a rule type:
    • Forward Sync Rule. Allows you to create a rule that synchronizes attribute values from the source to the target data system. This type of rule is available in creating, updating, and deprovisioning steps. For more information, see Configuring a forward sync rule.
    • Reverse Sync Rule. Allows you to create a rule that synchronizes attribute values from the target to the source data system. This type of rule is available in creating, updating, and deprovisioning steps. For more information, see Configuring a reverse sync rule.
    • Merge Sync Rule. Allows you to create a rule that merges the values of specified attributes between the source and the target data systems. As a result, the attribute values in the source and the target become identical. This type of rule is only available in updating steps. For more information, see Configuring a merge sync rule.
Related Documents

The document was helpful.

Seleziona valutazione

I easily found the information I needed.

Seleziona valutazione