Use the Active Roles Add-on Manager to install and manage Active Roles add-ons, or create new ones with the Add-on Editor.
To install Add-on Manager
-
Mount the Active Roles installation .iso file, and navigate to the Solutions > Add-on Manager folder.
-
Run the ActiveRolesAddonManager .exe file, and follow the on-screen instructions of the Setup wizard.
-
In the configuration wizard that appears after installation completes, select how to register Add-on Manager to the Active Roles Administration Service.
-
Any available Administration Service: Select this option to register Add-on Manager with the nearest Administration Service, connecting to that Administration Service instance with the credentials of your current logon account. To apply this option, your current logon account must be an Active Roles Admin.
-
Administration Service on this computer: Select this option to register Add-on Manager with the Administration Service that runs on the computer you specify. The wizard will then connect to that Administration Service with the user name and password you supply. Make sure that you specify the user name and password of the Active Roles Admin.
-
To apply your change, click Register.
You can upgrade from Active Roles 7.0.x or later to Active Roles 7.x using one of the following methods:
- In-place upgrade: Install the latest version of Active Roles on the computer without removing the earlier version.
- New installation with import of database from earlier version: Install the latest version of Active Roles and import the database from the earlier version of Active Roles.
NOTE:
- To perform a clean installation of Active Roles, uninstall the currently installed version before installing Active Roles 8.1.1.
- Active Roles supports selection of custom installation path only during a fresh installation. During an in-place upgrade, Active Roles does not support changing the custom installation path.
For information on importing configuration data from the database of an earlier version of Active Roles, see Import Configuration under Install and configure the Administration Service.
NOTE: Before upgrading to the latest version of Active Roles, the add-ons of the earlier versions must be uninstalled.
Upgrading from Active Roles 6.9 version to 7.x version is a side-by-side upgrade, which does not interrupt operations or affect the configuration of your earlier Active Roles version. To ensure smooth upgrade to the new Active Roles version, first upgrade the Administration Service and then upgrade the Web Interface.
Active Roles 6.x components are not used in the upgrade and neither are any components from the earlier version uninstalled.
IMPORTANT: During in-place upgrade, when importing from the source database (Configuration and Management History database), the following database permissions are automatically migrated from the previously used (source) SQL database to the new (destination) SQL database:
The service account that is used for performing the in-place upgrade or the import or migration operation should have the following permissions in the SQL Server to perform the operation:
-
db_datareader fixed database role in the source database.
-
db_owner fixed database role and the default schema of dbo in the destination database.
-
sysadmin fixed server role in the destination database.
If a limited SQL access account is used for performing the in-place upgrade, a manual action is required to pre-create the new Active Roles databases. For more information, see Knowledge Base Article 4303098 on the One Identity Support Portal.
By default, the database users, permissions, logins, and roles are imported to the destination database. You can clear the Copy database users, permissions, logins, and roles check box in the following locations depending on the operation:
-
During in-place upgrade: in the Upgrade configuration window.
-
Importing configuration: Import Configuration > Source Database > Configure advanced database properties.
-
Importing management history: Import Management History > Source database > Configure advanced database properties.
Impact on Office 365 add-on
After an upgrade of Active Roles components to Active Roles 8.1.1, the Office 365 add-on which was supported in the earlier versions of Active Roles, ceases to work. Hence, it is recommended to uninstall the Office 365 add-on prior to the upgrade of Active Roles.
NOTE:
- Uninstall the Office 365 add-on before installing the latest version of Active Roles as the add-on is not supported.
- The latest version of Active Roles manages Office 365 and Azure AD natively. However, Active Roles does not support the following feature of Office 365 add-on that was supported in earlier versions:
- Ability to manage and select Office 365 domains through policies.
Upgrading to Active Roles 8.1.1 from 7.0.x or later using in-place upgrade method
To upgrade existing Active Roles 7.0.x or later version to the latest version, perform the following steps.
NOTE: One Identity recommends to approve all pending approval activities before performing the in-place upgrade.
To upgrade the Active Roles package using in-place upgrade
- Log on with a user account that has administrator rights on the computer.
- Navigate to the location of the Active Roles distribution package, and start the Setup wizard by double-clicking ActiveRoles.exe.
- Follow the instructions in the Setup wizard.
- On the Ready to Upgrade page, click Upgrade to perform upgrade.
- On the Completion page, click Finish.
NOTE: After upgrading the Active Roles package to 8.1.1, perform the steps of Configuring Active Roles during in-place upgrade.
NOTE: By default, during in-place upgrade, the Copy database users, permissions, logins, and roles check box is selected in the Upgrade configuration window.
Configuring Active Roles 8.1.1 during in-place upgrade
NOTE: Before upgrading to the latest version of Active Roles:
The in-place upgrade of Active Roles 7.4 upgrades the Active Roles 7.4 Administration Service and Web Interface components.
The in-place upgrade of Active Roles 7.4 does not upgrade the Active Roles solution components such as SPML Provider, Add-on Manager, Add-ins for Outlook, Diagnostic Tools, and so on. To upgrade the solution components installed with Active Roles, use the respective installers available in the Active Roles installation package.
During Active Roles upgrade, if the Active Roles database is not split into configuration and management history databases, then the upgrade process creates a management history database by default.
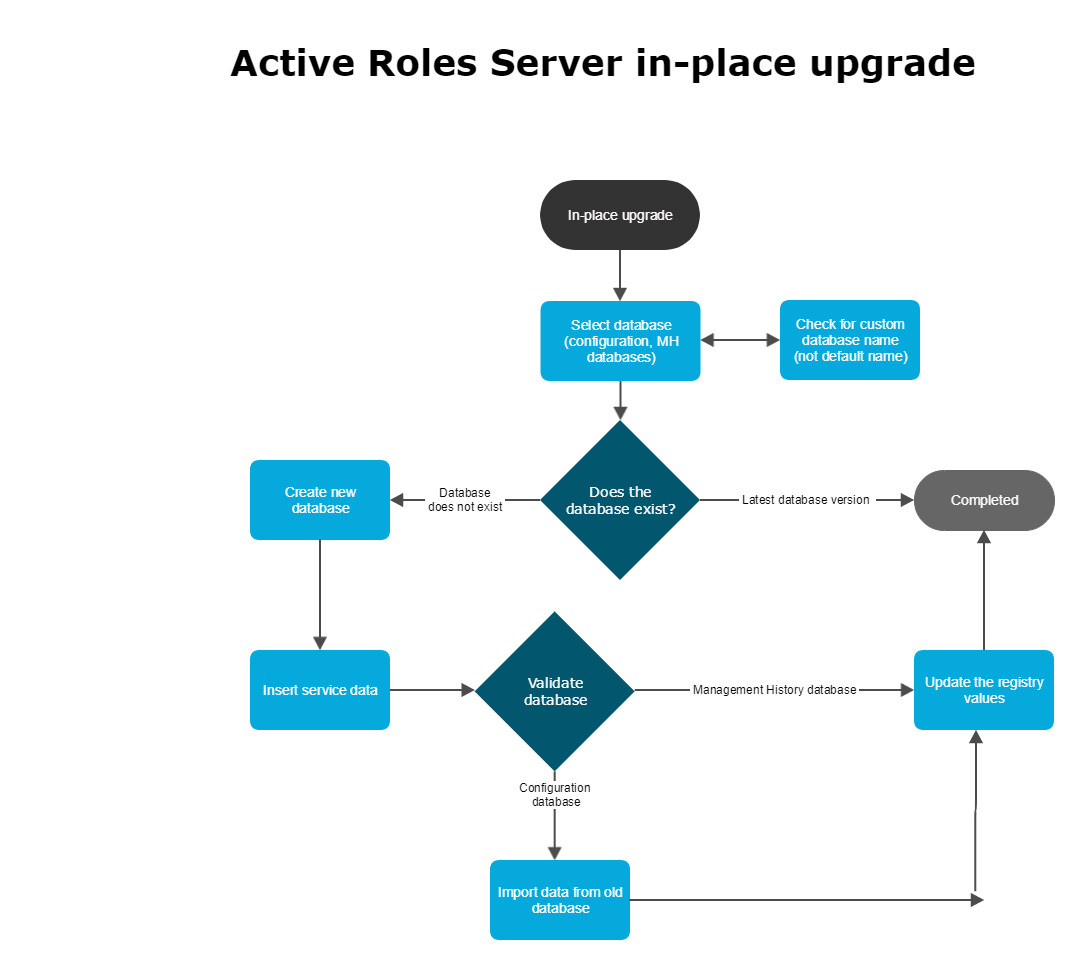
The following steps describe the in-place upgrade scenario for Active Roles 8.1.1
-
After upgrading the Active Roles package to 8.1.1, restart the operating system.
NOTE: When upgrading from Active Roles version 7.4.1 or 7.4.3 to 8.1, you must restart the operating system
- After the system restarts, the Configuration Center opens by default, displaying the Upgrade configuration wizard.
As part of this upgrade, Active Roles creates new databases with default names. The Upgrade configuration wizard displays the new databases information.
Optional step: To change the default names of the new databases, click Click here to change or provide existing database names.
- On the Upgrade configuration wizard, select the check box to confirm that you have read the instructions in the Quick Start guide regarding "Configuring Active Roles for in-place upgrade".
-
The Azure Tenant association page displays the lists of configured Azure tenants in the source database and options for association.
The Azure Tenant association section notifies you to select an Azure tenant from the drop-down list of the Azure tenants configured in the source database, and the selected Azure tenant is associated with all Azure objects in the destination database. You can also choose to Run Azure Tenant association immediately or Schedule Azure Tenant association, where you select the date and time from the Calendar to run the Azure tenant association.
NOTE:
- This page is visible only if the Azure tenants association are present in the source database.
- If Azure Tenant association is scheduled at a certain time and the upgrade/import operation is still in progress or completes after the Azure Tenant association scheduled time, the tenants are not associated. You have to run the built-in scheduled task Update Azure Objects Associated Tenant Id from the Active Roles console to manually associate the Azure Tenants.
-
Alternatively, Azure Tenant association can be run at any time using the template workflow Update Azure Objects Associated Tenant Id available in the Built-in Workflow Container. The parameter in the script used by the workflow can be configured with the required tenant ID. You can use the drop-down to select a default Azure Tenant from the list of available Azure Tenants. The script used by the workflow can be modified to Search Azure objects based on the requirement.
-
The Services association page allows you to configure the Administration services for executing Dynamic Groups, Group Families, and Scheduled tasks from the drop-down list.
The available options in the drop-down list are This Server and Other, where choosing Other allows to specify any other Administration Service in a fully qualified domain name (FQDN) format. If the value is empty, then the current administration service is used.
NOTE: Services association does not update certain scheduled tasks, For example, scheduled tasks that cannot be edited (Managed Object Counter) or scheduled tasks that are set to All servers option.
You can choose to run the Services association immediately or schedule Services association.
NOTE: If Services association is scheduled at a certain time and the upgrade/import operation is still in progress or completes after the Services association scheduled time, the services are not associated. You have to run the built-in scheduled task Update Services To ExecuteOn from the Active Roles console to manually associate the Services.
To ensure Dynamic Groups, Group Families, and Scheduled tasks continue to function after an import the installation configures the new Active Roles server as the executing server for the tasks mentioned above. The configuration mentioned here runs after an upgrade.
NOTE: Alternatively, Services association can be performed any time using the template workflow Update Services To Execute On available in the built-in Workflow Container. The parameters in the script used by the workflow can be configured to the required administration services, such as, Dynamic Group Service, Group Family Service, Scheduled Task Service. You can select the Administration Service from the drop-down list. The drop-down list displays all the currently running Administration Services that are connected to the current configuration database. If the parameter value is not selected, then the current Administration Service is used.
- Click Next.
NOTE: If the disk space in SQL server is insufficient, then an error is displayed prompting you to increase the disk space.
In case of any errors during the in-place upgrade, you must resolve the errors and re-open the Configuration Center to continue the in-place upgrade.
The upgrade starts and the Execution tab displays the progress bar for the upgrade.
-
After the database upgrade, stop and then restart the Active Roles Service.
After the database upgrade is complete, the Active Roles Service is ready for use.
NOTE: To upgrade multiple Active Roles Service instances, log in to the individual systems where Active Roles Service was upgraded, and perform the in-place upgrade steps for each Service.
Compatibility of Active Roles components
The new Administration Service is only compatible with the Active Roles user interfaces (Web Interface and console) of version 8.1.1. Earlier versions of the user interfaces may not work with the new Administration Service. The user interfaces of Active Roles 8.1.1 are only compatible with the Administration Service of version 8.1.1. Therefore, to use the Active Roles console or Web Interface of version 8.1.1, you must first upgrade the Administration Service.
Impact on custom solutions
An upgrade of Active Roles may affect custom solutions (such as scripts or other modifications), if any, that rely on the Active Roles functions. Custom solutions that work fine with an earlier Active Roles version may cease to work after the upgrade. Prior to attempting an upgrade, you should test the existing solutions with the new Active Roles version in a lab environment to verify that the solutions continue to work.
To upgrade Active Roles Administration Service from a version earlier than 6.9 to 7.x, you must first upgrade to version 6.9.
You can upgrade the Administration Service from version 6.9 through 7.4 to 8.1.1.
Upgrading the Administration Service implies creation of a new Administration Service instance of the latest version, with the configuration and management history data imported from your Administration Service of an earlier version. As a result, the new Administration Service instance inherits all of your existing Active Roles configuration settings, such as managed domains, managed units, permission assignments, policies, workflows, virtual attributes and so on. By importing management history data, you transfer change history, approval tasks, and temporal group membership tasks from your Administration Service of an earlier version to the new Administration Service instance.
To upgrade the new Administration Service instance from 7.0.x or later to 8.1.1 perform the following steps:
|

|
NOTE: Before upgrading to the latest version of Active Roles, the add-ons of the earlier versions must be uninstalled. |
- After upgrading the Active Roles package to 8.1.1, you are prompted to restart the system.
- After the system restarts, the Configuration Center opens by default, displaying the Upgrade configuration wizard.
The fields in the wizard are auto-populated. The database name for Configuration and Management history are suggested, by default. However. if you want to update the database name, click Click here to change or provide existing database names link.
- Select the check box on the Upgrade configuration wizard, to confirm that you have read the instructions in the Quick Start guide regarding "Configuring Active Role for in-place upgrade".
- Click Next.
|
|
NOTE: If you click Next without selecting the check box, an error is displayed prompting you to follow the instructions given against the check box and select the check box. |
The upgrade starts and the Execution tab displays the Progress bar for the upgrade.
After the database upgrade is complete, the Active Roles Service is automatically started and ready for use.
You can upgrade from Active Roles 7.0.x or later to Active Roles 7.x using in-place upgrade or a new installation of Active Roles with import of database from an earlier version.
Upgrading from Active Roles 6.9 version to 7.x version is a side-by-side upgrade, which does not interrupt operations or affect the configuration of your earlier Active Roles version. To ensure smooth upgrade to the new Active Roles version, you must first upgrade the Administration Service and then upgrade the Web Interface.
If you no longer need the Administration Service of the earlier version, you can uninstall it using Programs and Features in Control Panel: Right-click Administration Service in the list of installed programs, and then click Uninstall.
Install and configure the Administration Service
To create a new Administration Service instance, you first install Administration Service files and then perform initial configuration.
To install the Administration Service files
- Log on with a user account that has administrator rights on the computer.
- Navigate to the location of the Active Roles distribution package, and start the Setup wizard by double-clicking
ActiveRoles.exe.
- Follow the instructions in the Setup wizard.
- On the Component Selection page, ensure that the Administration Service component is selected, and click Next.
- On the Ready to Install page, click Install to perform installation.
- On the Completion page, select the I want to perform configuration check box, and click Finish.
The Setup wizard only installs the files. After you have completed the Setup wizard, you need to configure the newly installed Administration Service instance by using Active Roles Configuration Center. The Configuration Center opens automatically if you select the I want to perform configuration check box on the Completion page in the Setup wizard. Another way to open Configuration Center is by selecting Active Roles Configuration Center on the Apps page or Start menu, depending upon the version of your Windows operating system.
To perform initial configuration
- In Configuration Center, under Administration Service, click Configure.
- On the Service Account page in the Configure Administration Service wizard that appears, enter the name and password of the domain user account or the service account details of the Group Managed Service Account to be used as the Administration Service account, and then click Next.
- On the Active Roles Admin page, accept the default account, or click Browse and select the group or user to be designated as Active Roles Admin. When finished, click Next.
- On the Configuration Database Options page, select the New Active Roles database option, and then click Next.
- On the Connection to Database page, specify a SQL Server instance and database name, and select the authentication option:
- Select the required Database Type, in the Database Server name. Specify an SQL Server instance in the form <Computer>\<Instance> (for named instance) or <Computer> (for default instance), where <Computer> stands for the short name of the computer running SQL server or name of the Azure SQL database server. The wizard will create the database on the SQL Server instance you specify.
- In the Database box, type a name for the database that will be created.
- Under Connect using, select the appropriate authentication option:
- To have the Administration Service connect to the database using the service account, click Windows authentication.
-
On the Management History Database Options page in the Configure Administration Service wizard, select the New Active Roles database option, and then click Next.
-
On the Connection to Database page, perform the steps a to c for Management history database.
-
Click Next, and then complete the Encryption Key Backup page as described in Backup of encryption key.
- Click Next, and follow the instructions in the wizard to complete the configuration.
Import configuration
After you have installed and initially configured the Administration Service of the new version, import the configuration data from the database used by your Administration Service of the earlier version. To import configurations, you must identify that database. To identify the database:
- Open the Active Roles console and connect to your Administration Service of the earlier version (see “Connecting to the Administration Service” in the Active Roles Administration Guide).
- Select the console tree root, and then, on the page in the details pane, expand the Configuration Databases and Replication area.
You can identify the database name, SQL Server name, and database type from the first string in the Configuration Databases and Replication area that has the following format: Database <name> on SQL Server <name> Database Type <type>.
After identifying the database, perform the import using the Import configuration wizard of the Configuration Center. On the Source database page in the Import configuration wizard, supply the database name and SQL Server name that you have identified. For more information, see Importing configuration data.
|
|
NOTE: When an import configuration is performed from Active Roles version 7.0 to 8.1.1, the Web Interface does not get upgraded. However, the Configuration Center or any client report the Active Roles Web Interface version incorrectly as 8.1.1. To upgrade the Web Interface to the latest version, see Creating Web interface sites and importing configuration. |
Import management history
After you have imported configuration of your earlier Active Roles version, import the management history data from the database used by your Administration Service of the earlier version. First, identify that database:
- Open the Active Roles console and connect to your Administration Service of the earlier version (see “Connecting to the Administration Service” in the Active Roles Administration Guide).
- Select the console tree root, and then, on the page in the details pane, expand the Management History Databases and Replication area.
Identify the database name, SQL Server, database type name from the first string in the Management History Databases and Replication area that has the following format: Database <name> on SQL Server <name> Database Type <type>.
After identifying the database, perform the import. You can do this using the Import Management History wizard of the Configuration Center. On the Source database page in the Import Management History wizard, supply the database name and SQL Server name you have identified. For more information, see Importing management history data.
Upgrade in case of shared database
If multiple instances of the Administration Service use a single database, then you can perform the upgrade as follows:
- Upgrade one of the Administration Service instances as described in Upgrading the Administration Service.
As a result of this step, you have an Administration Service instance of the new version connected to the new database containing the data imported from the old database. The other instances of the Administration Service are not upgraded at this point; they continue to use the old database.
- Now that you have the database of the new version, you can upgrade the remaining instances of the Administration Service, one by one.
- In the Configure Administration Service wizard, select the Existing Active Roles database option on the Configuration Database Options page, and then, on the Connection to Database page, specify the database created during upgrade of the first Administration Service instance. You need not import configuration as the database already has that data imported.
- In the Configure Administration Service wizard, select the Existing Active Roles database option on the Management History Database Options page, and then, on the Connection to Database page, specify the database created during upgrade of the first Administration Service instance. You need not import the management history as the database already has that data imported.
As a result of these steps, multiple Administration Service instances of the new version use a single database updated with the configuration and management history data of your earlier Active Roles version.
If your organization has any Azure tenants managed in Active Roles, you will need to reauthenticate and reconsent each Azure tenant after installing a new version of Active Roles. Otherwise, you may experience difficulties with Exchange Online connectivity and managing Azure AD resources (for example, assigning Azure AD roles).
To reauthenticate and reconsent Azure tenants after installing Active Roles
-
Once Active Roles is installed, open the Active Roles Configuration Center in Windows. The Upgrade configuration wizard will automatically appear.
-
To reauthenticate existing Azure tenants, proceed to the Reauthenticate tenants step and click Reauthenticate next to each Azure tenant.
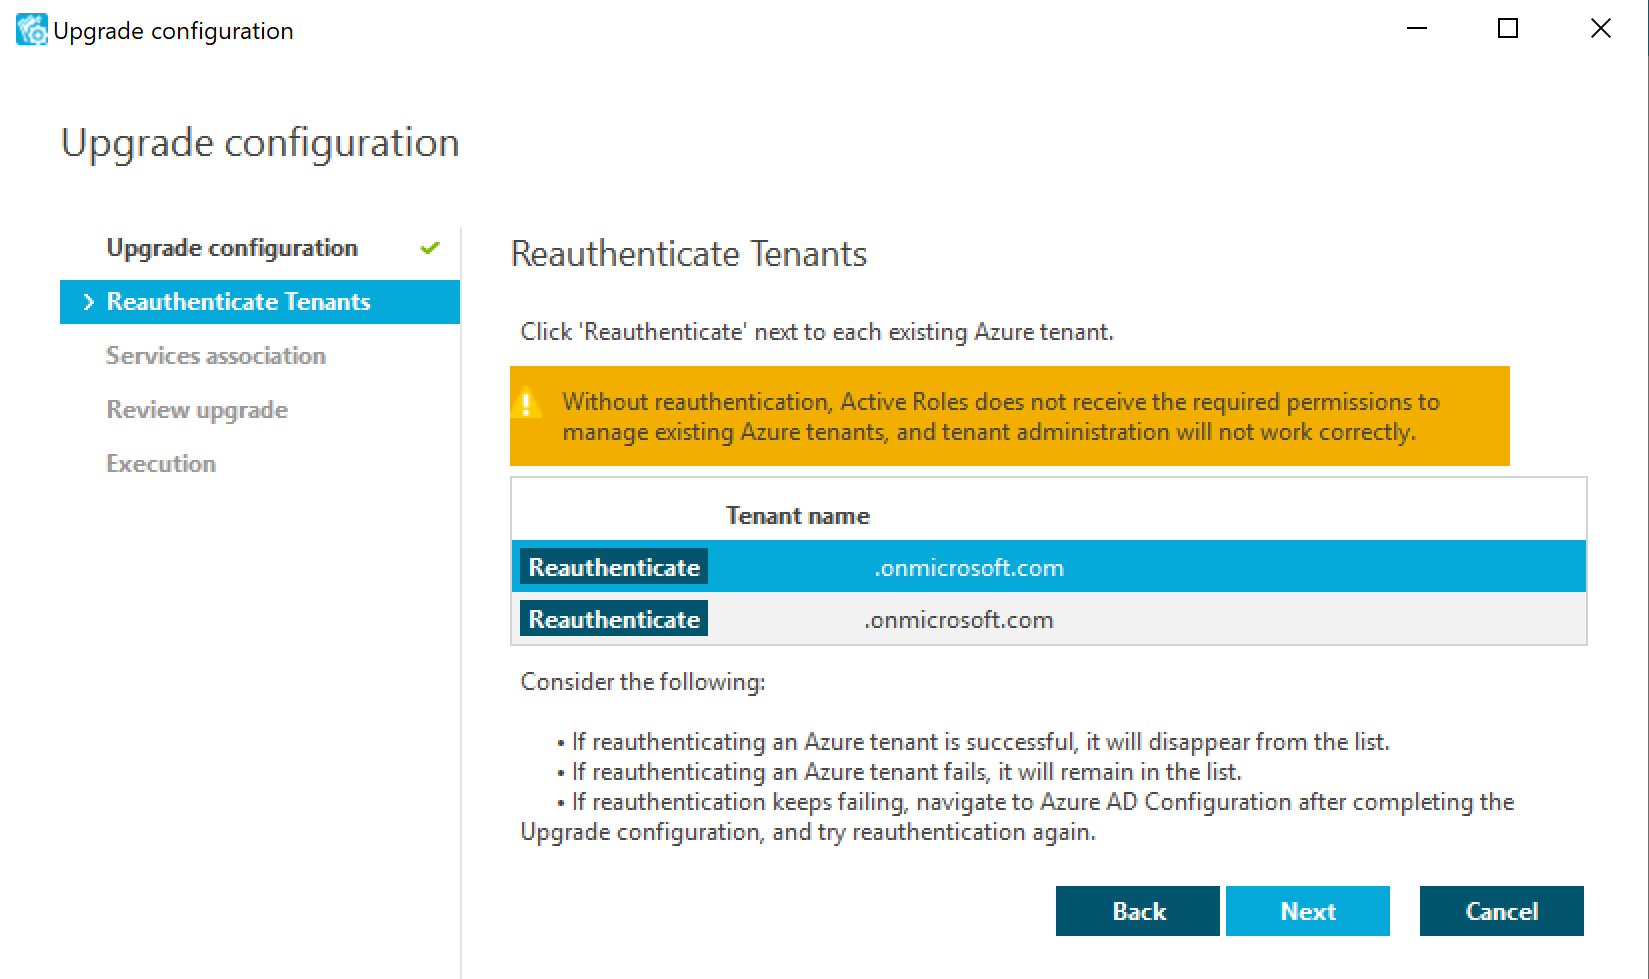
NOTE: Consider the following when reauthenticating existing Azure tenants:
-
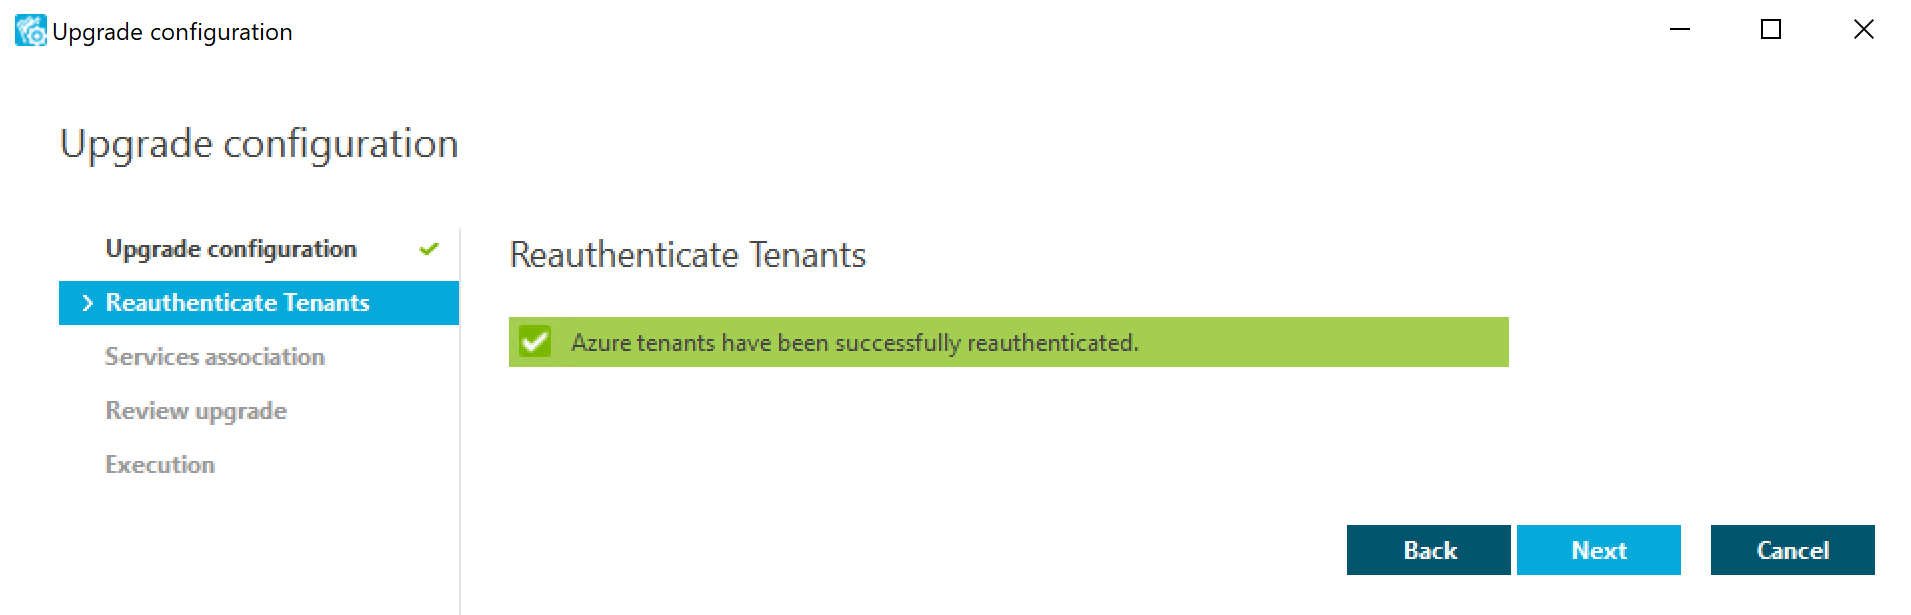
If reauthentication is successful, the Azure tenant will disappear from the list, and the Reauthenticate tenants step shows a confirmation message.
-
If reauthentication fails, the Azure tenant will remain in the list. Reauthentication can typically fail if there is a service outage in Azure AD, or in case of internet connectivity issues in your network. If reauthentication keeps failing, try performing it later after completing the Upgrade configuration wizard by removing, readding and consenting the Azure tenants to Active Roles via the Azure AD Configuration tab of the Active Roles Configuration Center. For more information, see Reconfiguring Azure tenants manually.
-
Complete the rest of the steps in the Upgrade configuration wizard.
-
To make the reauthenticated Azure tenants appear in the Active Roles Web Interface, you must restart the Administration Service. Click Administration Service on the left pane, then either click Restart, or first click Stop and then Start.

-
Once the Active Roles Configuration Center successfully restarted, navigate to Azure AD Configuration.
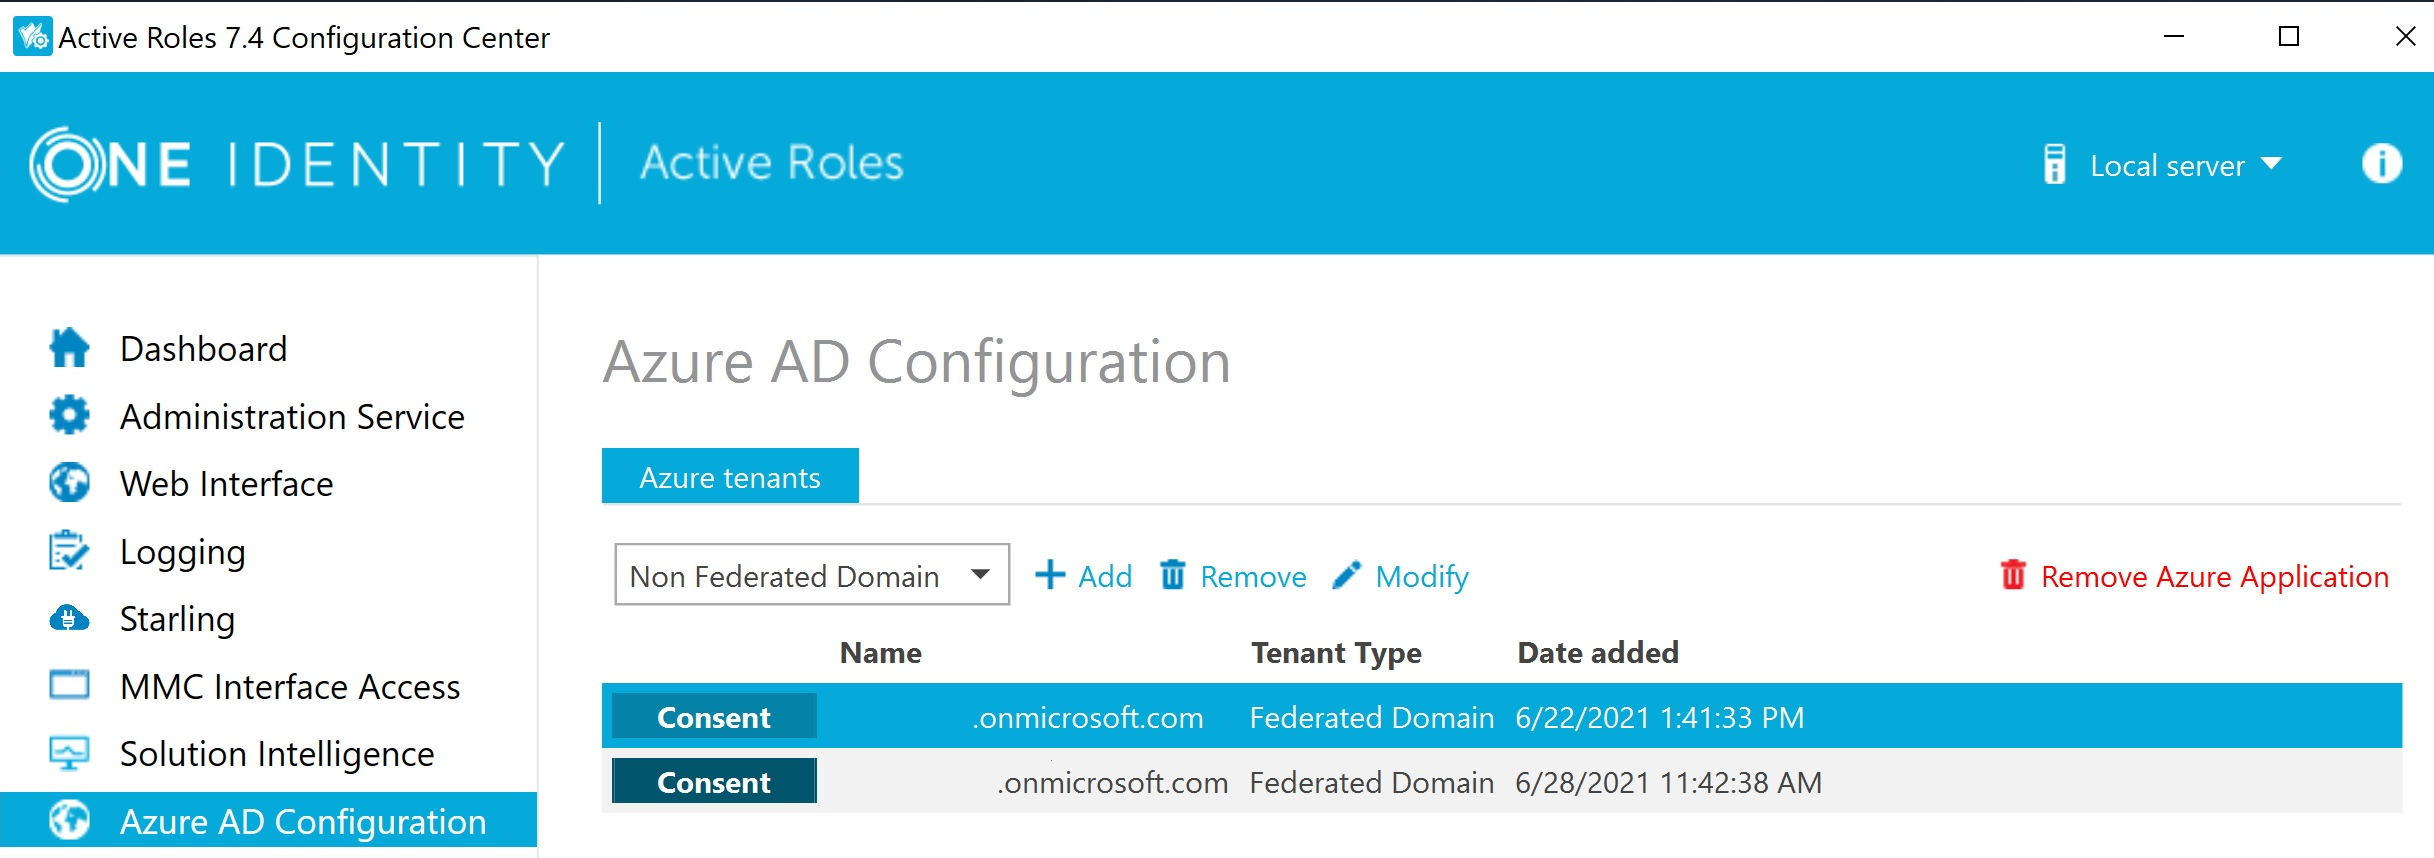
-
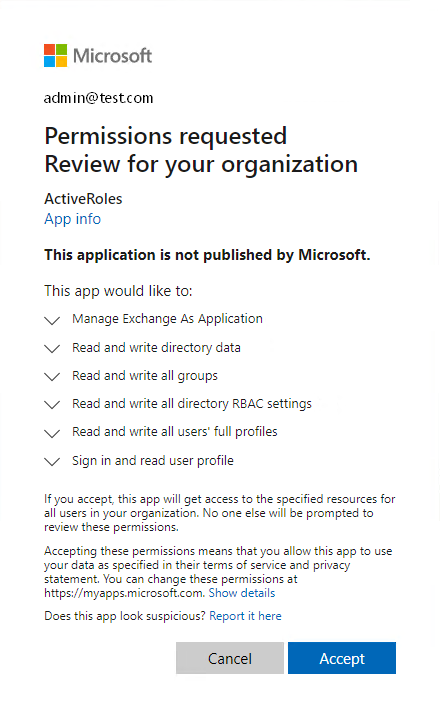
To reconsent Active Roles as an Azure application for the reauthenticated Azure tenants, click Consent in each tenant row.
-
To complete consenting, click Accept on the Microsoft Permissions Requested page that appears.