サポートと今すぐチャット
サポートとのチャット

Identity Manager 8.2.1 - IT Shop Administration Guide

Setting up an IT Shop solution
One Identity Manager users in the IT Shop Implementing the IT Shop Using the IT Shop with the Application Governance Module Requestable products Preparing products for requesting Assigning and removing products Preparing the IT Shop for multi-factor authentication Assignment requests Delegations Creating IT Shop requests from existing user accounts, assignments, and role memberships Adding system entitlements automatically to the IT Shop Deleting unused application roles for product owners
Approval processes for IT Shop requests
Approval policies for requests Approval workflows for requests Determining the effective approval policies Selecting responsible approvers Request risk analysis Testing requests for rule compliance Approving requests from an approver Automatically approving requests Approval by peer group analysis Gathering further information about a request Appointing other approvers Escalating an approval step Approvers cannot be established Automatic approval on timeout Halting a request on timeout Approval by the chief approval team Approving requests with terms of use Using default approval processes
Request sequence Managing an IT Shop
IT Shop base data Setting up IT Shop structures Setting up a customer node Deleting IT Shop structures Templates for automatically filling the IT Shop Custom mail templates for notifications Request templates Recommendations and tips for transporting IT Shop components with the Database Transporter
Troubleshooting errors in the IT Shop Configuration parameters for the IT Shop Request statuses Examples of request results

Configuring peer group analysis for requests

To configure peer groups

  1. In the Designer, set the QER | ITShop | PeerGroupAnalysis configuration parameter.

  2. Set at least on of the following subparameters:

    • QER | ITShop | PeerGroupAnalysis | IncludeManager: Employees who have the same manager as the request's recipient

    • QER | ITShop | PeerGroupAnalysis | IncludePrimaryDepartment: Employees who belong to the same primary department as the request's recipient

    • QER | ITShop | PeerGroupAnalysis | IncludeSecondaryDepartment: Employees whose secondary department corresponds to the primary or secondary department of the request's recipient

    Thus, you specify which employees belong to the peer group. You can also set two or all of the configuration parameters.

  3. To specify a threshold for the peer group, set the QER | ITShop | PeerGroupAnalysis | ApprovalThreshold configuration parameter and specify a value between 0 and 1.

    The default value is 0.9. That means, at least 90 percent of the peer group members must already have the requested product so that the request can be approved.

  4. (Optional) To check whether the requested product is cross-functional, enable the QER | ITShop | PeerGroupAnalysis | CheckCrossfunctionalAssignment configuration parameter.

    1. Assign the service items and departments to functional areas.

      Only functional areas that are primary assigned service items are taken into account.

      For more information about functional areas, see the One Identity Manager Identity Management Base Module Administration Guide.

    2. Assign employees to primary departments.

  5. In the Manager, create an approval workflow with at least one approval level. For the approval step, enter at least the following data:

    • Single step: EXWithPeerGroupAnalysis.

    • Approval procedure: EX

    • Event: PeerGroupAnalysis

    The event starts the QER_PersonWantsOrg_Peer group analysis process, which runs the QER_PeerGroupAnalysis script.

    The script runs automatic approval and sets the approval step type to Grant or Deny.

Detailed information about this topic
Related topics

Gathering further information about a request

Approvers are able to gather additional information about a request. This ability does not, however, replace granting or denying approval for a request. There is no additional approval step required in the approval workflow to obtain the information.

Approvers can request information in form of a question from anybody. The request is placed on hold for the period of the inquiry. Once the queried employee has supplied the necessary information and the approver has made an approval decision, the request is taken off hold. The approver can recall a pending inquiry at any time. The request is taken off hold. The approver’s request and the employee's answer are recorded in the approval flow and are therefore available to the approver.

NOTE: If the approver who made the query is dropped, hold status is revoked. The queried employee must not answer. The request procedure continues.

For more information, see the One Identity Manager Web Designer Web Portal User Guide.

Detailed information about this topic

Appointing other approvers

Once an approval level in the approval workflow has been reached, approvers at this level can appoint another employee to handle the approval. To do this, you have the options described below:

  • Rerouting approvals

    The approver appoints another approval level to carry out approvals. To do this, set up a connection to the approval level in the approval workflow to which an approval decision can be rerouted.

  • Appointing additional approvers

    The approver appoints another employee to carry out the approval. The other approver must make an approval decision in addition to the known approvers. To do this, enable the Additional approver possible option in the approval step.

    The additional approver can reject the approval and return the requests to the original approver. The original approver is informed about this by email. The original approver can appoint another additional approver.

  • Delegate approval

    The approver appoints another employee with approval. This employee is added to the current approval step as the approver. This employee then makes the approval decision instead of the approver who made the delegation. To do this, enable the Approval can be delegated option in the approval step.

    The current approver can reject the approval and return the requests to the original approver. The original approver can withdraw the delegation and delegate a different employee, for example, if the other approver is not available.

Email notifications can be sent to the original approvers and the others.

For more information, see the One Identity Manager Web Designer Web Portal User Guide.

Detailed information about this topic
Related topics

Escalating an approval step

Approval steps can be automatically escalated once the specified timeout is exceeded. The request is presented to another approval body. The request is then further processed in the normal approval workflow.

To configure escalation of an approval step

  1. Open the approval workflow in the Workflow Editor.

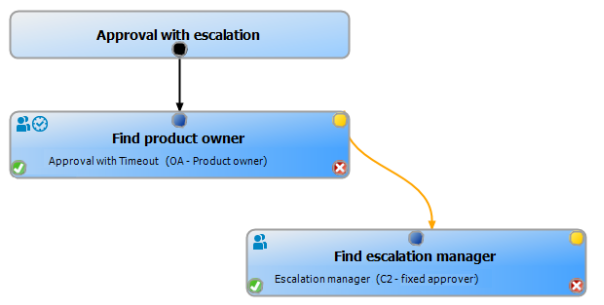
  2. Add an additional approval level with one approval step for escalation.

  3. Connect the approval step that is going to be escalated when the time period is exceeded with the new approval step. Use the connection point for escalation to do this.

    Figure 9: Example of an approval workflow with escalation

  4. Configure the behavior for the approval step to be escalated when it times out.

    Table 50: Properties for escalation on timeout
    Property Meaning
    Timeout (minutes)

    Number of minutes to elapse after which the approval step is automatically granted or denied approval. The input is converted into working hours and displayed additionally.

    The working hours of the respective approver are taken into account when the time is calculated.

    NOTE: Ensure that a state, county, or both is entered into the employee's main data of determining the correct working hours. If this information is missing, a fallback is used to calculate the working hours. For more information about calculating employees' working hours, see the One Identity Manager Identity Management Base Module Administration Guide.

    TIP: Weekends and public holidays are taken into account when working hours are calculated. If you want weekends and public holidays to be dealt with in the same way as working days, set the QBM | WorkingHours | IgnoreHoliday or QBM | WorkingHours | IgnoreWeekend configuration parameter. For more information about this, see the One Identity Manager Configuration Guide.

    If more than one approver was found, then an approval decision for the approval step is not automatically made until the timeout for all approvers has been exceeded. The same applies if an additional approver has been assigned.

    If an approver delegated approval, the time point for automatic approval is recalculated for the new approver. If this approval is rejected, the time point for automatic approval is recalculated for the original approver.

    If an approver is queried, the approval decision must be made within the defined timeout anyway. The time point for automatic approval is not recalculated.

    If additional approvers are determined by recalculating the current approvers, then the automatic approval deadline is not extended. The additional approvers must approve within the time frame that applies to the current approver.

    Timeout behavior

    Action that is run if the timeout expires.

    • Escalation: The request process is escalated. The escalation approval level is called.

  5. (Optional) If the approval step still needs to be escalated but no approver be found and no fallback approver is assigned, set the Escalate if no approver found option.

    In this case, the request is escalated instead of being canceled or passed to the chief approval team.

In the event of an escalation, email notifications can be sent to the new approvers and requesters.

Related topics
関連ドキュメント

The document was helpful.

評価を選択

I easily found the information I needed.

評価を選択