To create, edit, or delete an outgoing mail profile, in the , click Settings > Mail Profiles in the upper-right corner. Then, follow the appropriate procedure below.
To create a profile
-
Click Add below the list of profiles, then specify the settings you want to use. For the descriptions of the settings you can specify, see Outgoing mail profile settings.
-
When you are finished, click OK.
To edit a profile
-
In the list, select the outgoing mail profile you want to edit.
-
Click Edit below the list of profiles, then specify the settings you want to use. For the description of the settings you can specify, see Outgoing mail profile settings.
-
When you are finished, click OK.
To delete a profile
-
In the list, select the outgoing mail profile you want to delete.
-
Click the Delete button below the list of profiles.
In each outgoing mail profile, you can use the following settings:
-
Profile name: Enter a descriptive name with which you want to identify the profile.
-
Outgoing SMTP server: Enter the fully qualified domain name of the SMTP mail server you want to use for sending notification emails.
-
This server requires an encrypted connection (SSL): Select this check box if the specified mail server requires an encrypted connection.
-
This server requires authentication: Select this check box if the specified mail server requires authentication, then specify the user name and password with which you want to access the server.
-
Sender email address: Specify the email address you want to use as the originating address in the notification emails.
-
Sender name: Specify the sender name you want to display in the From field to the recipients of the notification emails.
Object mapping allows you to establish one-to-one relationships between objects in two connected data systems. By using object mapping, you can determine what objects will participate in data synchronization operations you run between these two data systems.
maps objects automatically when running the creating steps of a sync workflow. In this case, a one-to-one relationship is automatically established between source objects and their counterparts created in the target connected system during the creation operation. In some cases, however, you may have to manually map objects. For example, you should configure object mapping before running a sync workflow that includes updating or deprovisioning steps. By doing so, you provide with the information on which objects need to be updated or deprovisioned in the target data system.
To map objects, you can use mapping pairs and mapping rules. A mapping pair allows you to establish a relationship between a certain object type in one connected system and its counterpart in the other connected system. A mapping rule allows you to define the scope of conditions where the objects belonging to the object types specified in a particular mapping pair will be mapped. You can create multiple mapping rules for a mapping pair, with each mapping rule defining a specific mapping condition. You have to run your mapping rules for them to take effect. After you run a mapping rule, reads data in the connected data systems for which the rule is configured, and then maps the objects that meet the conditions specified in the mapping rule.
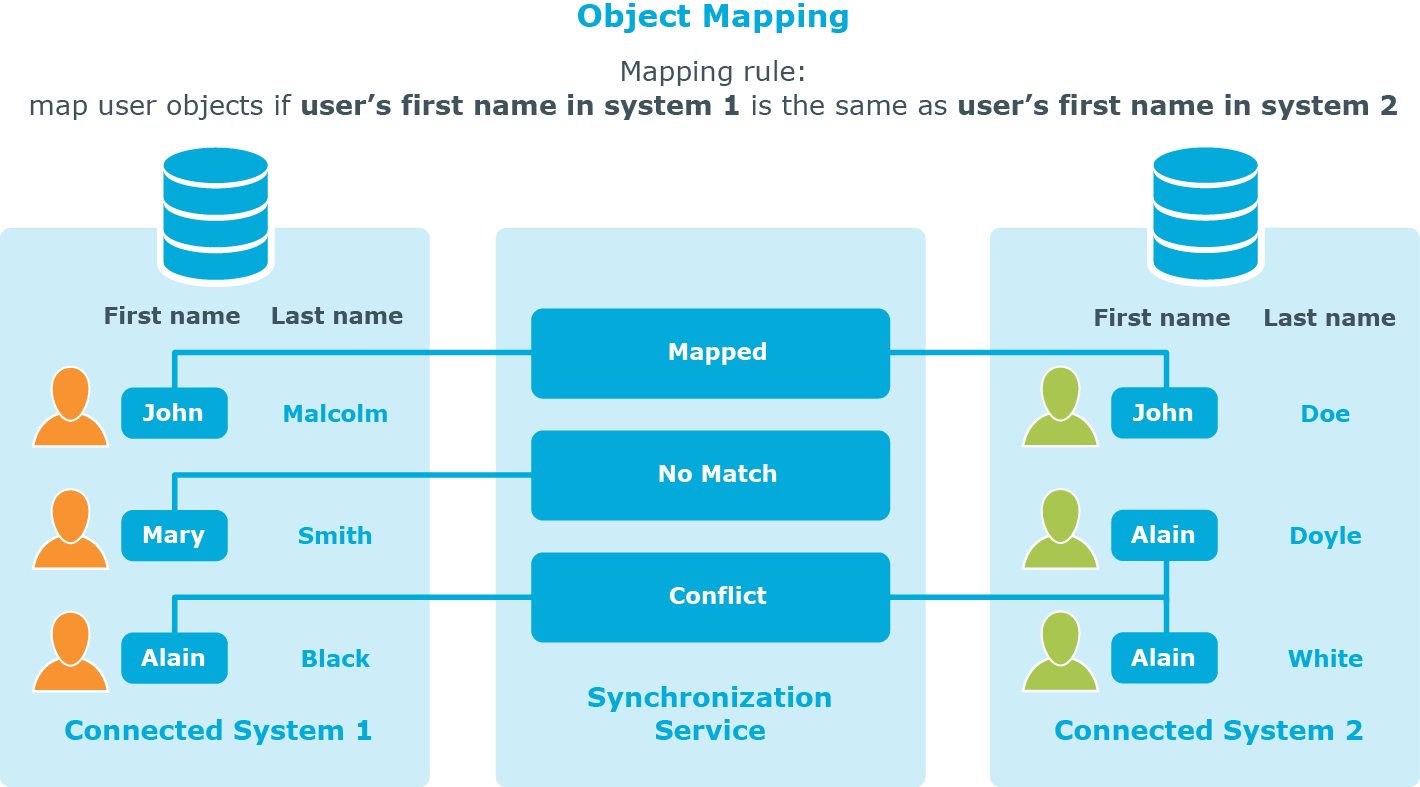
The following example shows how a mapping rule works:
Figure 21: Object mapping

In this example, one-to-one relationship is established between the user object John Malcolm in Connected System 1 and the user object John Doe in Connected System 2: the first names of these user objects match, and thus the condition specified in the mapping rule is met. Now, if you configure a sync workflow for these systems and populate it with synchronization steps, identity information will be synchronized between these two user objects, since they are mapped. The direction of synchronization depends on which of these two connected data systems acts as the synchronization source and which is the target.
You can map objects in two data systems to which is connected.

