In reports and in the TimeTrace, an analysis is carried out of the data changes saved in the One Identity Manager database and those stored in a One Identity Manager History Database. You can use this to find out who had what permissions at which point in time.
Figure 1: Analyzing data changes
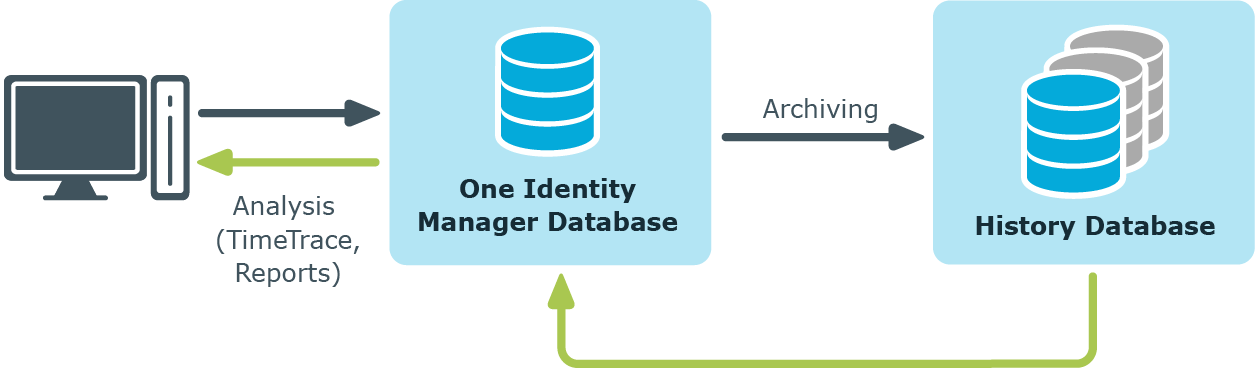
Prerequisite for analyzing historical data in reports and in the TimeTrace is the recording of data changes within process monitoring. Data changes that are saved in the One Identity Manager database, can be immediately included in the analysis. To use archived data, the One Identity Manager History Database must be declared in the One Identity Manager database.
Prerequisites for analyzing data changes
-
The Common | ProcessState configuration parameter is set and a method for recording the data changes with process monitoring is configured.
For more detailed information about logging changes to data, see the One Identity Manager Configuration Guide.
-
To access archived data in the TimeTrace and in reports, the One Identity Manager History Database must be declared in the One Identity Manager database.
There are different ways to establish a connection to the One Identity Manager History Database:
For more information about archiving data, see the One Identity Manager Data Archiving Administration Guide.
-
To display the TimeTrace view in the Manager, users require the Option to show the TimeTrace (Common_TimeTrace) program function.
-
To evaluate of the effectiveness of the assignments (XIsInEffect column) in reports, in the Designer check the Common | ProcessState | PropertyLog | ShowEffectiveAssignmentsOnly configuration parameter and change it if necessary.
-
To display only the effective assignments when evaluating historical assignments in reports, set the configuration parameter (default).
-
To show all assignments as effective, regardless of their effectiveness, do not set the configuration parameter.
NOTE: The effectiveness of assignments (XIsInEffect column) is logged in the history as of One Identity Manager version 8.1.5. Older assignment data is always presented as effective, regardless of its actual effectiveness.
Related topics
Prerequisites for connecting a One Identity Manager History Database through an application server
-
Declaring the One Identity Manager History Database in the TimeTrace, requires an ID.
-
An ID for the One Identity Manager History Database connection is entered in the application server’s configuration file (web.config).
-
Enter a unique ID for each One Identity Manager History Database.
-
The ID must be entered in all application servers that can be used by users to log in to the Manager.
-
The ID must be entered for the application server that the One Identity Manager Service uses to connect.
-
The Manager and the Web Portal use the application server to log in. Otherwise, it is not possible to evaluate data modifications.
-
To generate and send report subscriptions and reports by email that show changes to data, there must be a Job server set up over an application server.
For more information about setting up a Job server and about configuring the One Identity Manager Service, see the One Identity Manager Configuration Guide.
To link a One Identity Manager History Database into a TimeTrace
-
Use the Designer to log in to the One Identity Manager database.
-
In the Designer, select the Base Data > General > TimeTrace databases category.
-
Select the Object > New menu item.
-
Ensure that the Use ID from application server option is set.
-
In History database name, enter the name of the One Identity Manager History Database.
-
In the Connection parameter field, enter the ID for connecting to theOne Identity Manager History Database.
The ID must match the ID in the application server’s configuration file.
-
Select the Database > Save to database and click Save.
NOTE: Set the Disabled option to disable the connection at a later time. If a One Identity Manager History Database is disabled, it is not taken into account when determining change data in the TimeTrace.
To configure an ID in the application server for connecting to the One Identity Manager History Database
-
During installation of the application server, enter the ID for connecting to the One Identity Manager History Database.
-
To connect a One Identity Manager History Database at a later date, enter the ID for connection in the application server’s configuration file (web.config) in the <connectionStrings> section.
Example:
<connectionStrings>
...
<add name="<History Database ID>" connectionString="Data Source=<database server>;Initial Catalog=<database name>;User ID=<database user>;Password=<password>"/>
...
</connectionStrings>
NOTE:
The connection credentials in the application server’s configuration file are encrypted with the default Microsoft ASP.NET encryption. If you want to change the connection credentials later, you must decrypt them first and then encrypt them again afterward. Use ASP.NET IIS registration tool to decrypt and encrypt (Aspnet_regiis.exe).
Example call:
Decrypting: aspnet_regiis.exe -pdf connectionStrings <path to web application in IIS>
Encrypting: aspnet_regiis.exe -pef connectionStrings <path to web application in IIS>
Related topics
To link a One Identity Manager History Database into a TimeTrace
-
Use the Designer to log in to the One Identity Manager database.
-
In the Designer, select the Base Data > General > TimeTrace databases category.
-
Select the Object > New menu item.
-
Disable the Use ID from application server.
-
In History database name, enter the name of the One Identity Manager History Database.
-
Declare the Connection parameters.
-
Click the [...] button next to the input field to open the input dialog for connection data.
-
Enter the connection data for the One Identity Manager History Database.
-
Server: Database server.
-
(Optional) Windows Authentication: Specifies whether the integrated Windows authentication is used. This type of authentication is not recommended. If you decide to use it anyway, ensure that your environment supports Windows authentication.
-
User: The user's SQL Server login name.
-
Password: Password for the user's SQL Server login.
-
Database: Select the database.
-
Select the Database > Save to database and click Save.
NOTE: Set Disabled to disable the connection at a later time. If a One Identity Manager History Database is disabled, it is not taken into account when determining change data in the TimeTrace.
Related topics
NOTE: To display the TimeTrace view in the Manager, users require the Option to show the TimeTrace (Common_TimeTrace) program function.
To display an object's change data:
-
In the Manager, open the time trace using the View > TimeTrace menu item.
-
Select the object whose change information you want to display.
-
Activate the change history for this object in the TimeTrace view using the  button.
-
In the TimeTrace view, use the  (time range) filter in the toolbar to specify the time range for which the change information is loaded. The changes are determined from the One Identity Manager database and the connected One Identity Manager History Database databases.
All change time stamps in the time frame that has been loaded are now shown in the overview below the timeline.
NOTE: To display changes of assignments to an object, such as the employee assignment to a department or a resource assignment to an organization, select the relevant assignment form in the task view of the Manager. In the TimeTrace view, you can then also select a source for which to display the changes. An additional Source menu is offered, in which you can select the respective assignment or the base object.
To select a change time stamp on the timeline:
-
To display a part of the timeline in greater detail, click a marking below the timeline.
-
Each change time stamp has a label showing the date and time. There is a tooltip for each change, showing which items of data were changed and by whom.
-
Select a change time stamp on the timeline or on the label.
-
If there are multiple change time stamps which are very close together, when you select a time stamp a context menu appears from which you can choose the specific change time stamp.
-
Click the timeline or Ctrl + mouse wheel to zoom in or zoom on the display of several time change stamps that are close together.
When you select a change time stamp in TimeTrace, the program's document view opens the object's main data form or the assignment form. Use the timeline or quick edit a label to choose if you want the object settings or assignments to be displayed in the main data form before or after the changes have been made.
If a property of an object shows a historical value, it is marked by an icon. A tooltip shows the current value of the property. Use the Show property change history context menu to display the recorded data for this property.
You can apply historical data to the current object and restore the object to the status prior to the change.
To apply the historic values:
-
Click the icon in front of the modified property. The following information is displayed.
-
Property: These properties are changed once the historical value is transferred. The changes are made immediately or by templates.
-
New value: Value of the property after the historical value has been saved.
-
Old value: Current value of the property. This value is overwritten once the historical value is saved.
- Click Save.
