For certain protocols, multiple channels are defined each of which is responsible for a specific functionality supported by the protocol. For example, the Session Shell channel is the traditional remote terminal session, while the Session Exec channel allows to execute a remote command (for example rsync without opening a session shell.
For details on the supported SSH channel types, see Supported SSH channel types.
SPS can permit/deny access to these functionalities based on various parameters of a connection (for example time of the day, username, and so on) to provide an additional level of access control and protection.
Figure 4: Controlling protocol channels

Access to sub-channels is controlled by channel policies. The default SSH channel policy allows session shell access only.
For details, see Creating and editing channel policies.
To configure SCP and SFTP access in SSH
-
Navigate to SSH Control > Channel Policies and click  to create a new channel policy. Enter a name for the policy into the Channel Policy field (for example, shell_and_backup).
-
Click to add a new channel.
-
Select Session Exec SCP from the Type field.
-
Restrict the availability of the channel based on your preferences.
For details, see Creating and editing channel policies.
-
To be able to extract the original file from the corresponding audit trail for further inspection, select the Record audit trail option to record the activities of the channel into audit trails.
-
(Optional) To also configure SFTP channel access, add a new channel and repeat the steps above, but this time, select Session SFTP from the Type field.
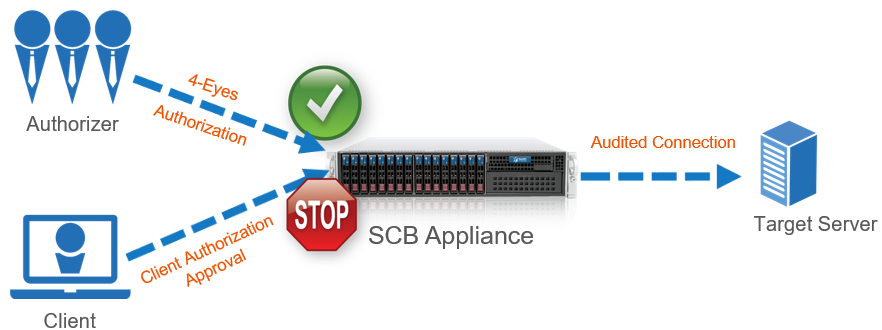
This is called four-eyes authorization in SPS terminology. When four-eyes authorization is required for a connection, a user (called authorizer) must authorize the connection on SPS as well. This authorization is in addition to any authentication or group membership requirements needed for the user to access the remote server. Any connection can use four-eyes authorization, so it provides a protocol-independent, outband authorization and monitoring method.
The authorizer has the possibility to terminate the connection any time, and also to monitor real-time the events of the authorized connections: SPS can stream the traffic to the Safeguard Desktop Player application, where the authorizer (or a separate auditor) can watch exactly what the user does on the server, just like watching a movie.
Figure 5: Four-eyes authorization
For details on four-eyes authorization, see Four-eyes authorization.
To configure four-eyes authorization
-
To enforce four-eyes authorization, navigate to SSH Control > Connections.
-
Select the connection policy to modify. Navigate to Access Control and click .
-
Enter the name of the usergroup whose members are permitted to authorize the sessions of the connection policy into the Authorizer field.
-
Configure the parameters of four-eyes authorization. For details, see Configuring 4-eyes authorization.
-
Navigate to SSH Control > Channel Policies, and select the channel policy used in the connection.
-
Enable the 4 eyes option for the channels which should be accessed only using four-eyes authorization.
-
Click  .
.
