A split brain situation is caused by a temporary failure of the network link between the cluster nodes, resulting in both nodes switching to the active (master) role while disconnected. This might cause new data (for example, log messages) to be created on both nodes without being replicated to the other node. Thus, it is likely in this situation that two diverging sets of data have been created, which cannot be easily merged.
|
|
Caution:
Hazard of data loss In a split brain situation, valuable log messages might be available on both syslog-ng Store Box (SSB) nodes, so special care must be taken to avoid data loss. |

The nodes of the SSB cluster automatically recognize the split brain situation once the connection between the nodes is re-established, and do not perform any data synchronization to prevent data loss. When a split brain situation is detected, it is visible on the SSB system monitor, in the system logs (Split-Brain detected, dropping connection!), on the Basic Settings > High Availability page, and SSB sends an alert as well.
NOTE: After the connection between the nodes has been restored, the split brain situation will persist. The core firmware will be active on one of the nodes, while it will not start on the other node.
Once the network connection between the nodes has been re-established, one of the nodes will become the master node, while the other one will be the slave node. Find out which node is the master node. There are two ways to identify the master node:
-
Locally: Log in to each SSB locally, and wait for the console menu to come up. The console menu only appears on the master node.
-
Remotely: Try connecting to each SSB using SSH. It is only the master node that you can directly connect to via SSH. The slave node cannot be accessed externally, only via SSH from the master.
To recover an SSB cluster from a split brain situation, complete the procedures described in Data recovery and HA state recovery.
|
|
Caution:
Do NOT shut down the nodes. |
Data recovery
In the procedure described here, data will be saved from the host currently acting as the slave host. This is required because data on this host will later be overwritten by the data available on the current master.
NOTE: During data recovery, there will be no service provided by SSB.
To configure recovering from a split brain situation
-
Log in to the master node as root locally (or remotely using SSH) to access the Console menu. If no menu is showing up after login, then this is the slave node. Try the other node.
-
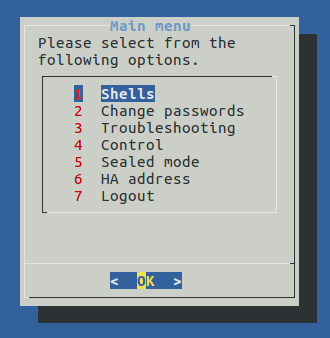
Select Shells > Boot Shell.
-
Enter /usr/share/heartbeat/hb_standby. This will change the current slave node to master and the current master node to slave (HA failover).
-
Exit the console.
-
Wait a few seconds for the HA failover to complete.
-
Log in on the other host. If no Console menu is showing up, the HA failover has not completed yet. Wait a few seconds and try logging in again.
-
Select Shells > Core Shell.
-
Issue the systemctl stop syslog-ng.service command to disable all traffic going through SSB.
-
Save the files from /opt/ssb/var/logspace/ that you want to keep. Use scp or rsync to copy data to your remote host.
TIP: To find the files modified in the last n*24 hours, use find . -mtime -n.
To find the files modified in the last n minutes, use find . -mmin -n .
-
Exit the console.
-
Log in again, and select Shells > Boot Shell.
-
Enter /usr/share/heartbeat/hb_standby. This will change the current slave node to master and the current master node to slave (HA failover).
-
Exit the console.
-
Wait a few minutes to let the failover happen, so the node you were using will become the slave node and the other node will become the master node.
The nodes are still in a split-brain state but now you have all the data backed up from the slave node, and you can synchronize the data from the master node to the slave node, which will turn the HA state from "Split-brain" to "HA". For details on how to do that, see HA state recovery.
HA state recovery
In the procedure described here, the "Split-brain" state will be turned to the "HA" state.
|
|
Caution:
Keep in mind that the data on the current master node will be copied to the current slave node and data that is available only on the slave node will be lost (as that data will be overwritten). |
To swap the nodes (optional)
NOTE: If you completed the procedure described in Data recovery, you do not have to swap the nodes. You can proceed to the steps about data synchronization.
If you want to swap the two nodes to make the master node the slave node and the slave node the master node, perform the following steps.
-
Log in to the master node as root locally (or remotely using SSH) to access the Console menu. If no menu is showing up after login, then this is the slave node. Try the other node.
-
Select Shells > Boot Shell.
-
Enter /usr/share/heartbeat/hb_standby. This will output:
Going standby [all]
-
Exit the console.
-
Wait a few minutes to let the failover happen, so the node you were using will become the slave node and the other node will be the master node.
To initialize data synchronization
-
Log in to the slave node as root locally (or remotely using SSH) to access the Console menu. If the menu is showing up, then this is the master node. Try logging in to the other node.
Note that you are in the boot shell now as on the slave node, only the boot shell is available.
-
Invalidate the DRBD. Issue the following commands:
drbdadm secondary r0
drbdadm connect --discard-my-data r0
ssh ssb-other
drbdadm connect r0
-
Reboot the slave node.
Following this step, the master will be in Standalone state, while the slave's DRBD status will be WFConnection.
The console will display an Inconsistent (10) message. This is normal behavior, and it is safe to ignore this message.
-
Reboot the master node. The SSB cluster will now be functional, accepting traffic as before.
-
After both nodes reboot, the cluster should be in Degraded Sync state, the master being SyncSource and the slave being SyncTarget. The master node should start synchronizing its data to the slave node. Depending on the amount of data, this can take a long time. To adjust the speed of synchronization, see Adjusting the synchronization speed.
-
Enable all incoming traffic on the master node. Navigate to Basic Settings > System > Service control > Syslog traffic, indexing & search: and click Enable.
If the web interface is not accessible or unstable, complete the following steps on the active SSB:
-
Log in to SSB as root locally (or remotely using SSH) to access the console menu.
-
Select Shells > Core Shell, and issue the systemctl start syslog-ng.service command.
-
Issue the date, and check the system date and time. If it is incorrect (for example, it displays 2000 January), replace the system battery. For details, see the hardware manual of the appliance.
-
 .
.