Installing the SSB software
The following describes how to install a new SSB on a server.
To install a new SSB on a server
-
Log in to your support portal account and download the latest syslog-ng Store Box installation ISO file. Note that you need to have partner access to download syslog-ng Store Box ISO files. If you are a partner but do not see the ISO files, you can request partner access within the support portal.
-
Mount the ISO image, or burn it to a CD-ROM.
-
Connect your computer to the IPMI interface of SSB. For details, see the following documents:
For syslog-ng Store Box (SSB) Appliance 3000 and 3500, see the Latest IPMI firmware for Syslog-ng Store Box 3000/3500 and One Identity Safeguard for Privileged Sessions 3000/3500 appliances.
For syslog-ng Store Box (SSB) T1 and syslog-ng Store Box (SSB) T4, see the IPMI User's Guide.
-
Power on the server.
-
Log in to the IPMI web interface, and boot the syslog-ng Store Box installation CD on the server using a virtual CD-ROM. For details, see the following documents:
For syslog-ng Store Box (SSB) Appliance 3000 and 3500, see the Latest IPMI firmware for Syslog-ng Store Box 3000/3500 and One Identity Safeguard for Privileged Sessions 3000/3500 appliances.
For syslog-ng Store Box (SSB) T1 and syslog-ng Store Box (SSB) T4, see the IPMI User's Guide.
-
When the syslog-ng Store Box installer starts, select Installer, pressEnter, and wait until the server finishes the boot process.
-
Select Install a new SSB and pressEnterto start the installation process. Depending on the size of the disks, the installation process takes from a few minutes to an hour to complete. The progress of the installation is indicated in the Installation Steps window.
-
The installer displays the following question: Warning, all data on the hard drive(s) will be erased. Are you sure? Select Yes and pressEnter.
-
The installer displays the MAC addresses of the network interfaces found in the SSB unit. Record these addresses.
-
The installer displays the product name (the SSB configuration that was installed). If the product name displayed does not match the product you wanted to install, complete the following steps:
-
Check that the hardware configuration of the appliance matches the specifications provided by One Identity.
-
If the configuration matches the specifications but the installer displays a different product name, contact our Support Team.
-
During the Finishing the Setup step, the installer performs RAID synchronization.
-
Select Yes to perform the RAID synchronization. RAID synchronization is a two-step process, the progress of the active step is indicated on the progress bar. Wait until both steps are completed. Note that this synchronization takes several hours (about 8 hours on average).
-
Select No to skip the RAID synchronization. Note that the system will automatically perform the synchronization after the first boot, but in this case the process will take several days.
-
After the installation is finished, pressEnterto return to the main menu.
-
Select Reboot and press Enter to restart the system. Wait until the system reboots.
-
Connect your computer to the EXT interface of SSB. Create an alias IP address for your computer that falls into the 192.168.1.0/24 subnet (for example, 192.168.1.10). For details, see "The initial connection to SSB" in the Administration Guide.
-
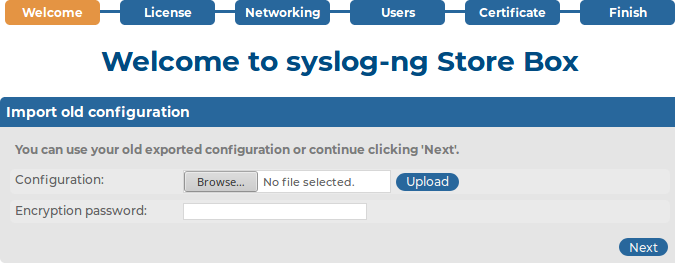
Open the http://192.168.1.1 URL in your web browser and verify that the Welcome Wizard of the syslog-ng Store Box is available.
Figure 1: The Welcome Wizard
-
Power off the system.
syslog-ng Store Box VMware Installation Guide
syslog-ng Store Box VMware Installation Guide
This tutorial describes the possibilities and limitations of installing syslog-ng Store Box (SSB) 6.10.0 as a virtual appliance under a VMware ESXi server.
Limitations of SSB under VMware
The following limitations apply to running version 6.10.0 of SSB under VMware:
-
SSB can be installed under the following VMware versions:
-
SSB can only use fixed disk space assigned to the virtual host, it is not possible to use on-demand disk allocation scenarios. To increase the size of the virtual disk, see Increasing the virtual disk size of SSB under a virtual machine.
-
If High Availability (HA) operation mode is required in a virtual environment, use the HA function provided by the virtual environment.
-
Hardware-related alerts and status indicators of SSB may display inaccurate information, for example, display degraded RAID status.
-
Creating Quiesced snapshots is not supported. Disable this option when taking a snapshot of your SSB appliance, otherwise the boot firmware of the appliance becomes tainted.
Installing SSB under VMware ESXi/ESX
The following describes how to install a new SSB under VMware ESXi or ESX.
To install a new SSB under VMware ESXi or ESX
-
Create the virtual machine for SSB using the following settings:
-
Guest operating system: Linux/Ubuntu 64-bit.
-
Allocate memory for the virtual machine. SSB requires a minimum of 1 GiB of memory, in addition to the memory limit of the indexed logspaces. The recommended size for the memory depends on the exact environment, but consider the following:
-
The base system requires 256 MiB.
-
The syslog-ng server running on SSB requires between 128 MiB and 1 GiB of memory, depending on the message load and on the configuration of SSB.
-
For every logspace, SSB requires additional memory to index the incoming messages. The amount of memory allocated for the indexer can be set individually for every logspace.
-
The hard disk controller must be LSI Logic Parallel.
-
Do not use RAID for the hard disk, use the data duplication features of your virtual environment instead. That way, a single hard disk is sufficient for the system. If you need to use the built-in RAID support of SSB for some reason, use two hard disks, and SSB will automatically use them in software RAID.
|

|
Caution:
Hazard of data loss When you install or reinstall SSB in a virtual environment, always create new hard disks. Using existing hard disks can cause unexpected behavior and operational problems. |
-
Configure a fixed size disk with at least 8 GiB space.
About 5 GB is required for the base system, the remaining disk space is used to store data. To increase the initial disk size, see Increasing the virtual disk size of SSB under a virtual machine.
-
SSB requires that you use either 1 network card or 4 network cards, all of them must be VMXNET3.
-
After creating the virtual machine, edit the settings of the machine. Set the following options:
-
Under Options > VMware Tools, enable the Shutdown, Suspend, Reset options, otherwise the SSB administrator will not be able to access these functions from the SSB web interface.
-
Under Options > Boot options, enable the Force BIOS Setup option. This is required to be able to check the system time (and modify it if needed) before installing SSB.
-
Log in to the support portal and download the latest syslog-ng Store Box installation ISO file. Note that you need to have purchased SSB as a virtual appliance or have partner access to download syslog-ng Store Box ISO files. If you are a partner but do not see the ISO files, you can request partner access within the support portal.
-
Mount the ISO image and boot the virtual machine. Follow the on-screen instructions to install SSB.
Once installation successfully completes, the virtual machine will restart automatically.
In case installation fails, a message will be displayed instructing you to press Ctrl+Alt+Delete to reboot the virtual machine.
