Active Roles Reporting
Active Roles offers optional on-premises reporting capabilities with its Data Collector and Report Pack, allowing you to view Active Roles tracking logs for administrative roles, Managed Units (MUs), policy compliance, Policy Objects, and the state of key Active Directory (AD) objects.
Active Roles Data Collector and Report Pack facilitates the collection of environment data (stored in an SQL Server database) and the automated generation of reports on management activities. The Report Pack component is deployed on Microsoft SQL Server Reporting Services (SSRS) to view, save, print, publish, and schedule Active Roles reports. For more information on the available report, see Available Active Roles Reports.
Table 6: Active Roles Collector and Report Pack system requirements
|
.NET Framework |
4.7.2 |
|
Supported OS on domain controllers |
Microsoft Windows Server 2022, 2019, or 2016 (Standard or Datacenter edition).
NOTE: Active Roles is not supported on Windows Server Core installations. |
|
Supported databases |
-
Microsoft SQL Server 2019, 2017 or 2016, any edition.
-
Microsoft SQL Server 2014 or 2012, any edition, 32-bit (x86) or 64-bit (x64), with or without any Service Packs. |
|
.NET Framework |
4.7.2 |
|
Other Active Roles components |
The Active Roles Management Tools must be installed and must have the same version as the Active Roles Administration Service, due to using the Active Roles ADSI Provider component. |
Available Active Roles Reports
Active Roles provides reporting services for the following Active Directory and Active Roles objects, components and events.
Active Directory Assessment
-
Domains
-
Group Membership
-
Group Membership by groups.
-
Group Membership by users.
-
Users with domain administration rights.
-
Groups
-
Organization Units (OUs)
-
Member statistics by OU.
-
OU hierarchy.
-
OU membership.
-
Other Directory Objects.
-
Potential Issues
-
Users
Active Roles Tracking Log
Administrative Roles
-
Access Template permissions.
-
Access Template summary.
-
Access Templates linked to Managed Units (MUs).
-
Access Templates linked to OUs.
-
Control delegation by object.
-
Control delegation by object (with group hierarchy).
-
Control delegation by trustee.
-
Control delegation by trustee (with container hierarchy).
Policy Objects
-
Linked property validation settings.
-
Linked property validation settings (with inheritance).
-
Linked script settings (with inheritance).
-
Policy Object references.
-
Policy Object settings.
-
Policy Object summary.
-
Policy Objects with securable objects.
-
Securable objects (with inheritance).
Preparing the offline join of the Active Roles On Demand server
Preparing the offline join of the Active Roles On Demand server
Before sending the One Identity Active Roles On Demand configuration information required by the One Identity Cloud Operations Team, you must prepare the Active Roles server for an offline domain join by generating a domain join file. You will need upload this file to the One Identity Starling portal (https://www.cloud.oneidentity.com) when sending the required configuration information.
Prerequisites
You must use an account with Active Directory permissions to perform a domain join. By default, Domain Admins have this permission.
To prepare the offline join of the Active Roles server
-
Determine the domain and Organizational Unit (OU) where the Active Roles server will be deployed.
NOTE: Consider the following when planning the deployment of the Active Roles server:
-
If you have more than one domain and need assistance in determining the proper Active Directory domain to use for this procedure, contact One Identity Support.
-
Do not pre-create the Active Roles server name, as this procedure will create the computer object automatically in the specified OU.
-
Generate an offline domain join file for One Identity. To do so, open a Command Prompt with elevated privileges on a Windows server joined to the same domain where the Active Roles server will be deployed, and run the following single-line command:
djoin /provision /domain <domain-name> /machine <activeroles-server-netbios-name> /machineou "OU=<OU-name>,DC=<NetBIOS-domain-name>,DC=<domain-suffix>" /savefile <X>:\<folder-name>\ODJBlob.txt
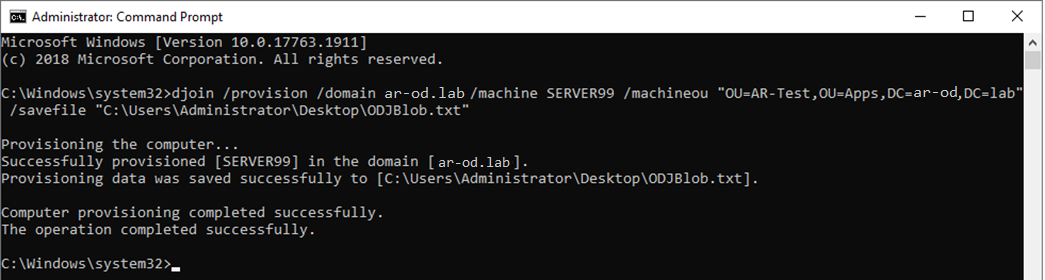
NOTE: Do not use a Container (CN) for the target location. Use only an OU instead. If you still prefer to use the default Computers CN, remove the /machineou switch and value.
-
Perform the steps of Sending required information to One Identity and upload the generated ODJBlob.txt file to the Technical Information form of the One Identity Starling portal.
The One Identity Cloud Operations Team will use the attached ODJBlob.txt file to complete the offline domain join and deploy the Active Roles On Demand tenant for your organization.
Sending required information to One Identity
Sending required information to One Identity
Before the One Identity Cloud Operations Team can configure and provision your Active Roles On Demand environment, you must send a set of configuration information via the One Identity Starling portal (https://www.cloud.oneidentity.com).
Prerequisites
Before collecting and sending the required information, make sure that the following conditions are met:
-
Your organization is already registered on the One Identity Starling portal.
-
If you configure a product trial, your One Identity representative notified your organization that the product trial has been added to your organization account.
-
If you configure a subscribed product, your organization received a subscription confirmation email from One Identity.
To send product configuration information to the One Identity Cloud Operations Team
-
To open the list of product services available for your organization, in the One Identity Starling portal, click Services.
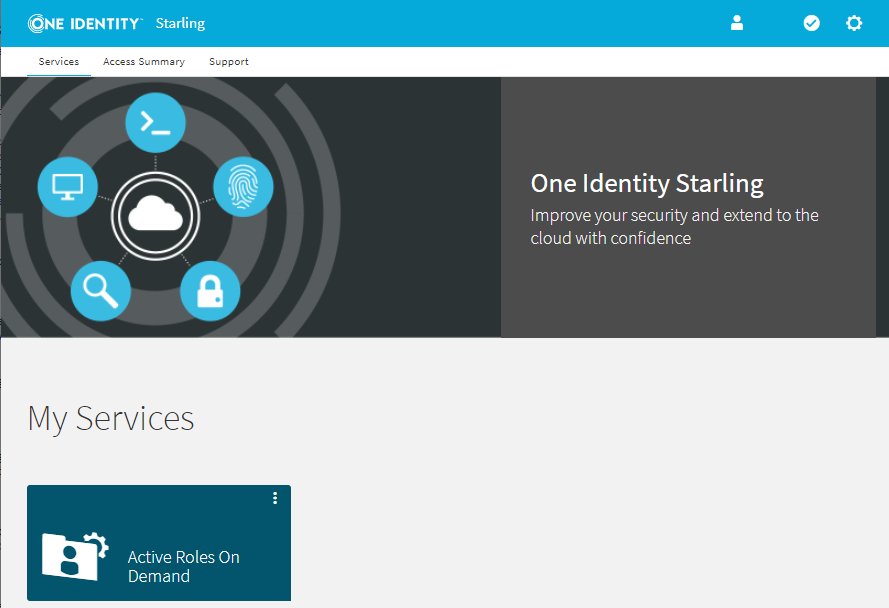
-
To start configuring the product, open the Application page of Active Roles On Demand.
-
To configure a product trial, open the View On Demand services ribbon at the bottom of the page and click Active Roles On Demand > Trial. This will create the trial subscription for you. Continue configuring the trial subscription as described in the next bullet point.
-
To configure a subscribed product (or an active product trial), click My Services > Active Roles On Demand.
-
In the Contact Information step, specify whether you are the technical contact for the One Identity Cloud Operations Team in your organization.
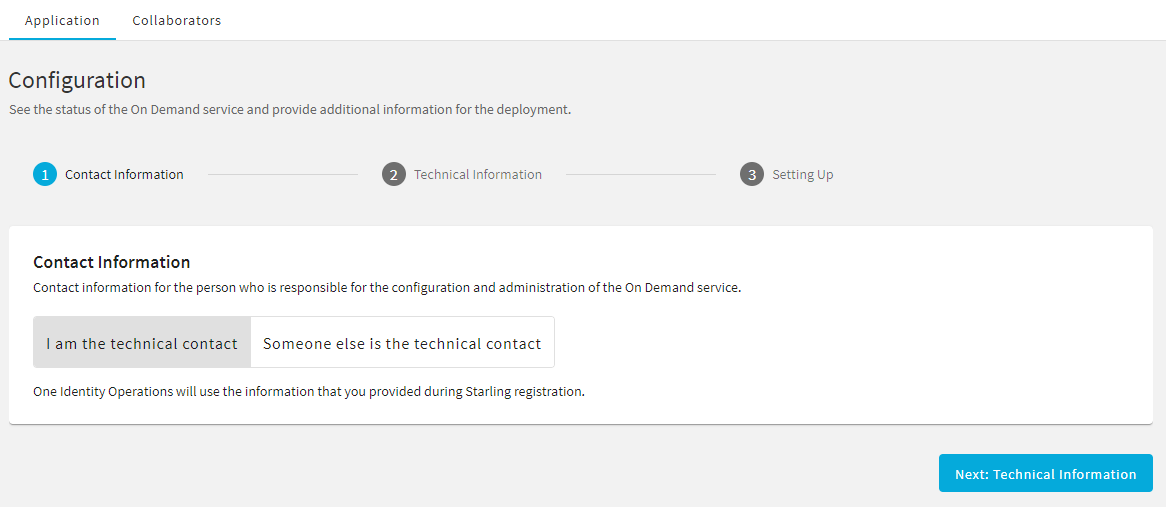
-
If you are the technical contact (that is you have all the technical information required by One Identity to configure and provision Active Roles On Demand), select I am the technical contact and click Next: Technical information.
-
If you are not the technical contact, then invite the contact who can provide the required configuration information. This is typically required if the initial On Demand invitation email was sent to you due to organizational policies, even if you are not the technical contact of the On Demand product. To invite the actual technical collaborator:
-
Select Someone else is the technical contact, then click Invite Collaborator.
-
In the Invite Collaborator dialog, provide the name and email address of the technical contact.
-
To send an invitation to the specified contact, click Invite.
TIP: You can also invite a technical contact by clicking Collaborators on the top left corner of the One Identity Starling web interface.
Once you sent the invitation to the technical contact, make sure that they perform the remaining steps.
-
In the Technical Information step, provide the required configuration information as instructed on-screen. To upload the offline domain join file created previously as described in Preparing the offline join of the Active Roles On Demand server, click Active Directory Domain Join File > Upload Join File.
-
To confirm the information you entered, click Submit Details. This opens the Confirm Details dialog, where you can either send the information to the One Identity Cloud Operations Team (Submit Details), or return to the Technical Information step and make any final changes (Edit Details).
NOTE: Once you submit the specified information, you cannot make any further changes, unless One Identity rejects the provided configuration information for some reason.
-
Once you sent the configuration information, the Setting Up step will indicate the status of provisioning and configuring Active Roles On Demand. One Identity will also send you an email notification each time the status of deployment changes.

The Setting Up step will also indicate if configuration fails for any reason (for example, because of incorrect data provided in the Technical Information step).

To open the Technical Information step and fix the provided information as requested by the One Identity Cloud Team, click Update Details. Once you updated the configuration details, resend them to the One Identity Cloud Operations Team by clicking Submit Details again in the Technical Information step.
Once Active Roles On Demand is configured for your organization, the Application page of Active Roles On Demand will display the connection and configuration data of your On Demand deployment.
