
Dell™ One Identity Cloud Access Manager 8.1.2 - How to Configure Microsoft SharePoint
Cloud Access Manager configuration prerequisites
Adding Microsoft® SharePoint™ to Cloud Access Manager using WS-Federation
Configuring a SharePoint™ 2010 or 2013 WS-Federation Trust using the Cloud Access Manager for Microsoft® SharePoint™ utility
Protecting your SharePoint™ website with Cloud Access Manager
Enabling SharePoint™ People Picker functionality
Using the SharePoint™ People Picker
Adding Microsoft® SharePoint™ to Cloud Access Manager using the reverse proxy
Troubleshooting
Legal notices
Installing Cloud Access Manager for SharePoint
Establishing a trust between Cloud Access Manager and SharePoint™
Manual configuration of a SharePoint™ 2013 Server WS-Federation Trust
Manual configuration of a SharePoint™ 2010 Server WS-Federation Trust
Installing Cloud Access Manager for SharePoint
|
1 |
|
2 |
Run the installer, which will install the software in its default location and add a link to your Windows® Start menu. Note: Cloud Access Manager for SharePoint requires Microsoft® .NET framework version 4.5 installed on your host. |
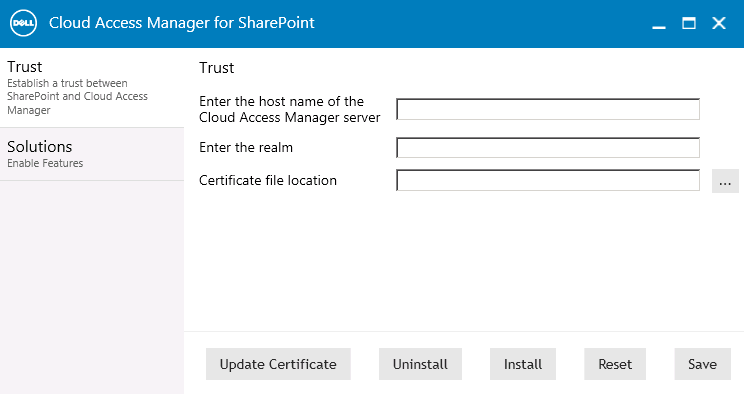
Establishing a trust between Cloud Access Manager and SharePoint™
|
2 |
Complete the fields on the Trust tab. You can obtain the realm value from the Cloud Access Manager SharePoint application configuration, Federation Settings | Relying Party Realm / Identity. |
Manual configuration of a SharePoint™ 2013 Server WS-Federation Trust
Note: These steps are an alternative method to using the Cloud Access Manager for Microsoft SharePoint utility described in Configuration of a SharePoint™ 2010 or 2013 WS-Federation Trust using the Cloud Access Manager for Microsoft® SharePoint™ utility.
For instructions on how to configure SharePoint™ 2010, please refer to Manual configuration of a SharePoint™ 2010 Server WS-Federation Trust.
Note: If you have added extra claims to the Claim Mapping page in the Cloud Access Manager SharePoint template, then you will need to add mappings for each extra claim here.
|
· |
use extra New-SPClaimTypeMapping commands, as for the EmailAddress default shown above. |
|
· |
then use the -ClaimsMappings parameter in the New-SPTrustedIdentityTokenIssuer command to create them in the Trust. |
Manual configuration of a SharePoint™ 2010 Server WS-Federation Trust
Note: These steps are an alternative to using the Cloud Access Manager for Microsoft SharePoint utility described in Configuration of a SharePoint™ 2010 or 2013 WS-Federation Trust using the Cloud Access Manager for Microsoft® SharePoint™ utility.
|
1 |
On the SharePoint server, open the SharePoint™ 2010 Management Shell, and enter the following commands to change SharePoint 2010 from classic-mode to claims-based authentication: |
Note: If you have added extra claims to the Claim Mapping page in the Cloud Access Manager SharePoint template, then you will need to add mappings for each extra claim here.
|
· |
use extra New-SPClaimTypeMapping commands, as for the EmailAddress default shown above. |
|
· |
then use the -ClaimsMappings parameter in the New-SPTrustedIdentityTokenIssuer command to create them in the Trust. |