
Overview
Topics:
For medium and large organizations, the proliferation of user accounts is a huge problem. As the number of line-of-business applications increases, the number of usernames and passwords that your staff are compelled to remember escalates to unmanageable levels. Over recent years the adoption of multi-tenant Software-as-a-Service (SaaS) has made the problem worse not better with each cloud application effectively managing its own independent user identity silo. The problem does not stop there, for every new user granted access to required resources a whole host of user accounts must be set up, one for each application. The cost of creating and managing these application accounts and the risk of authorization creep is significant. As the administrative processes required to manage application accounts for each individual become more time-consuming and complex, errors inevitably creep in and vulnerabilities to social engineering attacks and other such threats are introduced.
With Cloud Access Manager, whether your applications are hosted on your internal private network or in the cloud, your employees, partners, and customers require only a single username and password to gain secure access to their resources. In addition, if you demand stronger authentication, you can configure Cloud Access Manager to require a one-time-password (OTP). Users can access all of their applications through an easy-to-use, customizable application portal. You do not have to set up new user accounts across a range of applications every time you hire someone new, Cloud Access Manager will handle it all for you, creating user accounts as required.
The use of passwords to authenticate individuals is a trade-off between usability and security. If someone discovers a password by social engineering, network sniffing, shoulder surfing, keylogging or brute-force your business secrets and sensitive data are there for the taking. Because users only need to remember a single password there is no need for them to write their application passwords down, remember them, or even type them in. So, the vulnerability from this type of attack is greatly reduced. Because Cloud Access Manager only creates application accounts as needed with strong, hard-to-guess passwords, attackers do not have the easy option of compromising newly-created accounts with default initial passwords.
Cloud Access Manager delivers real productivity gains to your users while minimizing the effort needed to control access to your on-premise applications and cloud service accounts:
- Password wallet and identity federation functions provide your users with the convenience of Single Sign-On (SSO) to all applications, whether they run on your private network, or in the public cloud.
- Cloud Access Manager provides web access management functionality using its web proxy technology allowing you to securely expose your internal web applications to external users.
- An easy-to-use, customizable application portal provides your users with a convenient launchpad, allowing them to see, and navigate to the applications they are permitted to access.
- Identity federation with home realm discovery allows you to grant access to users in other forests within your own organization and external organizations.
- For extra security you can configure Cloud Access Manager to require a one-time passcode generated by an authentication token, or an X.509 certificate stored on a client computer or smart card.
- Just-in-time provisioning means that your users get access to the applications they need, when they need them and not before, giving you cost savings in license seats while at the same time reducing the administrative burden of application account provisioning.
- High availability deployment options provide continuity of service and scalability to millions of users.
Getting started with Cloud Access Manager
This guide takes you through the steps required to deploy a demonstration Cloud Access Manager environment on a single host. When completed, we will use the environment to demonstrate the Single Sign-On (SSO) capability of Cloud Access Manager to One Identity Active Roles using Integrated Windows Authentication (IWA).
|
|
NOTE: One Identity Active Roles is a separate product, refer to https://www.oneidentity.com/products/active-roles/ for further information. |

To add SSO to additional applications, for example Google Apps service using SAML Authentication, please refer to the One Identity Cloud Access Manager Configuration Guide. We recommend that this installation is performed within your local network on an Active Directory member server.
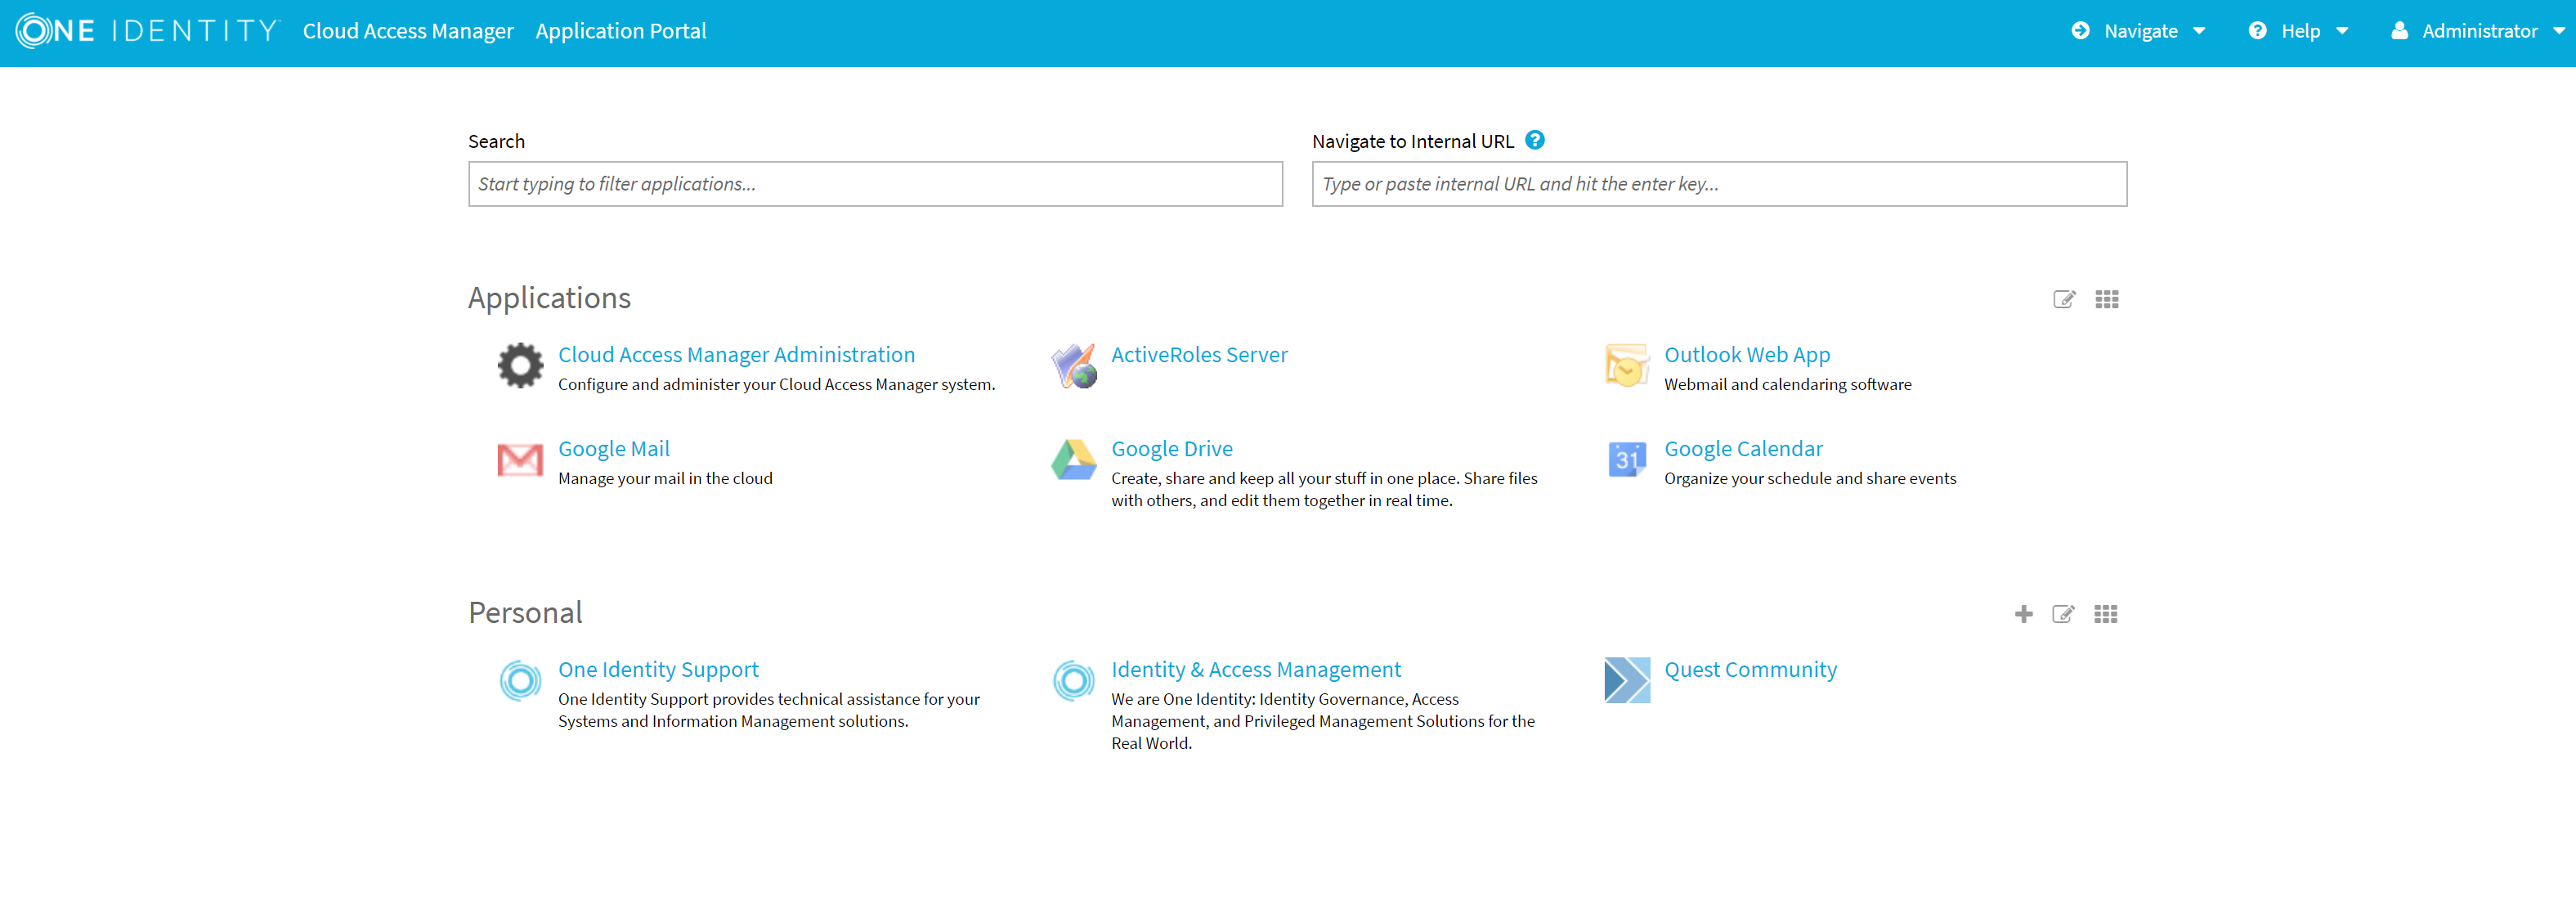
Figure 1: Cloud Access Manager Application Portal
Prerequisites
Make sure that the following prerequisites are met before installation, with the latest Microsoft Hotfixes applied.
- Operating system
- Microsoft Windows Server 2008 R2
- Microsoft Windows Server 2008 R2 Server Core
- Microsoft Windows Server 2012
- Microsoft Windows Server 2012 R2
- Microsoft Windows Server 2012 Server Core
- Microsoft Windows Server 2012 R2 Server Core.
- Microsoft Windows Server 2016
-
Domain member server — the host should be joined to the Active Directory domain containing the users that require SSO.
NOTE: Please be aware that Domain controllers are not valid Cloud Access Manager hosts.
- Hardware — the Cloud Access Manager host must have:
- 2 GHz Processor
- 2 GB Memory
- 30 GB Hard Disk.
- Internet connection — an internet connection is required for the installation process.
- Enhanced Security Configuration (ESC) is enabled in Internet Explorer by default on Windows Server platforms. This may prevent some features of Cloud Access Manager from functioning correctly. If you want to temporarily disable ESC, click the Configure IE ESC link in Windows Server Manager.
- If the browser on the Cloud Access Manager host is configured to use a proxy server, add the fully qualified domain name or IP address of the Cloud Access Manager host to the proxy's exceptions list to make sure that the Cloud Access Manager host is not proxied.
-
On a Proof of Concept installation, port 10443 is used to host the user interface (UI) and Security Token Service (STS). Make sure that port 10443 is not already being used by another application, this port is only used internally on the host.
NOTE: For a full list of installation prerequisites and additional software installed automatically during the Autorun, please refer to the One Identity Cloud Access Manager Installation Guide.
Installing Cloud Access Manager
To install Cloud Access Manager
-
Start the Autorun and navigate to the Install section.
NOTE: The Autorun cannot be used to install Cloud Access Manager on hosts running the Server Core installation option of Microsoft Windows Server. You must run the installer files directly from the command line.
- Click Install on the Cloud Access Manager IIS Components.
- Accept the license agreement. Click Next.
- Click Proof of Concept Installation.
-
Click Install to deploy the components required for Cloud Access Manager.
NOTE: Cloud Access Manager requires Microsoft .NET framework version 4.5. If this is not already installed on the host, the installer will download and install .NET framework from the Internet. Alternatively, an offline .NET 4.5 installer is available from the Cloud Access Manager Autorun, which you can install before Cloud Access Manager.
-
When the installation is complete, click Launch to start the configuration wizard.
NOTE: The configuration wizard may take a few moments to open when accessed for the first time; this is due to Internet Information Services (IIS) initializing and starting the web applications. Please wait until Internet Explorer opens and displays the Cloud Access Manager Welcome page.
-
When the configuration wizard has loaded, click Next.
- Enter a fallback password in the Password and Confirm password fields. You can use this password to access the Cloud Access Manager Administration interface, using the fallback link in the Start Menu, in the event that Active Directory authentication is unavailable. Click Next.
-
Cloud Access Manager will now configure its required components. When the configuration is complete, click Finish.
NOTE: For a full list of the steps required to deploy, backup, restore and upgrade a typical two host production installation of Cloud Access Manager, please refer to the One Identity Cloud Access Manager Installation Guide.
