The IT Shop allows users to request company resources such as software, system roles, or group membership as well as non-IT resources such as mobile telephones or keys. Furthermore, membership of a hierarchical role (department, location, cost center, or business role) can be requested through the IT Shop. The requests are processed by a flexible policy-based approval process. Introducing the IT Shop avoids time-consuming demands within the company and reduces the administration effort. The request history makes it possible to follow who requested which company resource or hierarchical role and when it was requested, renewed, or canceled.
Shops, shelves, customers, and products all belong to an IT Shop solution. Several shops can be grouped together into shopping centers. The shelves are assigned company resources in the form of products. Products can be grouped into service categories. All the service categories are summarized in a service catalog. Customers can select products from a service catalog in the Web Portal, add them to a cart, and send a purchase request.
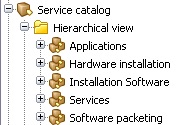
The following figure shows an example of a service catalog with service categories.
Figure 1: Example of a service catalog

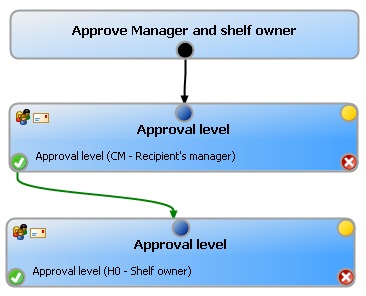
Requests follow a defined approval process that determines whether a product may be assigned or not. Products can be renewed or canceled. Approval processes can also be specified for renewals and cancellations. Approval policies are defined for approval processes. The approval policies are assigned to approval workflows for product requests, renewals, or cancellations.
Figure 2: Example of a simple approval workflow

The products are requested, renewed, and canceled through the Web Portal. Authorized employees have the option to approve requests and cancellations. For more information about this, see the One Identity Manager Web Designer Web Portal User Guide.
The following users are involved in the setting up and operating of an IT Shop system.
Table 1: Users
|
Administrators for the IT Shop |
Administrators must be assigned to the Request & Fulfillment | IT Shop | Administrators application role.
Users with this application role:
-
Create the IT Shop structure with shops, shelves, customers, templates, and service catalog.
-
Create approval policies and approval workflows.
-
Specify which approval procedure to use to find attestors.
-
Create products and service items.
-
Set up request notifications.
-
Monitor request procedures.
-
Administrate application roles for product owners and attestors.
-
Maintain members of the chief approval team.
-
Set up other application roles as required.
-
Create extended properties for company resources of any type.
-
Edit the resources and assign them to IT Shop structures.
-
Assign system entitlements to IT Shop structures. |
|
Product owners |
Product owners must be assigned to the Request & Fulfillment | IT Shop | Product owners application role or a child application role.
Users with this application role:
|
|
One Identity Manager administrators |
administrator and administrative system users Administrative system users are not added to application roles.
administrators:
-
Create customized permissions groups for application roles for role-based login to administration tools in the Designer as required.
-
Create system users and permissions groups for non role-based login to administration tools in the Designer as required.
-
Enable or disable additional configuration parameters in the Designer as required.
-
Create custom processes in the Designer as required.
-
Create and configure schedules as required. |
|
Role approver |
- Request approval in the Web Portal.
Approvers are determined through approval processes. |
|
Attestors for requests |
Attestors must be assigned to the Request & Fulfillment | IT Shop | Attestors application role.
Users with this application role:
-
Attest correct assignment of company resource to IT Shop structures for which they are responsible.
-
Attest objects that have service items assigned to them.
-
Can view main data for these IT Shop structures but not edit them.
NOTE: This application role is available if the Attestation Module is installed. |
|
Chief approval team |
Chief approvers must be assigned to the Request & Fulfillment | IT Shop | Chief approval team application role.
Users with this application role:
- Approve through requests.
- Assign requests to other approvers.
|
Identity & Access Lifecycle is already included in the default installation of One Identity Manager. This shop contains several shelves that have standard products assigned to them. You can use these products to request role or group memberships, for example, or to delegate duties. All active employees automatically become members of this shop and can therefore make requests.
You can use the Identity & Access Lifecycle shop to request standard products. Default approval policies are implemented for approving these requests. You can request any company resources you like by taking the default shop and extending it with your own shelves or by setting up your own IT Shop solution.
To use the Identity & Access Lifecycle shop
-
In the Designer, set the QER | ITSHOP configuration parameter.
In the default installation, the configuration parameter is set and the IT Shop is available. If the configuration parameter is not set, you can set it in the Designer and then compile the database.
If you disable the configuration parameter at a later date, model components and scripts that are not longer required, are disabled. SQL procedures and triggers are still carried out. For more information about the behavior of preprocessor relevant configuration parameters and conditional compiling, see the One Identity Manager Configuration Guide.
-
Install and configure the Web Portal.
The products are requested, renewed, and canceled through the Web Portal. Authorized employees have the option to approve requests and cancellations.
For more information, see the One Identity Manager Installation Guide and the One Identity Manager Web Designer Web Portal User Guide.
To customize the Identity & Access Lifecycle shop
-
Set up more shelves.
For more information, see Managing an IT Shop.
-
Prepare company resources for requesting.
For more information, see Preparing products for requesting.
-
Assign requestable products to the shelves.
For more information, see Assigning and removing products.
-
Set up the approval process.
In the default installation, different default approval policies are assigned to the Identity & Access Lifecycle shop. Therefore, requests from this shop are run through predefined approval processes.
You can also assign your own approval policy to the shop. For more information, see Approval processes for IT Shop requests.
-
If necessary, edit the dynamic role condition.
For more information, see Assigning employees through dynamic roles. For more information about creating the condition, see the One Identity Manager Identity Management Base Module Administration Guide.
To set up your own IT Shop solution
-
In the Designer, set the QER | ITSHOP configuration parameter.
In the default installation, the configuration parameter is set and the IT Shop is available. If the configuration parameter is not set, you can set it in the Designer and then compile the database.
If you disable the configuration parameter at a later date, model components and scripts that are not longer required, are disabled. SQL procedures and triggers are still carried out. For more information about the behavior of preprocessor relevant configuration parameters and conditional compiling, see the One Identity Manager Configuration Guide.
-
Set up shops, shelves, and customer node.
For more information, see Managing an IT Shop.
-
Prepare company resources for requesting.
For more information, see Preparing products for requesting.
-
Assign requestable products to the IT Shop.
For more information, see Assigning and removing products.
One Identity Manager makes different standard products available, which can be requested through the Identity & Access Lifecycle shop. You can also add these standard products to your own IT Shop.
-
Set up the approval process.
For more information, see Approval processes for IT Shop requests.
-
Install and configure the Web Portal.
The products are requested, renewed, and canceled through the Web Portal. Authorized employees have the option to approve requests and cancellations.
For more information, see the One Identity Manager Installation Guide and the One Identity Manager Web Designer Web Portal User Guide.
Related topics
The Application Governance Module allows you to quickly and simply run the onboarding process for new applications from one place. An application created with the Application Governance Module combines all the permissions application users require for their regular work. This way, you can assign application entitlements to your applications (such as system entitlements or system roles) and plan when they will be available as requestable products (service items) (for example, in the Web Portal).
For more information about the Application Governance Module, see the One Identity Manager Application Governance User Guide. For more information about configuring the Application Governance Module, see the One Identity Manager Web Application Configuration Guide.
Applications can also be set up in the Manager if the Application Governance Module is available. For more information about this, see the One Identity Manager Web Application Configuration Guide.


