Exporting the configuration of One Identity Safeguard for Privileged Sessions (SPS)
The configuration of One Identity Safeguard for Privileged Sessions (SPS) can be exported (for manual archiving, or to migrate it to another SPS unit) from the Basic Settings > System page. Use the respective action buttons to perform the desired operation.
You also have the option to export the configuration SPS into a local file using the console. For details, see Exporting and importing the configuration of One Identity Safeguard for Privileged Sessions (SPS) using the console.
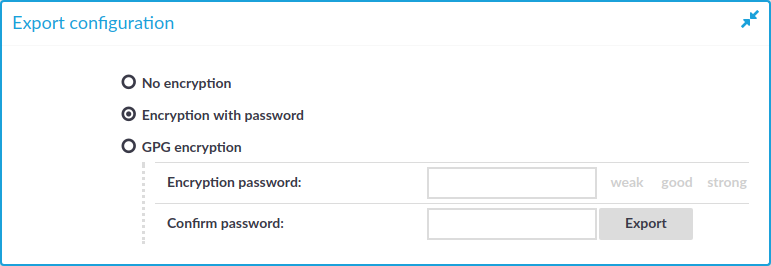
Figure 133: Basic Settings > System — Exporting the SPS configuration

To export the configuration of SPS
-
Navigate to Basic Settings > System > Export configuration.
-
Select how to encrypt the configuration:
-
To export the configuration file without encryption, select No encryption.
|

|
Caution:
One Identity does not recommend exporting the SPS configuration without encryption, as it contains sensitive information such as password hashes and private keys. |
-
To encrypt the configuration file with a simple password, select Encrypt with password and enter the password into the Encryption password and Confirm password fields.
NOTE: SPS accepts passwords that are not longer than 150 characters and supports the following characters:
-
To encrypt the configuration file with GPG, select GPG encryption. Note that this option uses the same GPG key that is used to encrypt automatic system backups, and is only available if you have uploaded the public part of a GPG key to SPS at Basic Settings > Management > System backup. For details, see Encrypting configuration backups with GPG.
-
Click Export.
NOTE: The exported file is a gzip-compressed archive. On Windows platforms, it can be decompressed with common archive managers such as the free 7-Zip tool.
The name of the exported file is <hostname_of_SPS>-YYYMMDDTHHMM.config, the -encrypted or -gpg suffix is added for password-encrypted and GPG-encrypted files, respectively.
Importing the configuration of One Identity Safeguard for Privileged Sessions (SPS)
The configuration of One Identity Safeguard for Privileged Sessions (SPS) can be imported from the Basic Settings > System page. Use the respective action buttons to perform the desired operation.
You also have the option to import configuration of SPS from a local file using the console. For details, see Exporting and importing the configuration of One Identity Safeguard for Privileged Sessions (SPS) using the console.
Figure 134: Basic Settings > System — Importing the SPS configuration

|

|
Caution:
It is not possible to import the configuration of an older major release (for example, 1.0) into a newer release (for example, 2.0). |
To import the configuration of SPS
-
|

|
Caution:
Do not export or import configuration between a physical SPS deployment and a virtual one. Because of the differences and limitations between physical and virtual appliances, configure the virtual appliance from scratch to ensure proper functionality. When you migrate a virtual SPS to another one, you can export and import the configuration. |
Navigate to Basic Settings > System > Import configuration.
-
Click Browse and select the configuration file to import.
-
Enter the password into the Encryption password field and click Upload.
NOTE: SPS accepts passwords that are not longer than 150 characters and supports the following characters:
Managing the One Identity Safeguard for Privileged Sessions (SPS) license
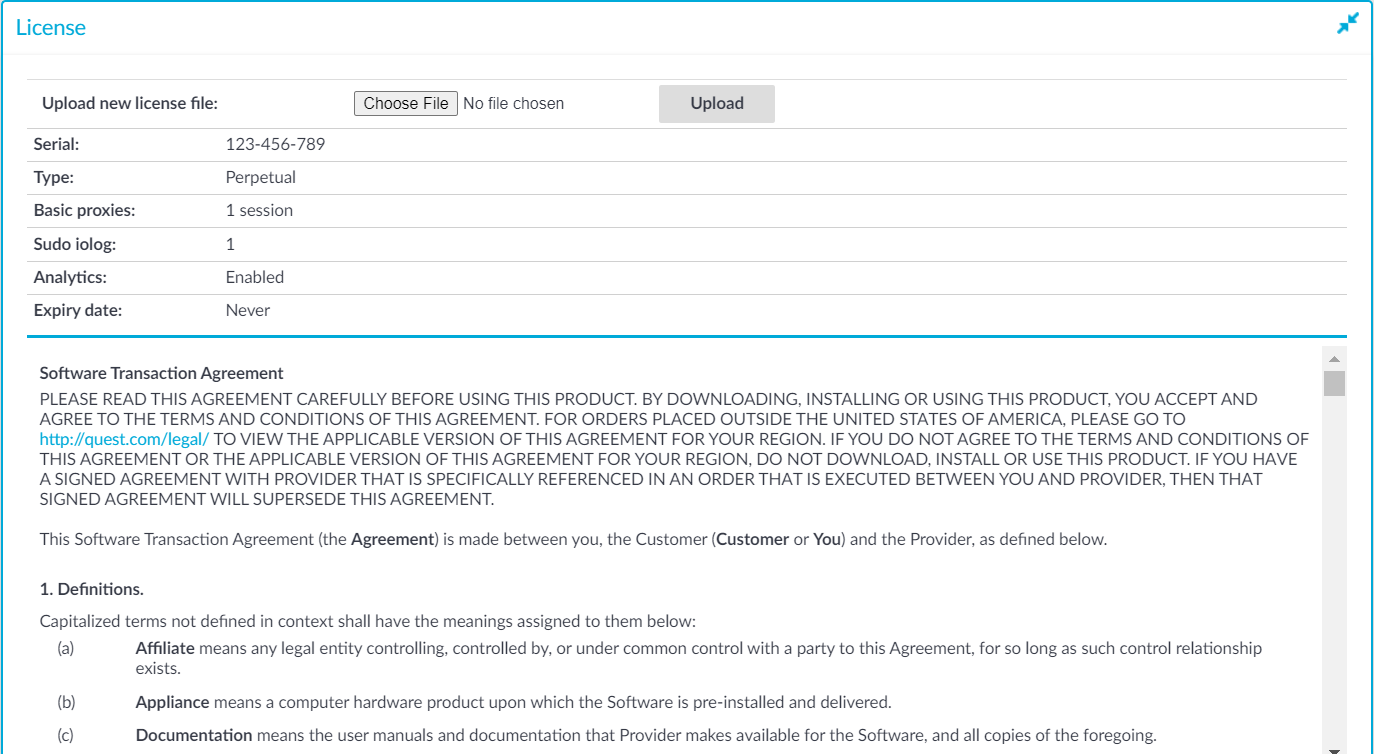
The Basic Settings > System > License page displays the following information of the current license:
Figure 135: Basic Settings > System > License — Updating the license

-
Serial: The unique serial number of the license.
-
Type: The license type, for example: Perpetual.
-
Basic proxies: The actual value of the sessions or hosts. You can select the following sub-options:
-
Host: Limits the number of servers (individual IP addresses) that can be connected through SPS.
-
Session: Limits the number of concurrent sessions (parallel connections) that can pass through SPS at a time (for example 25).
-
Sudo iolog: Number of enabled Sudo iolog connections.
For more information, see Using Sudo with SPS.
-
Analytics: Enables the Analytics option.
For more information, see Analyzing data using One Identity Safeguard for Privileged Analytics.
-
Expiry Date: The license expiration date. The date is displayed in YYYY-MM-DD format.
SPS starts sending automatic alerts daily, 60 days before the license expires.
Updating the SPS license
One Identity recommends that you update the SPS license before the existing license expires or when you purchase a new license.
|

|
Caution:
After upgrading to version 7.0 LTS, SPS requires a new license. To avoid possible downtimes due to certain features not being available, before starting the upgrade, ensure that you have a valid SPS license for 7.0 LTS.
Upgrade as follows:
-
Perform the upgrade to 7.0 LTS with your current license.
-
Update your SPS license to 7.0 LTS.
For a new SPS license for 7.0 LTS, contact our Licensing Team. |
To update the license
-
Navigate to Basic Settings > System > License.
-
Click Browse and select the new license file.
-
Click Upload, then Commit.


