Chat now with support
Chat with Support

Active Roles 8.2 - Administration Guide

Introduction Getting started with Active Roles Configuring rule-based administrative views Configuring role-based administration Configuring rule-based autoprovisioning and deprovisioning
Configuring Provisioning Policy Objects
User Logon Name Generation E-mail Alias Generation Exchange Mailbox AutoProvisioning Group Membership AutoProvisioning Home Folder AutoProvisioning Property Generation and Validation Script Execution O365 and Azure Tenant Selection AutoProvisioning in SaaS products
Configuring Deprovisioning Policy Objects
User Account Deprovisioning Group Membership Removal User Account Relocation Exchange Mailbox Deprovisioning Home Folder Deprovisioning User Account Permanent Deletion Office 365 Licenses Retention Group Object Deprovisioning Group Object Relocation Group Object Permanent Deletion Script Execution Notification Distribution Report Distribution
Configuring entry types Configuring a Container Deletion Prevention policy Configuring picture management rules Managing Policy Objects Checking for policy compliance Deprovisioning users or groups Restoring deprovisioned users or groups Configuring policy extensions
Using rule-based and role-based tools for granular administration Workflows
About workflow processes Workflow processing overview Workflow activities overview Configuring a workflow
Creating a workflow definition for a workflow Configuring workflow start conditions Configuring workflow parameters Adding activities to a workflow Configuring an Approval activity Configuring a Notification activity Configuring a Script activity Configuring an If-Else activity Configuring a Stop/Break activity Configuring an Add Report Section activity Configuring a Search activity Configuring CRUD activities Configuring a Save Object Properties activity Configuring a Modify Requested Changes activity Enabling or disabling an activity Enabling or disabling a workflow Using the initialization script
Approval workflow Email-based approval Automation workflow Activity extensions
Temporal Group Memberships Group Family Dynamic groups Active Roles Reporting Management History Entitlement profile Recycle Bin AD LDS data management One Identity Starling Join and configuration through Active Roles Managing One Identity Starling Connect Configuring linked mailboxes with Exchange Resource Forest Management Configuring remote mailboxes for on-premises users Migrating Active Roles configuration with the Configuration Transfer Wizard Managing Skype for Business Server with Active Roles
About Skype for Business Server User Management Active Directory topologies supported by Skype for Business Server User Management User Management policy for Skype for Business Server User Management Master Account Management policy for Skype for Business Server User Management Access Templates for Skype for Business Server Configuring the Skype for Business Server User Management feature Managing Skype for Business Server users
Exchanging provisioning information with Active Roles SPML Provider Monitoring Active Roles with Management Pack for SCOM Configuring Active Roles for AWS Managed Microsoft AD Azure AD, Microsoft 365, and Exchange Online Management
Azure tenant types and environment types supported by Active Roles Using Active Roles to manage Azure AD objects Unified provisioning policy for Azure M365 Tenant Selection, Microsoft 365 License Selection, Microsoft 365 Roles Selection, and OneDrive provisioning Changes to Active Roles policies for cloud-only Azure objects
Managing the configuration of Active Roles
Connecting to the Administration Service Managed domains Using unmanaged domains Evaluating product usage Creating and using virtual attributes Examining client sessions Monitoring performance Customizing the Console Using Configuration Center Changing the Active Roles Admin account Enabling or disabling diagnostic logs Active Roles Log Viewer
SQL Server replication Using regular expressions Administrative Template Configuring federated authentication Communication ports and URLs used by Active Roles Integrating Active Roles with other products and services Active Roles Language Pack Active Roles Diagnostic Tools Active Roles Add-on Manager

Enabling debugging for a script

You can attach a debugger to the script host of the Administration Service for a given policy script or scheduled task script. When the specified Administration Service runs the script, you can use the debugger for identifying and isolating problems.

To enable script debugging

  1. In the Console tree, navigate to Configuration > Script Modules.

  2. Right-click the script module that you want to debug, and select Properties.

  3. In the Properties window, select the Debugging tab, then select Enable debugging.

  4. Depending on type of the script, the following options are available:

    • If you are debugging a PowerShell script, select from the Debug trace level drop-down.

    • If you are debugging any other type of script, select the following:

      • (Optional) To automatically run the debugger when an error occurs, select Enter debugger on error.

      • (Optional) To freeze all operation while the debugger is running, select Break into debugger at the earliest opportunity.

      • In the Debug on server drop-down, select the Active Roles instance where you want the debugger to run.

Example: Restricting the group scope in a Script Execution policy

The policy described in this example scenario prevents administrators from creating a new universal group or converting an existing group to a universal group in Active Roles Console or Active Roles Web Interface.

The script checks the property values submitted to the Administration Service and analyzes the value of the groupType attribute to determine if the universal group scope option was set. If the script detects that the groupType value would set the group as a universal group, it raises a policy violation event in the Administration Service.

As a result, the application that initiated the request, such as the Active Roles Console or Web Interface, displays an error message provided by the script.

To implement this example scenario

  1. Import the script that implements this scenario.

    For more information, see Configuring the script module to restrict the group scope.

  2. Create and configure the Policy Object to run the script, then apply it to a domain, OU, or Managed Unit.

    For more information, see Creating and applying the Script Execution Policy Object to restrict the group scope.

As a result, neither the Active Roles Console, nor the Active Roles Web Interface can be used to set the universal group scope option when creating a new group or modifying an existing group.

Configuring the script module to restrict the group scope

The script used in this scenario is installed with the Active Roles SDK. By default, the file path and name of the script file is the following:

%ProgramFiles%\One Identity\Active Roles\Active Roles\SDK\Samples\RestrictGroupScope\RestrictGroupScope.ps1

To import the script using Active Roles Console

  1. In the Console tree, navigate to Configuration > Script Modules.

  2. Select the folder to which you want to add the script module.

    TIP: To create a new folder, right-click Script Modules, and select New > Scripts Container.

  3. Right-click the folder, and click Import.

    TIP: One Identity recommends storing custom script modules in a separate folder.

  4. Select the RestrictGroupScope.ps1 file, and click Open.

Creating and applying the Script Execution Policy Object to restrict the group scope

You can create and apply the Script Execution policy that is described in Example: Restricting the group scope in a Script Execution policywith the New Policy Object Wizard.

To configure the Script Execution policy to restrict the group scope

  1. In the Console tree, navigate to Configuration > Policies > Administration.

  2. To open the New Policy Object Wizard dialog, choose one of the following:

    1. To add a provisioning policy, right-click Administration, then select New > Provisioning Policy.

    2. To add a deprovisioning policy, right-click Administration, then select New > Deprovisioning Policy.

  3. On the Name and Description page, provide a unique Name for the new Policy Object. Optionally, also provide a Description. To continue, click Next.

  4. On the Policy to Configure page, select Script Execution, then click Next.

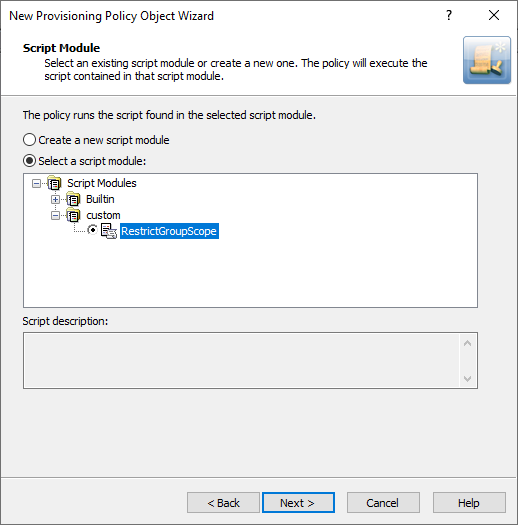
  5. On the Script Module page, click Select a script module, then select RestrictGroupScope from the list of script modules.

    Figure 38: Adding the RestrictGroupScope script module for the Policy Object

  6. (Optional) On the Policy Parameters page, edit the policy parameters:

    1. In the Function to declare parameters drop-down, choose the function that defines the parameters for the policy.

      The list contains the names of all script functions found in the selected script module.

    2. To view and change the values of policy parameters, under Parameter values, select the name of the parameter and click Edit.

    3. On the Edit Parameter page, modify the value of the parameter.

      NOTE: The selected parameter might have a predefined list of possible values. In such cases, you can only select values from that list.

  7. Click Next, then follow the instructions in the wizard to create (and optionally, immediately apply) the Policy Object.

  8. To apply the Policy Object:

    • Use the Enforce Policy page in the New Policy Object Wizard.

    • Alternatively, complete the New Policy Object Wizard, then use the Enforce Policy command on the domain, OU, or Managed Unit where you want to apply the policy.

    For more information on how to apply a Policy Object, see Linking Policy Objects to directory objects.

Related Documents

The document was helpful.

Select Rating

I easily found the information I needed.

Select Rating