
Configuring a front-end authentication method
Microsoft® Active Directory® authentication
Configuring smart card authentication
LDAP authentication
Microsoft® Active Directory® LDS
389 Directory Service
Novell® eDirectory™
Windows Azure™ Active Directory® authentication
SAML federated
WS-Federated
Social authenticators
Integration with password management applications
Primary credentials
Configuring user front-end authentication method selection
Adding a web application
Integrated Windows Authentication
Form fill authentication
Proxy-less form fill authentication
SAML federation
Configuring advanced SAML token settings
Configuring advanced WS-Federation token settings
OpenID Connect/OAuth 2.0
Manual user provisioning
HTTP basic authentication
HTTP header value
No back-end SSO
Exporting an application configuration template
Forwarding claims to federated applications
Adding HTTP headers to proxy applications
Configuring step-up authentication
Configuring front-end authenticators
Configuring each application
Configuring for external users
Configuring Defender as a Service with Cloud Access Manager
Using Dell's Security Analytics Engine
Enabling Dell's Security Analytics Engine
Configuring Cloud Access Manager to use Dell's Security Analytics Engine for access control
Managing your SSL certificate
Obtaining a signed certificate
Replacing an expiring certificate
Installing a fully signed certificate from a certificate archive file
Installing a certificate authority certificate
Changing the Cloud Access Manager service account password
Cloud Access Manager IIS Application Pool
Dell Redistributable Secure Token Server
Front-end authenticators
Reporting
Customizing Dell™ One Identity Cloud Access Manager
Further considerations
When you have added an application to Dell™ One Identity Cloud Access Manager, you may want to ensure that users only access the application using Cloud Access Manager. This may be required if you are using Cloud Access Manager to enforce strong authentication for the application, or want to use Cloud Access Manager’s auditing features to monitor application usage. For further information on how to ensure that users access the application using Cloud Access Manager, please refer to Preventing direct access to applications protected by Cloud Access Manager in the Dell™ One Identity Cloud Access Manager Security and Best Practice Guide.
SAML federation
|
1 |
Log in to the Administration Console using the desktop shortcut Cloud Access Manager Application Portal and select Add New from the Applications section on the home page. |
|
2 |
Click Configure Manually. |
|
3 |
|
4 |
If your service provider provides metadata for configuration, follow the instructions in this step to automatically configure the federation settings in Cloud Access Manager. Otherwise proceed to Step 5 to manually configure the federation settings. In the Federation Metadata URL field enter the federation metadata URL provided by your service provider. Alternatively, click Browse to locate the file containing federation metadata. Please refer to your service provider’s configuration interface for assistance locating this information. |
|
5 |
Enter the Recipient value for your SAML application, for example: https://www.google.com/a/<your_google_domain>/acs for Google Apps service If your service provider provides multiple Assertion Consumer Service (ACS) endpoints then you can add multiple entries by supplying an Index and Recipient for each entry. Click Add ACS Entry to add a new entry. Select the Default check box for the entry that will be the default if no Assertion Consumer Service URL or Index is specified in the SAML Authentication request. |
|
6 |
Enter the Audience / SP Identity value for your SAML application, for example, google.com for Google Apps™ service. |
|
7 |
If your service provider supports SAML logout enter the logout URL in the Application Logout URL field. |
|
NOTE: For logout requests to be sent to federated applications you must enable the Log out of federated applications on session termination option in Settings | Configuration Settings. |
|
• |
If your service provider signs their SAML Authentication requests, click the first Choose File button to upload the certificate used to sign the request. This certificate will then be used by Cloud Access Manager to verify the SAML Authentication requests have come from a trusted source. |
|
• |
If your service provider requires SAML Authentication responses to be encrypted, click the second Choose File button to upload the certificate used to encrypt the response. This certificate will be used by Cloud Access Manager to encrypt the assertion element of the SAML response. To proceed, click Next. |
|
9 |
|
10 |
Select the Derive the username from an attribute option and enter an attribute name of mail, then click Next. |
|
NOTE: This option uses the user’s email address stored in Active Directory® as their application username, known as the user’s SAML subject. You can change the suffix if required to match your Google domain. |
|
NOTE: Cloud Access Manager allows users to request their own application accounts. If the user is in a group that is authorized to access a particular application, the user can have a user account automatically created for them as they select it from their application catalog and add it to their portal page. Cloud Access Manager includes directory connectors, which allow user accounts to be provisioned from Cloud Access Manager into Google Apps™ service, Salesforce.com® and Microsoft® Office 365™. When a user adds an application to their portal page by selecting it from their application catalog, Cloud Access Manager automatically checks whether they already have a user account in that application’s directory. If the user does not, then an account is created for him or her through one of its directory connectors. The following three steps are for just-in-time provisioning of users and will only be displayed for applications for which Cloud Access Manager can provision users, such as Google Apps and Salesforce. |
|
11 |
Enter the credentials of a user account to provision new user accounts. Use the Test Connection button to validate the credentials before clicking Next. 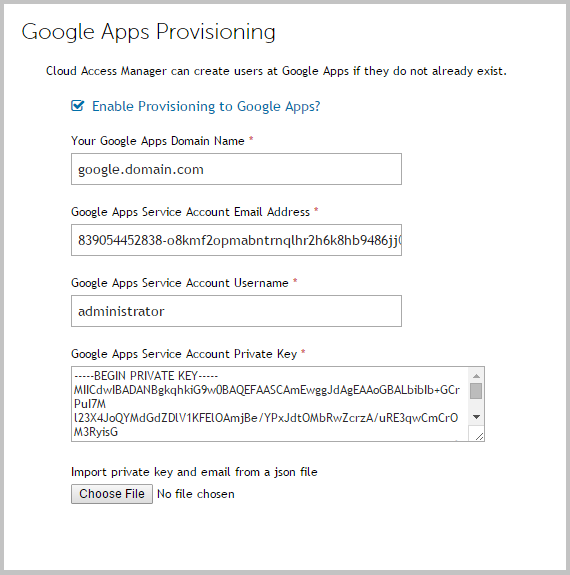 |
|
14 |
Click Next to continue. |
|
15 |
You will now see the Permissions page, which enables you to control the users who can access the application. By default, all Active Directory users have access to the application. You can restrict access to the application to users who belong to a specific Active Directory security group, but for this demonstration deployment, simply click Next to allow all Active Directory users access to the application. |
|
17 |
You can now configure how the application is displayed on the Cloud Access Manager Portal. Enter the Title and Description you want to display on the Cloud Access Manager Portal. |
|
18 |
|
19 |
|
20 |
Click Finish to complete the configuration of the application. |
|
21 |
Click Download Certificate to download the certificate created by Cloud Access Manager to import into your SAML application. In addition, make a note of the Issuer/IDP Service URL as this may be required by your SAML application. Click Close. |
|
NOTE: The Add application to application portal home and Allow user to remove application from application portal home options allow you to specify whether the application should appear automatically on each user’s portal page, and how the user can manage the application from the application portal. The options are shown in Table 4. |
|
|
|
|
|
|
|
|
|
|
|
To access the application catalog from the application portal, the user simply needs to click their username, then select Application Catalog. Depending on the settings in the Add application to application portal home and Allow user to remove application from application portal home options, the user can add or remove applications to/from the application portal.
Cloud Access Manager configuration is now complete.
Cloud Access Manager configuration is now complete.
|
1 |
|
2 |
|
3 |
Click Set up Single Sign-on (SSO). |
|
4 |
Select Enable Single-Sign-on. |
|
5 |
Enter the Cloud Access Manager Issuer/IDP Service URL that you noted in Step 21, into the Sign-in page URL and Change password URL fields. For example, enter: |
|
6 |
In the Sign-out page field, enter the URL: |
|
7 |
From the Verification certificate section, click Browse. Navigate to the Cloud Access Manager certificate obtained in the previous section, then click Upload. |
|
8 |
Click Save Change. |
For information on how to use the user mapping tool, please refer to the guide entitled Dell™ One Identity Cloud Access Manager How To Configure User Mapping.
|
1 |
Close Internet Explorer® to end your Cloud Access Manager session. |
|
2 |
Use the desktop shortcut Cloud Access Manager Application Portal to open the Cloud Access Manager portal. |
|
3 |
|
4 |
Browse to the Application Portal and click the Google Apps application. You are signed in automatically. |
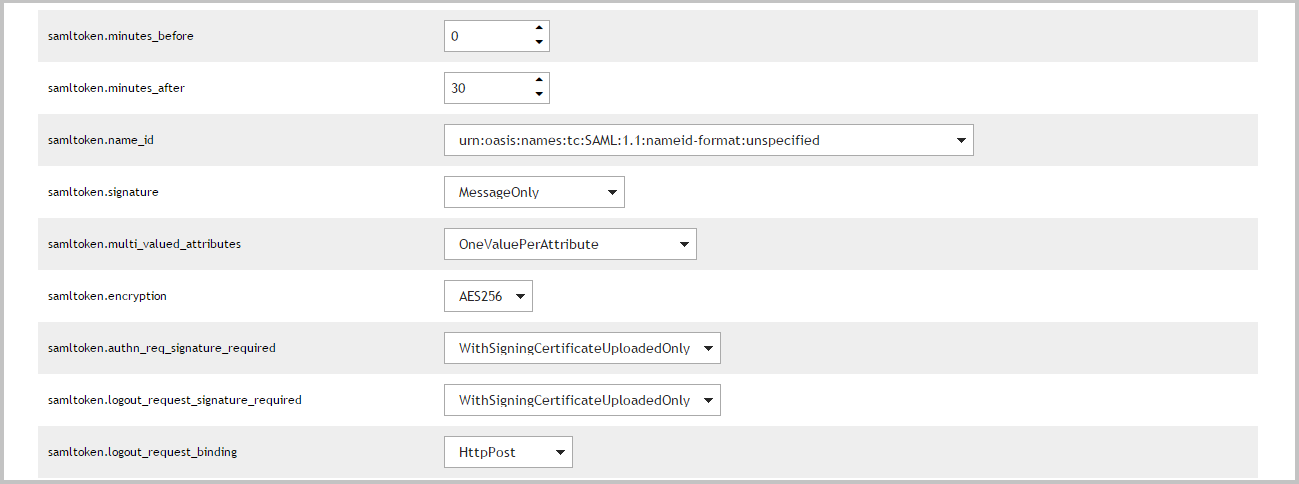
Configuring advanced SAML token settings
In most situations the SAML token produced by Dell™ One Identity Cloud Access Manager in response to an authentication request is accepted by the service provider. If the service provider has special requirements for the way the token is configured then you may modify the token options on the SAML Token Settings tab for the application.
|
|
The number of minutes before the token IssueInstant to set the NotBefore attribute in the Conditions element. |
||||||
|
The number of minutes after the token IssueInstant to set the NotOnOrAfter attribute in the Conditions and SubjectConfirmationData elements. |
||||||
|
The value of the Format attribute of the NameID element in the Subject. |
||||||
|
||||||
|
<Attribute Name="urn:example/role" NameFormat="urn:oasis:names:tc:SAML:2.0:attrname-format:uri">
|
||||||
|
||||||
|
||||||
|
||||||
|
The binding that will be used when sending logout requests to the application. Select Disabled to not send logout requests. |
Configuring advanced WS-Federation token settings
In most situations the WS-Federation token produced by Dell™ One Identity Cloud Access Manager, in response to an authentication request is accepted by the service provider. However, if a service provider has special requirements for the way the token is configured, then you can modify the token options on the WS-Fed Token Settings tab for the application.
|

|
The number of minutes before the token IssueInstant to set the NotBefore attribute in the Conditions element. |
||
|
The number of minutes after the token IssueInstant to set the NotOnOrAfter attribute in the Conditions element. |
||
|
The value of the Format attribute of the NameIdentifier element in the Subject. |
||
|
If HttpRedirect is selected then logout requests will be sent to the application. If Disabled is selected then logout requests will not be sent. |