
Logging in to One Identity Safeguard for Privileged Sessions (SPS) and configuring the first connection
Purpose
After finishing the initial configuration of One Identity Safeguard for Privileged Sessions (SPS) using the Welcome Wizard, connections must be configured between the clients and the servers. SPS inspects only the connections that are configured from the web interface, all other connections are forwarded without any inspection.
Steps
To enable a simple SSH terminal or a Remote Desktop session over a transparent and a non-transparent connection
-
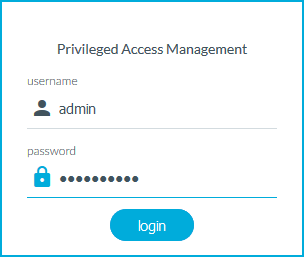
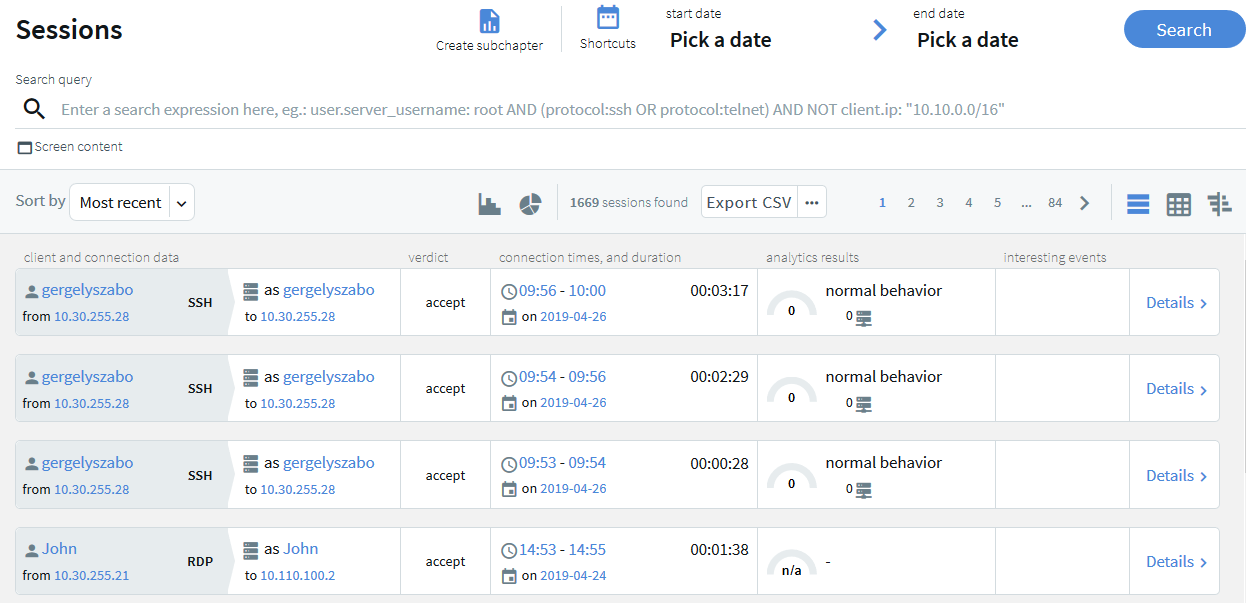
Login to SPS's web interface.
Figure 26: The first login
-
Open the https://IP-address-of-interface-1/ page from your browser to access the web interface of SPS. Replace the IP-address-of-the-interface-1 string with the IP set for interface 1 in the Networking settings section of the Welcome Wizard (see Configuring interface 1) (for example, 192.168.1.1).
-
The certificate created in the Certificate section of the Welcome Wizard (see Creating the web interface certificate) is displayed. Accept it.
-
Log in to the SPS web interface using the displayed login screen.
-
Enter admin into the Login field.
-
Enter the password set in the Users section of the Welcome Wizard (see Setting the administrator password) for the admin user into the Password field.
-
Click Login. The main page of the SPS administration interface is displayed.
-
-
-
Configure a new transparent connection.
-
-
To configure an SSH connection, select SSH Control > Connections from the Main Menu. Only terminal sessions will be permitted.
-
To configure an RDP connection, click on the RDP Control > Connections from the Main Menu. Only basic Remote Desktop sessions will be permitted (no file-sharing).
-
-
Click the
icon on the right to create a new connection.
-
Enter a name into the Name field that will identify the connection (for example, admin-server-transparent).
TIP: One Identity recommends that you use descriptive names that give information about the connection (that is, they refer to the name of the accessible server, the allowed users, and so on).
-
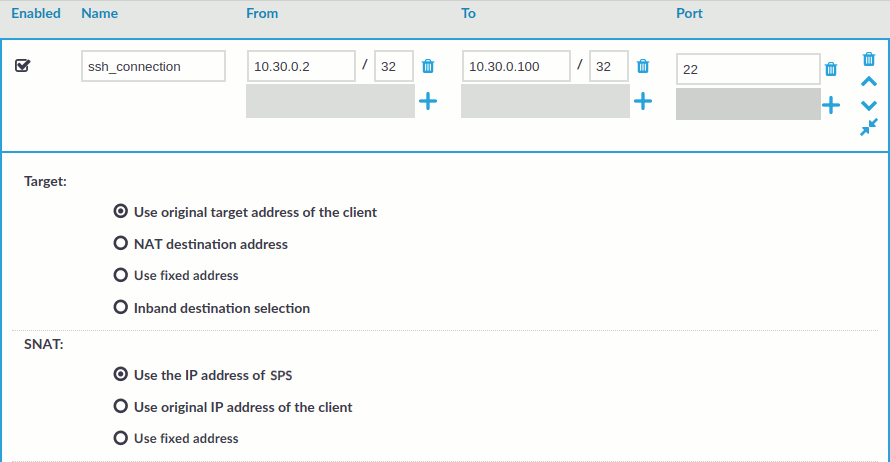
Enter the IP addresses defining the connection:
Figure 27: <Protocol name> Control > Connections — Configuring an SSH connection in transparent mode
-
Enter the IP address of the client that will be permitted to access the server into the From field.
You can use an IPv4 or an IPv6 address. To limit the IP range to the specified address, set the prefix to 32 (IPv4) or 128 (IPv6).
-
Enter the IP address of the server into the To field.
You can use an IPv4 or an IPv6 address. To limit the IP range to the specified address, set the prefix to 32 (IPv4) or 128 (IPv6).
-
Enter the port number where the server is accepting connections into the Port field.
-
-
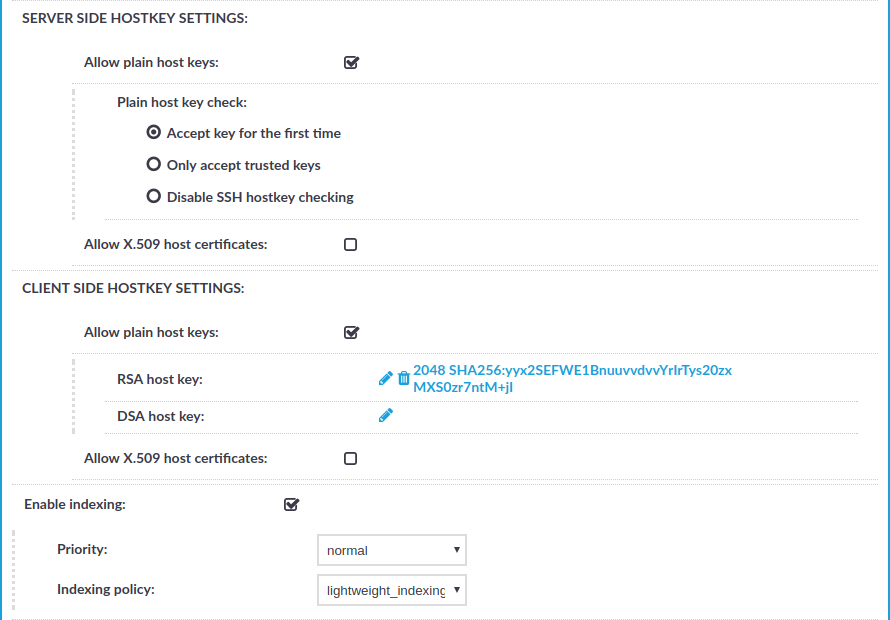
Select Enable indexing.
-
Click
.
This connection allows any user from the client machine to connect to the specified server, but permits only terminal sessions — other SSH channels like TCP forwarding are disabled.
-
-
Configure a new non-transparent connection.
-
-
To configure an SSH connection, select SSH Control > Connections from the Main Menu. Only terminal sessions will be permitted.
-
To configure an RDP connection, click on the RDP Control > Connections from the Main Menu. Only basic Remote Desktop sessions will be permitted (that is, no clipboard or file-sharing).
-
-
Click the
-
Enter a name into the Name field that will identify the connection (for example, admin-server-nontransparent).
TIP: One Identity recommends that you use descriptive names that give information about the connection (that is, they refer to the name of the accessible server, the allowed users, and so on).
-
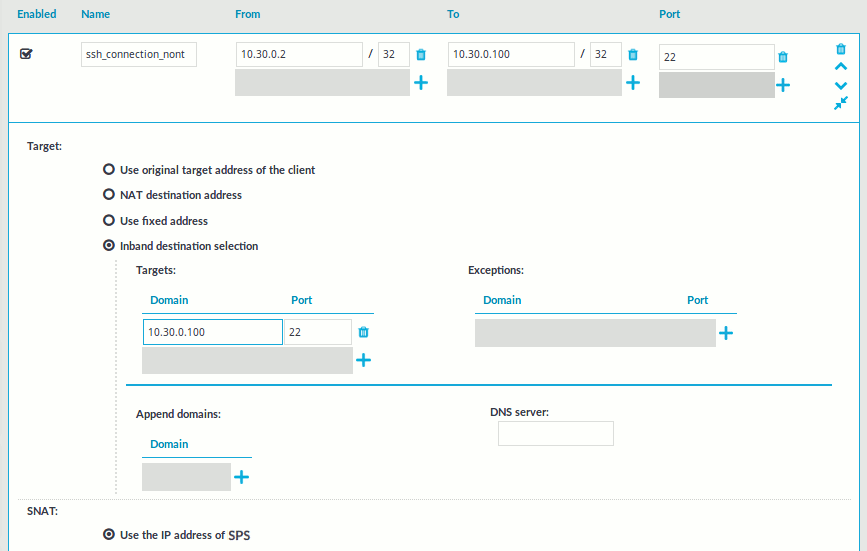
Enter the IP addresses defining the connection:
Figure 28: <Protocol name> Control > Connections — Configuring an SSH connection in non-transparent mode
-
Enter the IP address of the client that will be permitted to access the server into the From field.
You can use an IPv4 or an IPv6 address. To limit the IP range to the specified address, set the prefix to 32 (IPv4) or 128 (IPv6).
-
Enter the IP address of SPS's physical interface 1 into the To field.
You can use an IPv4 or an IPv6 address. To limit the IP range to the specified address, set the prefix to 32 (IPv4) or 128 (IPv6).
-
Enter a port number into the Port field.
-
Enter the IP address of the server into the Use fixed address field of the Target section.
You can use an IPv4 or an IPv6 address.
-
Enter the port number where the server is accepting connections into the Port field of the Target section.
-
-
Select Enable indexing.
-
Click
This connection allows any user from the client machine to connect to the specified server, but permits only terminal sessions — other SSH channels like TCP forwarding are disabled.
-
-
Test the new configuration: try to initiate an SSH or and RDP connection from the client to the server.
-
For the transparent connection, use the IP address of the server (as configured in Configuring a connection in transparent mode).
-
For the non-transparent connection, use the IP address and port of SPS (as configured in Configuring a connection in non-transparent mode).
-
-
After successfully connecting to the server, do something in the connection, for example, execute a simple command in SSH (for example, ls /tmp), or launch an application in RDP (for example, the Windows Explorer), then disconnect from the server.
-
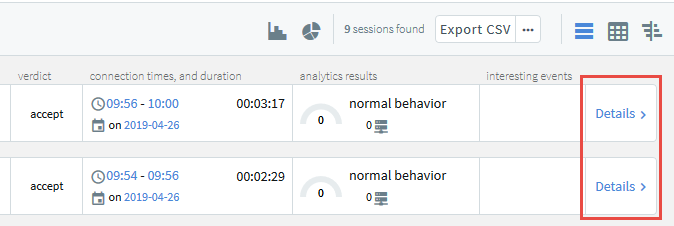
To access the Search interface, navigate to Search.
Figure 29: The Search interface
-
Find the session you want to replay on the Search page.
For more information about search criteria and other search-related options, see Using the Search interface.
Figure 30: Search — Accessing session details
For more information about the session info window and its contents, see Viewing session details.
-
Click
to display the details of the connection.
Alternatively, in the table view, click
.
-
Click
to generate a video file from the audit trail you want to replay. Depending on the load of the indexer and the length and type of the audit trail, this can take several minutes.
When the video is available,
and
. You can use the
- (Optional) If you have encrypted audit trails but the necessary certificates and private keys are not uploaded into your private keystore, you have to upload the keys first. After uploading them, click
. The
-
To replay the video, click
The Player window opens.
-
Play the audit trail, and review your actions.
For more information about audit trails, see sections Encrypting audit trails, Replaying audit trails in your browserand Replaying encrypted audit trails in your browser.

Basic settings
One Identity Safeguard for Privileged Sessions (SPS) is configured through the web interface. Configuration changes take effect automatically after clicking
-
For details about the supported browsers, see Supported web browsers and operating systems.
-
For details on how to use the web interface of SPS, see The structure of the web interface.
-
For details on how to configure the network interfaces, name resolution, and other networking-related settings, see Network settings.
-
For details on how to control (for example reboot) SPS, upload a new firmware or license, export the current configuration, or stop the incoming syslog traffic, see Network settings.
-
For details on how to set the system time and automatic time synchronization to an NTP server, see Configuring date and time.
-
For details on how to configure where SNMP and e-mail alerts are sent, see System logging, SNMP and e-mail alerts.
-
For details on how to configure system monitoring and alerts, see Configuring system monitoring on SPS.
-
For details on how to configure data and configuration backups, see Data and configuration backups.
-
For details on how to configure archiving, see Archiving and cleanup.
Supported web browsers and operating systems
|
|
Caution:
Since the official support of Internet Explorer 9 and 10 ended in January, 2016, they are not supported in One Identity Safeguard for Privileged Sessions (SPS) version 4 F3 and later. |

|
|
Caution:
Even though the One Identity Safeguard for Privileged Sessions (SPS) web interface supports Internet Explorer and Microsoft Edge in general, to replay audit trails you need to use Internet Explorer 11, and install the Google WebM Video for Microsoft Internet Explorer plugin. If you cannot install Internet Explorer 11 or another supported browser on your computer, use the the Safeguard Desktop Player application. For details, see "Replaying audit trails in your browser" in the Administration Guide and Safeguard Desktop Player User Guide. |
|
|
NOTE:
SPS displays a warning message if your browser is not supported or JavaScript is disabled. |
|
|
NOTE:
The minimum recommended screen resolution for viewing One Identity Safeguard for Privileged Sessions's (SPS's) web interface is 1366 x 768 pixels on a 14-inch widescreen (standard 16:9 ratio) laptop screen. Screen sizes and screen resolutions that are equal to or are above these values will guarantee an optimal display of the web interface. |
Supported browsers
The current version of Mozilla Firefox and Google Chrome, Microsoft Edge, and Microsoft Internet Explorer 11 or newer. The browser must support TLS-encrypted HTTPS connections, JavaScript, and cookies. Make sure that both JavaScript and cookies are enabled.
Supported operating systems
Windows 2008 Server, Windows 7, Windows 2012 Server, Windows 2012 R2 Server, Windows 8, Windows 8.1, Windows 10, Windows 2016, and Linux.
The SPS web interface can be accessed only using TLS-encryption and strong cipher algorithms.
Opening the web interface in multiple browser windows or tabs is not supported.
The structure of the web interface
|
|
NOTE:
The minimum recommended screen resolution for viewing One Identity Safeguard for Privileged Sessions's (SPS's) web interface is 1366 x 768 pixels on a 14-inch widescreen (standard 16:9 ratio) laptop screen. Screen sizes and screen resolutions that are equal to or are above these values will guarantee an optimal display of the web interface. |
Figure 31: Structure of the web interface

The web interface consists of the following main sections:
Main menu
Each menu item displays its options in the main workspace on one or more tabs. Click a Main menu item to display the list of tabs available under that particular menu item.
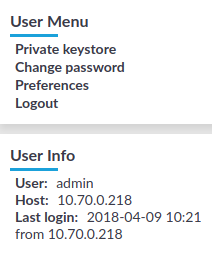
User Menu
Provides possibilities to upload your security passphrase and permanent or temporary keys, to change your SPS password, to log out, and disable confirmation dialogs and tooltips using the Preferences option. For details, see Preferences.
User Info
Provides information about the user currently logged in:
-
User: username
-
Host: IP address of the user's computer
-
Last login: date and IP address of the user's last login
Figure 32: User Menu and User Info
System Monitor
Figure 33: System Monitor
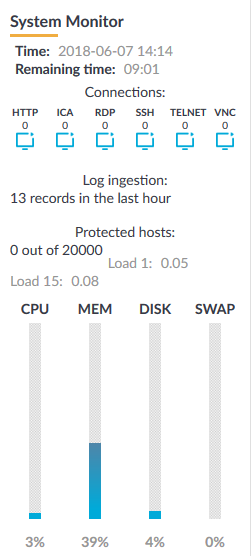
Displays accessibility and system health information about SPS, including the following:
-
Time: System date and time.
-
Remaining time: The time remaining before the session to the web interface times out.
NOTE: To change timeout settings, navigate to Basic Settings > Management > Web interface timeout and enter the timeout value in minutes.
-
Locked: Indicates that the interface is locked by another administrator (for details, see Multiple users and locking).
-
Indicators if HTTP, ICA, RDP, SSH, Telnet, and VNC traffic is permitted to the protected servers.
-
Connections: The number of active ICA, RDP, SSH, Telnet, and VNC connections. For HTTP, the number of active HTTP sessions is displayed.
-
License: License information if the license is not valid, or an evaluation version license has expired.
-
The status of the RAID devices, if synchronization between the disks is in progress.
-
HA: The HA status and the ID of the active node if two SPS units are running in a High Availability cluster. If there are redundant Heartbeat interfaces configured, their status is displayed as well. If the nodes of the cluster are synchronizing data between each other, the progress and the time remaining from the synchronization process is also displayed.
-
Protected hosts or Concurrent sessions: Displays license usage, that is, the number of hosts that have been accessed through SPS in case of host-based licensing, or the number of active sessions in case of session-based licensing.
-
Average system load during the
-
Load 1: last minute
-
Load 15: last fifteen minutes
-
-
CPU, memory, hard disk, and swap use. Hover the mouse above the graphical bars to receive a more details in a tooltip, or navigate to Basic Settings > Dashboard for detailed reports.
The System Monitor displays current information about the state of SPS. To display a history of these parameters, go to Basic Settings > Dashboard. For details, see Status history and statistics.