Configuring system monitoring on SPS
SPS supports the SNMPv2c and SNMPv3 protocols. The SNMP server set on the Management tab can query status information from SPS.

Configuring monitoring
The following describes how to configure monitoring.
To configure monitoring
-
Navigate to Basic Settings > Alerting & Monitoring.
-
The default threshold values of the parameters are suitable for most situations. Adjust the threshold values only if needed.
-
Click
.
-
Navigate to Basic Settings > Management and verify that the SNMP settings and Mail settings of SPS are correct. SPS sends alerts only to the alert e-mail address and to the SNMP server.
Caution: Sending alerts fails if these settings are incorrect.

The following sections describe the parameters you can receive alerts on.
-
For details on health-monitoring alerts, see Health monitoring.
-
For details on system-monitoring alerts, see System related traps.
-
For details on traffic-monitoring alerts, see Traffic related traps.
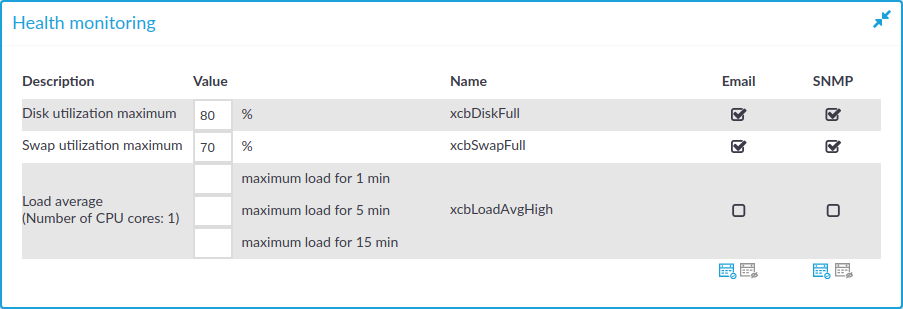
Health monitoring
SPS continuously monitors a number of parameters of the SPS hardware and its environment. If a parameter reaches a critical level (set in its respective Maximum field), SPS sends e-mail or SNMP messages to alert the administrator.
Figure 53: Basic Settings > Alerting & Monitoring — Health monitoring
-
Disk utilization maximum: Ratio of free space available on the hard disk. SPS sends an alert if the audit trails use more space than the set value. Archive the audit trails to a backup server to free disk space. For details, see Archiving and cleanup.
NOTE: The alert message includes the actual disk usage, not the limit set on the web interface. For example, you set SPS to alert if the disk usage increases above 10 percent. If the disk usage of SPS increases above this limit (for example to 17 percent), you receive the following alert message: less than 90% free (= 17%). This means that the amount of used disk space increased above 10% (what you set as a limit, so it is less than 90%), namely to 17%.
-
Load average: The average load of SPS during the last one, five, or 15 minutes.
-
Swap utilization maximum: Ratio of the swap space used by SPS. SPS sends an alert if it uses more swap space than the set value.
Preventing disk space fill-up
The following describes how to prevent disk space from filling up.
|
|
NOTE:
One Identity highly recommends this if One Identity Safeguard for Privileged Sessions (SPS) is hosted in a virtual environment. |
To prevent disk space from filling up
-
Navigate to Basic Settings > Management > Disk space fill-up prevention.
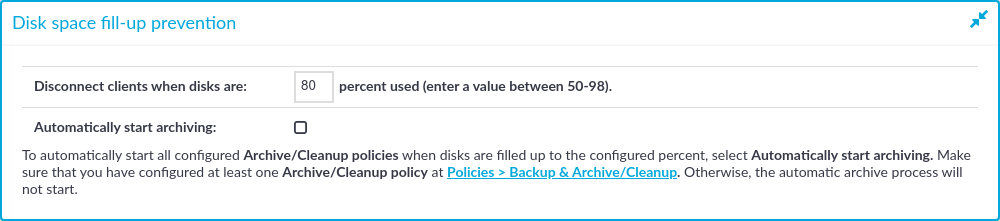
Figure 54: Basic Settings > Management > Disk space fill-up prevention — Preventing disk space fill-up
-
Enter the limit of maximum disk utilization in percents in the Disconnect clients when disks are: x percent used field. Make sure to enter a value between 50-98 percent. When disk space is used above the configured limit, SPS disconnects all clients. The default value is 80.
-
(Optional) To automatically start all configured archiving/cleanup jobs when disk usage goes over the limit, select the Automatically start archiving option.
For more information on configuring an archiving policy, see Archiving and cleanup.
NOTE:If there is no archiving policy configured, selecting this option will not trigger automatic archiving.
-
Click
-
Navigate to Basic Settings > Alerting & Monitoring > Health monitoring and enable alert Disk utilization maximum.
-
Click