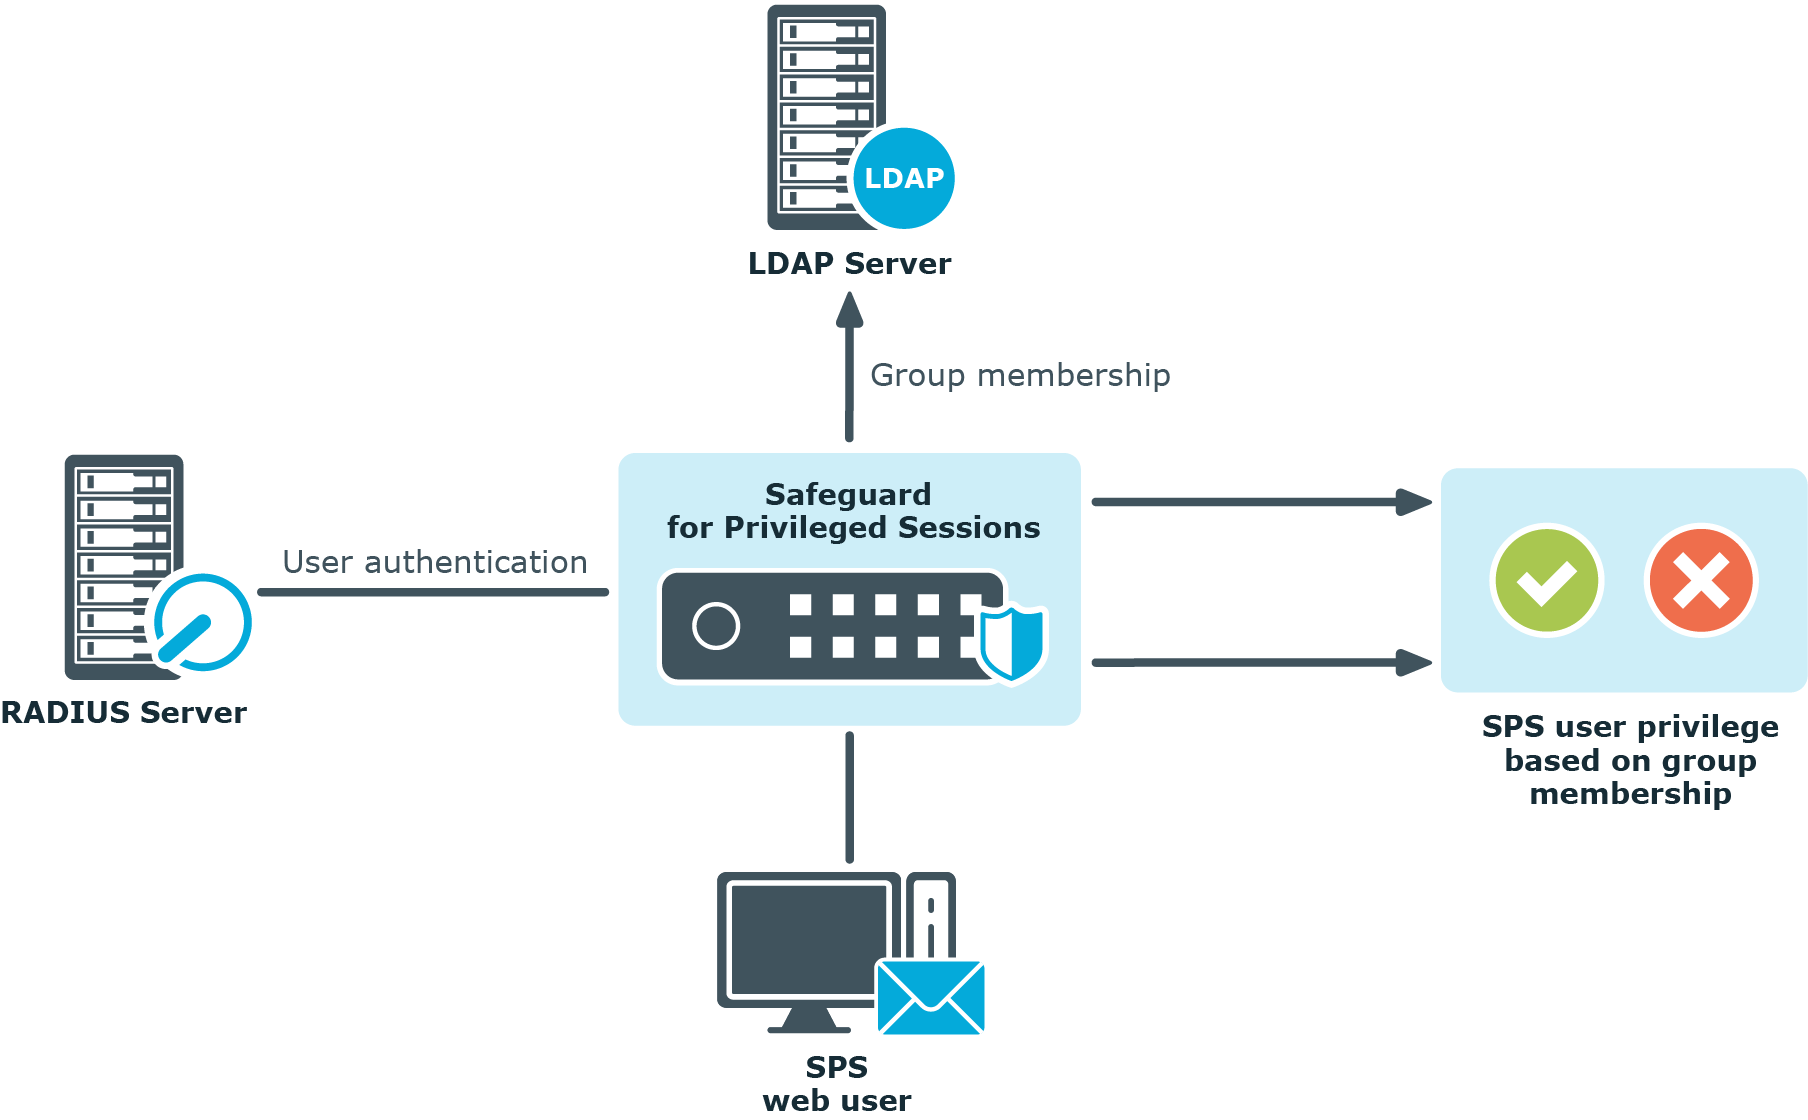
One Identity Safeguard for Privileged Sessions (SPS) has a web interface and is configured from a browser. The users of SPS can be authenticated using local, LDAP, or RADIUS databases. The privileges of users are determined by group memberships that can be managed either locally on SPS, or centrally in an LDAP database. Assigning privileges to groups is based on Access Control Lists (ACLs). It is also possible to match groups existing in the LDAP database to a set of SPS privileges. Access control in SPS is very detailed, it is possible to define exactly who can access which parts of the interface and of the stored data.
Figure 17: Authenticating the users of SPS
Cloud deployment considerations
Safeguard for Privileged Sessions (SPS) can be run from the cloud.
Before you start: platforms and resources
When setting up a virtual environment, carefully consider the configuration aspects such as CPU, memory availability, I/O subsystem, and network infrastructure to ensure the virtual layer has the necessary resources available. For more information on environment virtualization, see One Identity's Product Support Policies.
Platforms that have been tested with the cloud deployments are:
Safeguard for Privileged Sessions (SPS) can be run in the cloud using Amazon Web Services (AWS).
To deploy the Amazon Machine Image (AMI) of SPS from AWS, visit the AWS marketplace listing for Safeguard for Privileged Sessions (here) and follow the Deployment steps.
Limitations
-
If High Availability (HA) operation mode is required in a virtual environment, use the HA function provided by the virtual environment.
-
When running SPS in a virtual environment, use a single network interface.
-
During AWS installation, connecting directly to the Internet using a public IP address is not supported. Instead, you must access the Internet via a Virtual Private Network or a jump host.
-
Factory reset is not an option for virtual appliances. To factory reset a virtual appliance, just redeploy the appliance.
Disk size considerations
|

|
CAUTION: Before making any changes to the disk size, shut down the VM (stopped and deallocated). |
SPS deploys with a minimal OS disk size. You should increase the size of the OS disk based on your estimated usage and budget.
Disk size can be handled through Amazon Elastic Compute Cloud (Amazon EC2). For more information, see Getting Started with Amazon EC2. When you start up the VM, SPS automatically resizes the OS disk volume to use the available space.
AWS security considerations
Running SPS in AWS comes with some security considerations that do not apply to the hardware appliance. One Identity recommends:
Static IP address required
Configure the SPS VM with a static IP address in AWS. In AWS, the IP address must not change after the VM is deployed. If you need to change the IP address, take a backup, deploy again, and restore the backup. You can script the VM deploy to pick up an existing virtual NIC with the IP address configuration. For details, see the Amazon Virtual Private Cloud (VPC) documentation.
Deployment steps
AWS automatically licenses the operating system during the deployment with an AWS KMS.
AWS Marketplace steps
- Go to the AWS marketplace listing for SPS (here).
- On the One Identity Safeguard for Privileged Sessions page, click Continue to Subscribe.
-
Advance through the resource creation screens to configure your instance. In addition to the Disk size considerations, AWS security considerations, and Static IP address required, One Identity recommends you select the m4.2xlarge instance type.
-
Once you have finished configuring the instance, select to launch the instance.
NOTE: The instance launch process may take a while to complete.
-
Once the instance has finished launching, log into the web client using your static IP address. Change the admin password immediately. For more information, see Change password.
NOTE: Ensure that you upgrade SPS to the latest available release.
Purpose:
The following describes how to have a One Identity Safeguard for Privileged Sessions running in Microsoft Azure.
To have a One Identity Safeguard for Privileged Sessions running in Microsoft Azure
-
Deploy One Identity Safeguard for Privileged Sessions from the Microsoft Azure Marketplace
Create and configure a One Identity Safeguard for Privileged Sessions virtual machine (VM) in the Azure portal. For details, see the Microsoft Azure documentation, here we just describe the SPS-specific settings.
-
Login to the Azure portal, select One Identity Safeguard for Privileged Sessions from the Azure Marketplace, then click Create.
-
Fill the required fields of the Basics blade. Note that you must fill the User name and Authentication Password/SSH public key fields, but SPS will not actually use these settings (SPS will use the parameters you configure in the SPS Welcome Wizard).
-
Choose a size for the VM. If you want to use this machine in production and need help about sizing or architecture design, contact your One Identity sales representative.
The number of interfaces you can use depends on the size of your Azure VM. If your VM allows you to use multiple interfaces, you can configure multiple interfaces in SPS. For details, see VM with multiple NICs.
-
On the Settings blade, disable monitoring.
-
When the deployment is finished, navigate to the network settings of the new VM in the Azure portal. Change the IP address of the SPS network interface to Static, and note down the IP address and the hostname (you will need it in the SPS Welcome Wizard).
-
If you want to backup or archive data from SPS into Azure, create an Azure File Share. Note down the following information of the file share, because you will need it to configure SPS backups and archiving: URL, Username, Password.
|
|
Caution:
If you have multiple SPS VMs, make sure to use a separate file share for each SPS. |
-
Complete the SPS Welcome Wizard
Complete the SPS Welcome Wizard (for details, see "Configuring One Identity Safeguard for Privileged Sessions (SPS) with the Welcome Wizard" in the Administration Guide). Note the following points specific for Azure deployments. When configuring the network settings of SPS note the following points.
|
|
Caution:
Do not export or import configuration between a physical SPS deployment and a virtual one. Because of the differences and limitations between physical and virtual appliances, configure the virtual appliance from scratch to ensure proper functionality. When you migrate a virtual SPS to another one, you can export and import the configuration. |
-
Into the Physical interface EXT or 1 — IP address field, enter the static IP address of the SPS VM that you set on the Azure portal.
-
Default GW: The default gateway is usually the first address in a subnet (for example, if your subnet is 10.7.0.0/24, then the gateway will be 10.7.0.1).
-
Hostname: Use the hostname you have configured for the SPS VM on the Azure portal.
-
DNS server: You can use any DNS server that the SPS VM can access, even public ones.
-
Configure SPS
Login to SPS and configure it.
-
Configure backups for SPS. For backup and archiving purposes One Identity recommends the built-in file shares of Azure. For details on configuring backups, see "Data and configuration backups" in the Administration Guide.
-
Configure archiving for SPS. For backup and archiving purposes One Identity recommends the built-in file shares of Azure. For details on configuring backups, see "Archiving and cleanup" in the Administration Guide. Configuring Archiving policy is highly recommended: because if the disk of the VM fills up, SPS stops working.
-
Configure a server: set up a host that is on the same subnet as SPS, and enable Remote Desktop (RDP) or Secure Shell (SSH) access to it.
-
Configure a connection on SPS to forward the incoming RDP or Secure Shell (SSH) connection to the host and establish a connection to the host. See "Logging in to One Identity Safeguard for Privileged Sessions (SPS) and configuring the first connection" in the Administration Guide for details.
-
Replay your session in the browser. See "Replaying audit trails in your browser in Search (classic)" in the Administration Guide for details.
In case you have questions about SPS, or need assistance, contact your One Identity representative.
