Encrypting configuration backups with GPG
You can encrypt the configuration file of SPS during system backups using the public-part of a GPG key. The system backups of SPS contain other information as well (for example, databases), but only the configuration file is encrypted. Note that system backups do not contain audit-trail data.
When exporting the configuration of SPS, or creating configuration backups, always use encryption. Handle the exported data with care, as it contains sensitive information, including credentials. For details on encrypting the configuration, see "Encrypting configuration backups with GPG" in the Administration Guide.
For details on restoring configuration from a configuration backup, see Restoring One Identity Safeguard for Privileged Sessions (SPS) configuration and data.
|

|
NOTE:
It is not possible to directly import a GPG-encrypted configuration into SPS, it has to be decrypted locally first. |
Prerequisites:
You have to configure a backup policy before starting this procedure. For details, see Data and configuration backups.
You need a GPG key which must be permitted to encrypt data. Keys that can be used only for signing cannot be used to encrypt the configuration file.
To encrypt the configuration file of SPS during system backup
-
Navigate to Basic Settings > Management > System backup.
-
Select Encrypt configuration.
-
Click  .
.
-
To upload a key file, click Browse, select the file containing the public GPG key, and click Upload. SPS accepts both binary and ASCII-armored GPG keys.
-
To copy-paste the key from the clipboard, copy it, paste it into the Key field, then click Set.
-
Click  .
.
Archiving and cleanup
Archiving transfers data from SPS to an external storage solution, cleanup removes (deletes) old files. Archived data can be accessed and searched, but cannot be restored (moved back) to the SPS appliance. Only those closed audit-trail files are archived where the retention time has already elapsed.
To configure archiving and cleanup, you first have to create an archive/cleanup policy. Archive/cleanup policies define the retention time, the address of the remote backup server, which protocol to use to access it, and other parameters. SPS can be configured to use the SMB/CIFS and NFS protocols to access the backup server:
|

|
Caution:
Hazard of data loss Never delete an Archive Policy if data has been archived with it. This will make the already archived data inaccessible.
Do not "remake" an Archive Policy (that is, deleting an Archive Policy and then creating another one with the same name but different parameters). This will make data inaccessible, and identifying the root cause of the issue complicated.
If you want to change the connection parameters (that is when you perform a storage server migration), you must make sure that the share contents and file permissions are kept unmodified and there are no archiving or backup tasks running.
On the other hand, if you want to add a new network share to your archives, proceed with the following steps:
-
Create a new empty SMB/NFS network share.
-
Create a new Archive Policy that points to this network share.
-
Modify your Connection Policy(es) to archive using the newly defined Archive Policy.
-
Make sure to leave the existing Archive Policy unmodified.
It is also safe to extend the size of the network share on the server side. |
The different protocols assign different file ownerships to the files saved on the remote server. The owners of the archives created using the different protocols are the following:
|
|
Caution:
SPS cannot modify the ownership of a file that already exists on the remote server. |
Once you have configured an archive/cleanup policy, assign it to the connection you want to archive. For details, see Archiving or cleaning up the collected data.
Data about archived connections can be automatically deleted from the connection database. For details, see Configuring cleanup for the One Identity Safeguard for Privileged Sessions (SPS) connection database.
Creating a cleanup policy
Cleanup permanently deletes all audit trails and data that is older than Delete data from SPS after without creating a backup copy or an archive. Such data is irrecoverably lost. Use this option with care.
|
|
NOTE:
This policy does not delete existing archives from an external CIFS or NFS server. |
-
Navigate to Policies > Backup & Archive/Cleanup and click  in the Archive/Cleanup policies section to create a new cleanup policy.
-
Enter a name for the cleanup policy.
-
Enter the time when the cleanup process should start into the Start time field in HH:MM format (for example 23:00).
You can add the start time for additional cleanup processes.
|
|
Caution:
When specifying an additional start time, ensure that the previous cleanup process finishes before the new cleanup process starts. |
-
To cleanup the data collected on SPS more than once a day, click . You can schedule multiple cleanup times.
|
|
NOTE:
In case a cleanup process is not finished before the next one would start, the next cleanup process waits for the previous process to be completed. |
-
Fill the Delete data from SPS after field. Data older than this value is deleted from SPS.
-
To receive e-mail notifications, select the Send notification on errors only or the Send notification on all events option. Notifications are sent to the administrator e-mail address set on the Management tab, and include the list of the files that were backed up.
|
|
NOTE:
This e-mail notification is different from the one set on the Alerting & Monitoring tab. This notification is sent to the administrator's e-mail address, while the alerts are sent to the alert e-mail address (see Configuring system monitoring on SPS). |
-
Click .
-
To assign the cleanup policy to the connection you want to clean up, see Archiving or cleaning up the collected data.
Creating an archive policy using SMB/CIFS
The Move data to a remote server using SMB/CIFS archive method connects to a share on the target server with Server Message Block protocol. SMB/CIFS is mainly used on Microsoft Windows Networks.
|
|
NOTE:
Backup and archive policies only work with existing shares and subdirectories.
If a server has a share at, for example, archive and that directory is empty, when the user configures archive/scb1 (or similar) as a backup/archive share, it will fail. |
When deployed from the Azure Marketplace, you can use Azure File storage shares in your for Backup and Archive Policies. This is very useful as the quota for the files storage can be changed dynamically, so the cumulative size of the audit trails is not limited to the OS disk size. You can set up this share as a normal SMB shares in your Backup and Archive policies. The parameters for the policy can be obtained from the Azure portal.
|
|
Caution:
When you try to create backups and archives from SPS to NetApp devices using the CIFS protocol, the operation may fail with a similar error message: /opt/scb/mnt/14719217504d41370514043/reports/2010": Permission denied (13) '2010/day/' rsync: failed to set times on.
To overcome this problem, grant the SPS user "Full Control" access rights to the CIFS share on the NetApp device. |
|
|
Caution:
When using the CIFS protocol to backup or archive files to a target server running Windows 2008 R2 that uses NTLMv2 authentication, the operation may fail with a similar error message: CIFS VFS: Unexpected SMB signature
Status code returned 0xc000000d NT_STATUS_INVALID_PARAMETER
CIFS VFS: Send error in SessSetup = -22
CIFS VFS: cifs_mount failed w/return code = -22
CIFS VFS: Server requires packet signing to be enabled in /proc/fs/cifs/SecurityFlags.
CIFS VFS: cifs_mount failed w/return code = -95
CIFS VFS: Server requires packet signing to be enabled in /proc/fs/cifs/SecurityFlags.
CIFS VFS: cifs_mount failed w/return code = -95
To overcome this problem, either:
-
use the NFS protocol to access your Windows 2008 R2 servers, or
-
edit the registry of the Windows 2008 R2 server or apply a hotfix. For details, see Article 957441 in the Microsoft Support site. |
-
Navigate to Policies > Backup & Archive/Cleanup and click in the Archive/Cleanup policies section to create a new archive policy.
-
Enter a name for the archive policy.
-
Enter the time when the archive process should start into the Start time field in HH:MM format (for example 23:00).
You can add the start time for additional archive processes.
|
|
Caution:
When specifying an additional start time, ensure that the previous archive process finishes before the new archive process starts. |
-
To archive the data collected on SPS more than once a day, click . You can schedule multiple archive times.
|
|
NOTE:
In case an archive process is not finished before the next one would start, the next archive process waits for the previous process to be completed. |
-
Fill the Delete data from SPS after field. Data older than this value is archived to the external server.
|
|
NOTE:
The archived data is deleted from SPS. |
-
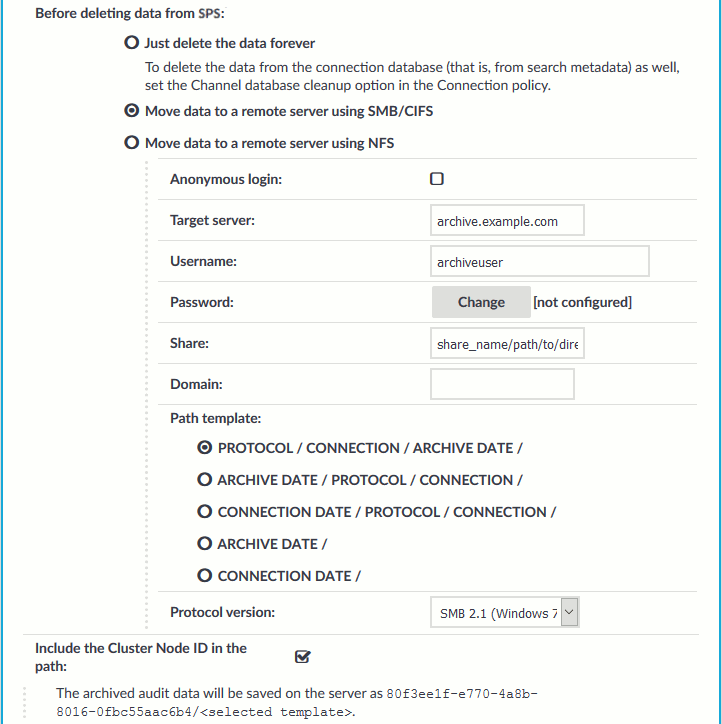
Select Move data to a remote server using SMB/CIFS from the Before deleting data from PSM radio buttons.
Figure 62: Policies > Backup & Archive/Cleanup — Configuring cleanup and archiving
-
Enter the username used to log on to the remote server into the Username field, or select the Anonymous login option.
Usernames can contain space.
-
Enter the password corresponding to the username into the Password field.
|
|
NOTE:
One Identity Safeguard for Privileged Sessions (SPS) accepts passwords that are not longer than 150 characters. The following special characters can be used: !"#$%&'()*+,-./:;<=>?@[\]^-`{|} |
-
Enter the name and directory path of the share into the Share field. Use the following format:
share_name/path/to/directory
You can use backslashes and forward slashes as well.
SPS saves all data into this directory, automatically creating the subdirectories. Archives of audit-trails are stored in the data, configuration backups in the config subdirectory.
-
Enter the domain name of the target server into the Domain field.
-
Select which SMB protocol to use when SPS connects to the server in the Protocol version field. Servers are usually backwards compatible with earlier protocol versions (for example, a server that supports version 2.1 supports versions 2.0 and 1.0 as well).
-
SPS organizes the audit trails into directories based on the date or the protocol. The subdirectories are created directly into the archive directory. Select one of the following directory structures:
-
Protocol/Connection/Archive Date/
-
Archive Date/Connection/Protocol/
-
Connection Date/Protocol/Connection/
-
Archive Date/
-
Connection Date/
For example, the Protocol/Connection/Archive Date template will have create subdirectories for the audited protocols (that is, ssh, rdp, telnet, vnc), for the name of the connection policy, and finally, for the date (YEAR-MONTH-DAY in YYYY-MM-DD format).
|
|
NOTE:
Connection Date refers to the time the connection started, while Archive Date to the time it was archived. The difference between the two dates depends on the retention time set for the archiving policy. |
-
When your SPS instance is a node in a cluster, select Include the Cluster Node ID in the path. This ensures that the ID of the node is included in the path of the relevant directory, which is required to prevent cluster nodes from archiving data to the same location, and so overwriting each other's data and resulting in data loss. In addition, having the node's ID in the directory name also enables easy identification.
|
|
Caution:
Hazard of data loss
Unchecking Include the Cluster Node ID in the path when your SPS is a node in a cluster can result in data loss if you have configured configuration synchronization across your cluster nodes. |
-
To receive e-mail notifications, select the Send notification on errors only or the Send notification on all events option. Notifications are sent to the administrator e-mail address set on the Management tab, and include the list of the files that were backed up.
|
|
NOTE:
This e-mail notification is different from the one set on the Alerting & Monitoring tab. This notification is sent to the administrator's e-mail address, while the alerts are sent to the alert e-mail address (see Configuring system monitoring on SPS). |
-
Click .
-
To assign the archive policy to the connection you want to archive, see Archiving or cleaning up the collected data.
