The Basic Settings > Network tab contains the network interface and naming settings of One Identity Safeguard for Privileged Sessions (SPS).
Interfaces:
Figure 39: Basic Settings > Network > Interfaces
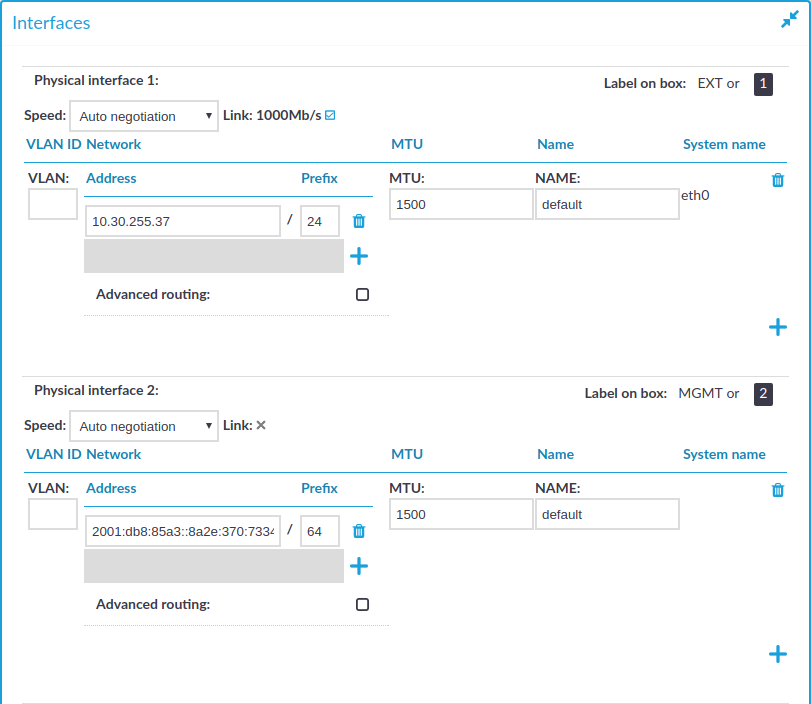
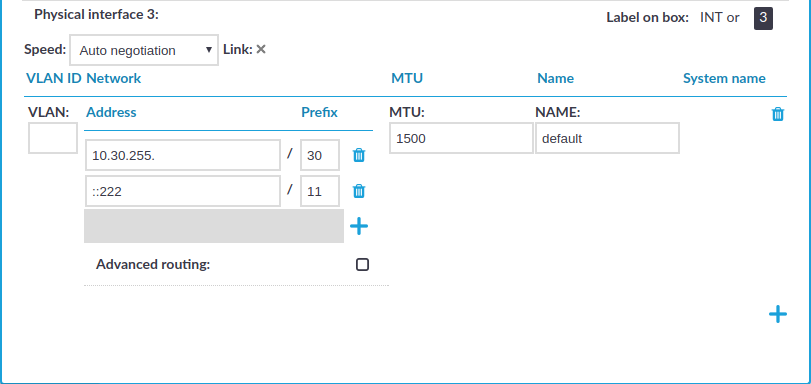
Lists all of the logical interfaces (VLAN IDs, IP addresses, netmasks, and names) assigned to the three physical interfaces of SPS. For more information on managing logical interfaces, see Managing logical interfaces.
In addition, it is also possible to set the Maximum Transmission Unit (MTU) for each network interface (VLAN or network interface card) individually. The default value is 1500.
Speed is displayed for every physical interface. To explicitly set the speed of the interface, select the new value from the Speed field. Modifying the speed of an interface is recommended only for advanced users.
You can add interface-specific network routes using the Advanced routing option of each interface. Otherwise, use the Routing table option to manage networking routes.
Routing table:
Figure 40: Basic Settings > Network > Routing table
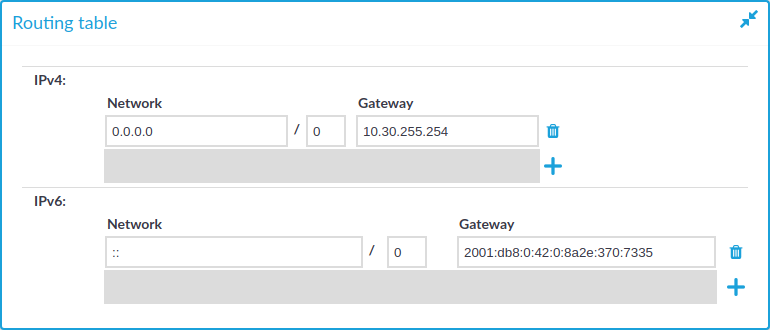
When sending a packet to a remote network, SPS consults the routing table to determine the path it should be sent. If there is no information in the routing table then the packet is sent to the default gateway. Use the routing table to define static routes to specific hosts or networks. You have to use the routing table if SPS interfaces are connected to multiple subnets.
Click the  and
and  icons to add new routes or delete existing ones. A route means that messages sent to the Address/Netmask network should be delivered to Gateway.
For detailed examples, see Configuring the routing table.
IP forwarding:
Figure 41: Basic Settings > Network > IP forwarding
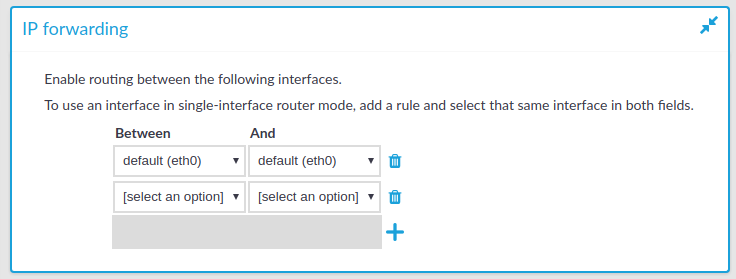
You can enable routing between logical interfaces, which allows you to direct uncontrolled traffic through SPS. For more information, see Routing uncontrolled traffic between logical interfaces.
To mimic the functionality of the deprecated Router mode, configure a logical interface for each physical interface you want to connect, and enable IP forwarding between them.
Naming:
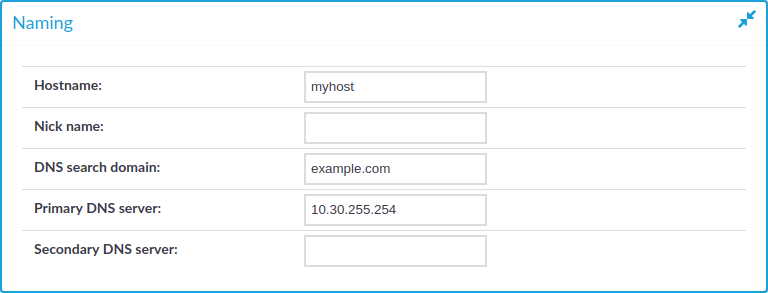
Figure 42: Basic Settings > Network > Naming
-
Hostname: Name of the machine running SPS.
-
Nick name: The nickname of SPS. Use it to distinguish the devices. It is displayed in the core and boot login shells.
-
DNS search domain: Name of the domain used on the network. When resolving the domain names of the audited connections, SPS will use this domain to resolve the target hostname if the appended domain entry of a target address is empty.
-
Primary DNS server: IP address of the name server used for domain name resolution.
-
Secondary DNS server: IP address of the name server used for domain name resolution if the primary server is unaccessible.
You can configure two separate login addresses for accessing the web interface of One Identity Safeguard for Privileged Sessions (SPS):
-
Web login for administrators and users: On this address, users can, depending on their access privileges, modify the configuration of SPS, and perform authentication-related activities (gateway authentication, 4-eyes authorization).
-
Web login for users only: The configuration of SPS cannot be viewed or altered from this address. Users (even ones with administrator privileges) can only perform gateway authentication and 4-eyes authorization.
Both login addresses can be configured to restrict connections to a configured set of IP addresses only.
|

|
NOTE:
Avoid using the IP address configured for administrator or user login on One Identity Safeguard for Privileged Sessions (SPS) when configuring HTTP or SSH connections. |
The login addresses are, by default, protected against brute-force attacks: after five unsuccessful login attempts, all following attempts are denied for increasing periods of time. You can turn this off by unselecting the Protect against brute-force attacks option for the web login addresses.
To configure two separate login addresses for accessing the web interface of SPS
-
Navigate to Basic Settings > Local Services > Web login.
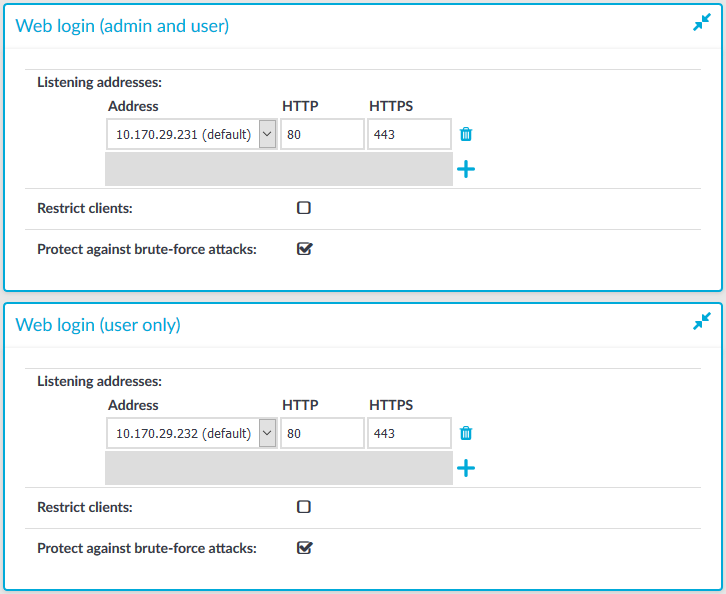
Figure 43: Basic Settings > Local Services > Web login — Configuring web login address
-
Choose in the Listening addresses field.
-
Enter the IP address to use for connecting to SPS's user interface into the Address field.
The available addresses correspond to the interface addresses configured in Basic Settings > Network > Interfaces. Only IPv4 addresses can be selected.
-
Enter the port number for HTTP connections into the HTTP field.
-
Enter the port number for HTTPS connections into the HTTPS field.
-
(Optional) To permit access to the SPS web interface only from selected subnets or IP addresses, select Restrict clients, click and enter the IP address and netmask of the allowed clients. Note that these settings do not affect the SSH access to SPS.
|

|
Caution:
Permit administrative access to SPS only from trusted networks. If possible, monitored connections and administrative access to the SPS web interface should originate from separate networks.
After comitting the changes, the web interface will be available only from the configured subnets or IP addresses. |
Use an IPv4 address.
-
Recommended: configure a separate login address for user connections in Web login (user only). The configuration settings of SPS cannot be viewed or modified from this address.
-
Click  .
.
You can assign logical interfaces to a physical interface. Each logical interface must have its own VLAN ID, and can have its own set of (alias) IP addresses and prefixes. The configured name for each logical interface is visible on One Identity Safeguard for Privileged Sessions (SPS)'s user interface only.
You can configure IPv4 and IPv6 addresses as well. IPv6 is intended for configuring monitored connections. Local services (including the web login) require IPv4 addresses. An interface can have multiple IP addresses, including a mix of IPv4 and IPv6 addresses.
|
|
NOTE:
SPS does not support scenarios with two hosts using the same IP address on different VLAN groups. |
To manage logical interfaces
-
Navigate to Basic Settings > Network > Interfaces.
Figure 44: Basic Settings > Network > Interfaces — Managing the logical interfaces
-
If necessary, use the label on the SPS hardware to identify the physical interface to which you want to assign a logical interface.
-
Choose to add a new logical interface. Provide the following:
-
VLAN: The VLAN ID of the logical interface. Optional.
|
|
Caution:
Do not set the VLAN ID unless your network environment is already configured to use this VLAN. Otherwise, your SPS appliance will be unavailable using this interface. |
-
Address: The IP address of the logical interface.
You can also enter a hostname instead of the IP address, and One Identity Safeguard for Privileged Sessions (SPS) automatically resolves the hostname to IP address. Note the following limitations:
-
SPS uses the Domain Name Servers set Basic Settings > Network > Naming > Primary DNS server and Secondary DNS server fields to resolve the hostnames.
-
If the Domain Name Server returns multiple IP addresses, SPS selects randomly from the list.
|
|
NOTE:
Do not use IP addresses that fall into the following ranges:
|
-
Prefix: The IP range of the logical interface.
-
Optional: To add additional (alias) IP addresses and prefixes to a logical interface, click . To remove an alias IP address, click the corresponding .
-
MTU: Maximum Transmission Unit (MTU) to set per network interface (VLAN or network interface card). The default value is 1500.
-
Name: The name of the logical interface. This name is visible on SPS's user interface only.
To remove a logical interface, choose the on the right side.
-
Click .
You can enable routing between logical interfaces, which allows you to direct uncontrolled traffic through SPS.
To enable routing between logical interfaces
-
Navigate to Basic Settings > Network > IP forwarding.
Figure 45: Basic Settings > Network > IP forwarding — IP forwarding between interfaces
-
To add a new forwarding rule, choose and select the two logical interfaces to connect. You can select the same interface in both fields to use that logical interface in single-interface router mode.
To delete an existing rule, choose .
-
Click .
