One Identity Safeguard for Privileged Sessions (SPS) version 3.2 and later provides an interface to query the user-rights and privileges of individual users and user groups. To display the privileges of a user or usergroup, navigate to AAA > Permission Query, enter the name of the user or group into the respective field, then click Filter. Note that:
-
It is not possible to filter on both the username and the group at the same time.
-
Partial matches are also displayed.
-
Usergroups can be local usergroups, userlists, or LDAP usergroups.
Web interface permissions
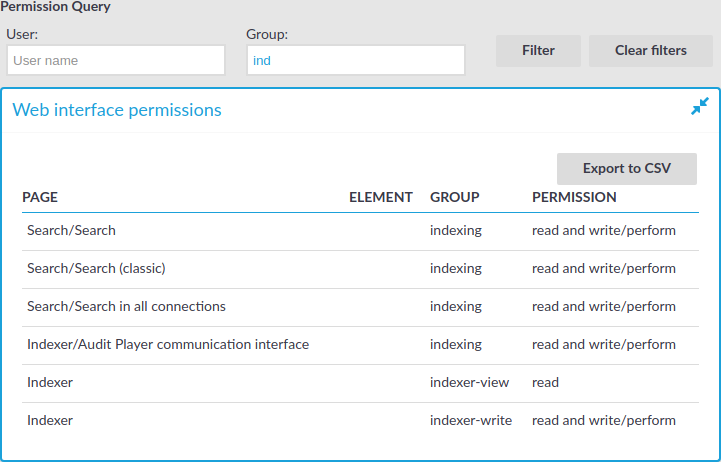
For usergroups accessing the SPS web interface, a table is displayed that lists the pages of the SPS web interface that the user or usergroup can access. The following information is displayed:
-
Page: The name of the page or group of pages, for example, Basic Settings.
-
Element: If a group has access only to a section of a page, the name of the element is listed here. For example, a particular Channel Policy.
-
Group: The name of the usergroup.
-
Permission: The type of access that the user or usergroup has to the page: read or read and write/perform.
Figure 82: AAA > Permission Query — Displaying web interface permissions
Connection permissions
To review which servers a user or usergroup can access, SPS collects the main information about the connections the user or group is permitted to use. The following information is displayed.
|

|
NOTE:
To display the usergroups that can access a specific Connection Policy, open the Connection Policy, then select Show connection permissions > Show on the Connections page. |
Figure 83: AAA > Connection permissions — Displaying connection permissions

-
Gateway group: Lists the group memberships required to access the connection. Group memberships can be restricted at the following places:
-
Connection > Gateway authentication > Groups
-
Channel Policies > Gateway group
-
Policies > Usermapping Policies > Groups
-
Source: Refers to the following field from the session database:
Source IP: The IP address of the client.
-
To: Refers to the following field from the session database:
Destination IP: The IP address of the server as requested by the client.
-
To port: Refers to the following field from the session database:
Destination port: The port number of the server as requested by the client.
-
Target: Refers to the following field from the session database:
Server IP: The IP address of the server connected by SPS.
-
Target port: Refers to the following field from the session database:
Server port: The port number of the server connected by SPS.
-
Remote user: Refers to the following field from the session database:
Username on server: The username used to log in to the remote server. This username can differ from the client-side username if usermapping is used in the connection. For details on usermapping, see Configuring usermapping policies.
-
Remote group: The group that can access the destination server, as set in the Usermapping Policy (if any).
-
Protocol: The protocol used in the connection (Citrix ICA, HTTP, RDP, SSH, Telnet, or VNC).
-
Connection: Refers to the following field from the session database:
Connection policy ID: The identifier of the connection policy.
-
Authorizer: Refers to the following field from the session database:
Four-eyes authorizer: The username of the user who authorized the session. Available only if 4-eyes authorization is required for the channel. For details on 4-eyes authorization, see Configuring four-eyes authorization.
-
Auth type: The authentication method used in the client-side connection during gateway authentication.
-
Channel: The type of the channel, for example, session-shell.
-
Time: The name of the Time Policy used in the connection.
-
LDAP: The name of the LDAP Server used in the connection (if any).
-
Credential store: The name of the Credential Store used in the connection (if any).
-
Audit: Indicates if the connection is recorded into audit trails.
Usergroup memberships
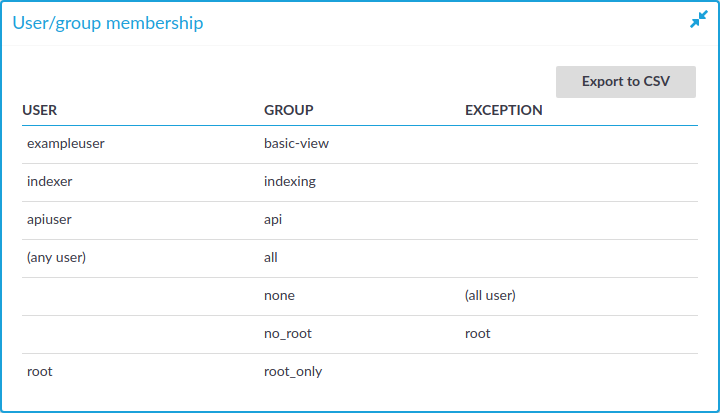
When searching for users, the table displays the group memberships of the matching users. When searching for usergroups, the table displays the members of the matching groups. The following information is displayed:
-
User: The username of the user.
-
Group: The name of the usergroup or userlist.
-
Exception: Usernames that are denied in case of default-deny userlists managed locally on SPS.
Figure 84: AAA > Connection permissions — Displaying usergroup and userlist memberships
Managing One Identity Safeguard for Privileged Sessions (SPS)
The following sections explain the basic management tasks of .
One Identity Safeguard for Privileged Sessions (SPS).
-
For basic management tasks (reboot and shutdown, disabling traffic), see Controlling One Identity Safeguard for Privileged Sessions (SPS): reboot, shutdown.
- For information on managing a cluster of two or more SPS instances, see Managing Safeguard for Privileged Sessions (SPS) clusters.
-
For managing a high availability cluster, see Managing a high availability One Identity Safeguard for Privileged Sessions (SPS) cluster.
-
For instructions on upgrading SPS, see Upgrading One Identity Safeguard for Privileged Sessions (SPS).
-
For instructions on accessing SPS through console and SSH, see Accessing the One Identity Safeguard for Privileged Sessions (SPS) console.
-
For enabling sealed mode (which disables basic configuration changes from a remote host), see Sealed mode.
-
For information on configuring the out-of-band (IPMI) interface, see Out-of-band management of One Identity Safeguard for Privileged Sessions (SPS).
-
For managing certificates used on SPS, see Managing the certificates used on One Identity Safeguard for Privileged Sessions (SPS).
You can configure your SPS cluster in the following ways:
-
Configuration synchronization without a central search.
It allows you to perform your configuration settings on your Central Management node. Managed Host nodes periodically fetch and merge the settings into their own (configuration synchronization). Central search is not configured and you can search for sessions on each node, including the Central Management node.
For more information, see Configuration synchronization without a central search.
-
Central search with configuration synchronization.
IMPORTANT: One Identity does not recommend having a central search configuration without configuration synchronization.
It allows you to use a Central Management node with a Search Master role to view session data recorded by the minion nodes of your cluster, as well as manage all the nodes in the cluster from one central location.
For more information, see Central search with configuration synchronization.
Topics:
To reboot or shut down One Identity Safeguard for Privileged Sessions (SPS)
- Navigate to Basic Settings > System > System control > This node.
- Click the respective action button.
The Other node refers to the secondary node of a high availability SPS cluster. For details on high availability clusters, see Managing a high availability One Identity Safeguard for Privileged Sessions (SPS) cluster.
|

|
Caution:
-
When rebooting the nodes of a cluster, reboot the other (secondary) node first to avoid unnecessary takeovers.
-
When shutting down the nodes of a cluster, shut down the other (secondary) node first. When powering on the nodes, start the primary node first to avoid unnecessary takeovers.
-
When both nodes are running, avoid interrupting the connection between the nodes: do not unplug the Ethernet cables, reboot the switch or router between the nodes (if any), or disable the HA interface of SPS. |
Figure 85: Basic Settings > System > System Control — Performing basic management

|
|
NOTE:
Web sessions to the SPS interface are persistent and remain open after rebooting SPS, so you do not have to relogin after a reboot. |
During the reboot process, SPS displays information about the progress of the reboot and any possible problems in the following places:
-
On the web interface of SPS, at any of the Listening addresses configured at Basic settings > Local Services > Web login (admin and user). (After booting, you are directed to the login screen of SPS.)
-
On the console, which you can monitor with IPMI (ILOM) or console access.
The information displayed in the browser and on the console is the same.
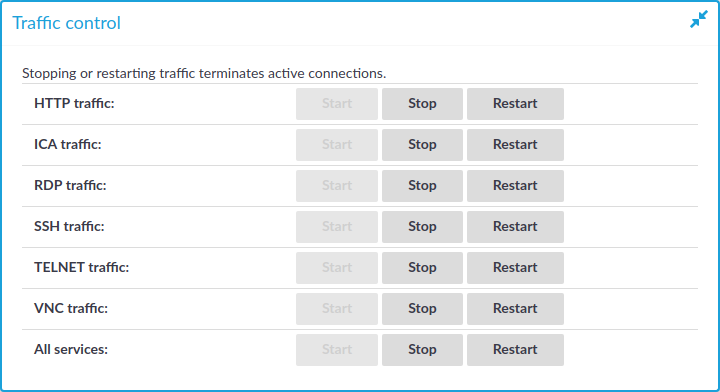
The following describes how to temporarily disable some or all of the controlled traffic to the protected servers.
Figure 86: Basic Settings > System > Traffic control — Disabling the controlled traffic
|
|
Caution:
Disabling traffic that way is only temporary. Connections will be enabled again after committing any other change from the SPS web interface. For details on how to permanently disable a type of traffic, see Disabling controlled traffic permanently. |
|
|
NOTE:
Disabling the traffic affects only the traffic configured in the Connection policies, other traffic can pass SPS even if the all traffic is disabled. For details on configuring Connection policies, see General connection settings. |
To temporarily disable some or all of the controlled traffic to the protected servers
-
Navigate to the Basic Settings > System > Traffic control.
-
-
To disable SSH traffic, click Stop in the SSH traffic field. Note that this also stops all other traffic forwarded in SSH, for example X11.
-
To disable RDP traffic, click Stop in the RDP traffic field.
-
To disable Telnet and TN3270 traffic, click Stop in the Telnet traffic field.
-
To disable VNC traffic, click Stop in the VNC traffic field.
-
To disable all types of traffic, click Stop in the All services field.
The System monitor displays the status of all types of traffic.
