The log files stored on syslog-ng Store Box (SSB) can be accessed as a network share if needed using the Samba (CIFS) or Network File System (NFS) protocols. Sharing is controlled using policies that specify the type of the share and the clients (hosts) and users who can access the log files. Sharing is possible also if SSB is part of a domain.
To share log files in standalone mode
-
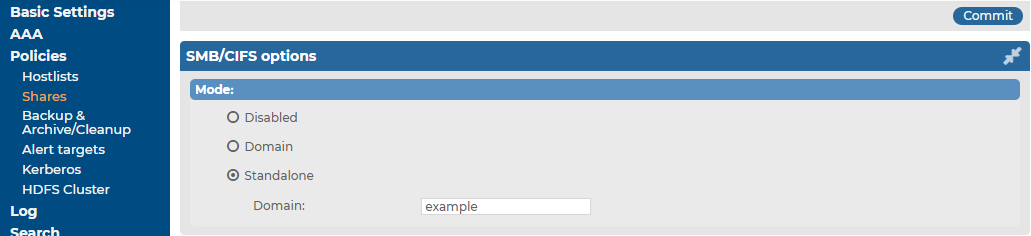
Navigate to Policies > Shares > SMB/CIFS options and select Standalone mode.
Figure 149: Policies > Shares > SMB/CIFS options — Sharing logspaces
-
Select  to create a new share policy and enter a name for the policy.
-
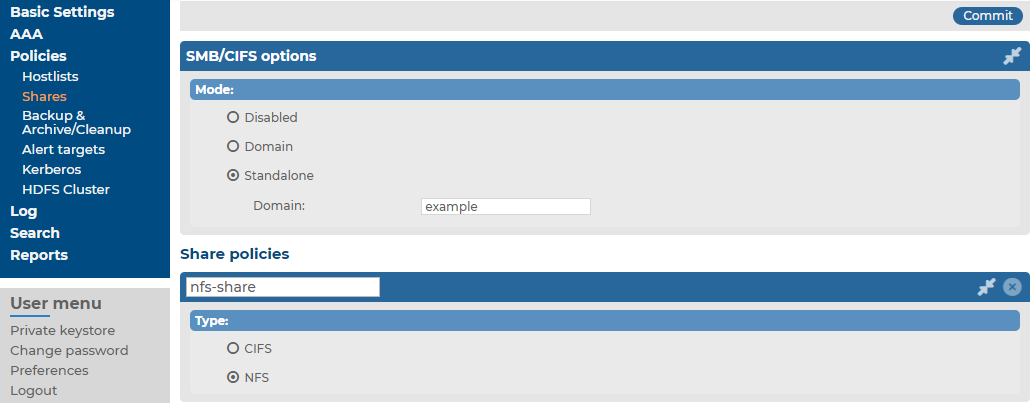
Select the type of the network share from the Type field.
Figure 150: Policies > Shares > Share policies — Creating share policies
-
To access the log files using NFS (Network File System), select NFS.
-
To access the log files using Samba (Server Message Block protocol), select CIFS.
NOTE: From SSB version 5.2.0, SSB only supports SMB 2.1 and later. If you are using a Windows version earlier than Windows 2008R2, make sure that it supports SMB 2.1 or later. Otherwise, the Windows machine cannot connect to the SSB share.
-
If you are using the Samba protocol, you can control which users and hosts can access the shares. Otherwise, every user with an syslog-ng Store Box (SSB) account has access to every shared log file.
-
To control which users can access the shared files, enter the name of the usergroup who can access the files into the Allowed group field. For details on local user groups, see Managing local usergroups.
-
To limit the hosts from where the shares can be accessed, create a hostlist and select it from the Hostlist field. For details on creating hostlists, see Creating hostlist policies.
-
Click  .
.
-
To display the details of the logspace, navigate to Log > Logspaces and click  .
.
-
Select the share policy to use from the Sharing policy field.
Figure 151: Log > Logspaces > Policies — Setting the share policy of a logspace

-
Click .
-
Mount the shared logspace from your computer to access it.
To share log files in Domain mode
-
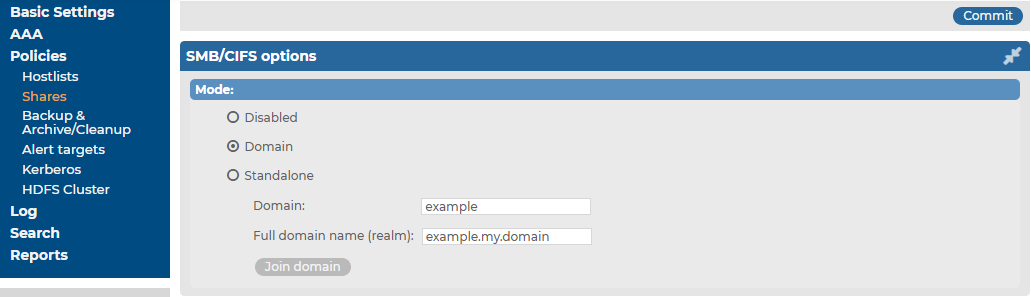
Navigate to Policies > Shares > SMB/CIFS options and select Domain mode.
-
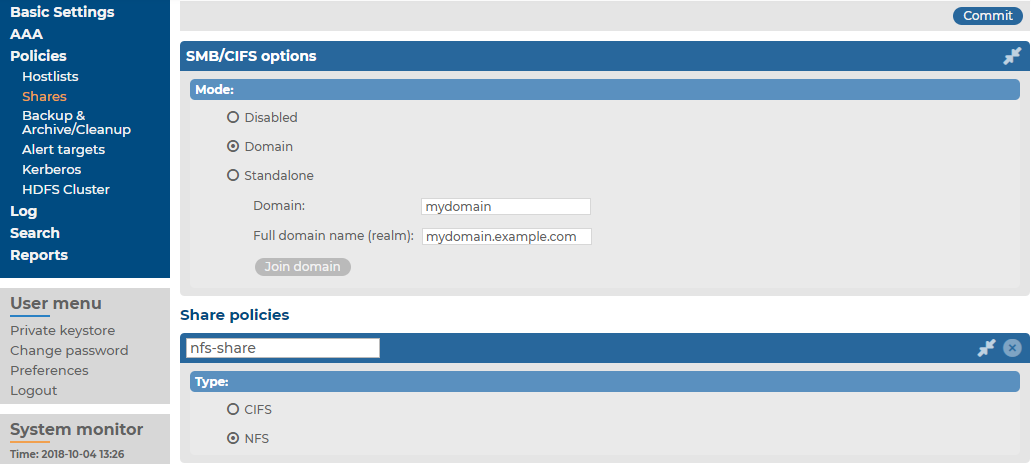
Enter the name of the domain (for example mydomain) into the Domain field.
Figure 152: Policies > Shares > SMB/CIFS options — Joining a domain
-
Enter the name of the realm (for example mydomain.example.com) into the Full domain name field.
NOTE: Ensure that your DNS settings are correct and that the full domain name can be resolved from syslog-ng Store Box (SSB). To check this, navigate to Basic Settings > Troubleshooting > Ping, enter the full domain name into the Hostname field, and select Ping host.
Click .
-
Click Join domain. A pop-up window is displayed.
-
SSB requires an account to your domain to be able to join the domain. Enter the name of the user into the Username field, and the corresponding password into the Password field.
NOTE: The syslog-ng Store Box (SSB) appliance accepts passwords that are not longer than 150 characters. The following special characters can be used:
! " # $ % & ' ( ) * + , - . / : ; < > = ? @ [ ] ^ - ` { | } |
Optionally, you can enter the name of your domain controller into the Domain controller field. If you leave this field blank, SSB will try to find the domain controller automatically.
NOTE: Ensure that your DNS settings are correct and that the hostname of the domain controller can be resolved from SSB. To check this, navigate to Basic Settings > Troubleshooting > Ping, enter the name of the domain controller into the Hostname field, and select Ping host.
-
Click Join domain.
-
Select to create a new share policy and enter a name for the policy.
Figure 153: Policies > Shares > Share policies — Creating share policies
-
Select the type of the network share from the Type field.
-
To access the log files using NFS (Network File System), select NFS.
-
To access the log files using Samba (Server Message Block protocol), select CIFS.
NOTE: From SSB version 5.2.0, SSB only supports SMB 2.1 and later. If you are using a Windows version earlier than Windows 2008R2, make sure that it supports SMB 2.1 or later. Otherwise, the Windows machine cannot connect to the SSB share.
-
If you are using the Samba protocol, you can control which users and hosts can access the shares. Otherwise, every user with an SSB account has access to every shared log file.
-
To control which users can access the shared files, enter the name of the domain that can access the files (specified in Step 2) into the Allowed group field. Note that the users and SSB must be members of the same domain.
-
To limit the hosts from where the shares can be accessed, create a hostlist and select it from the Hostlist field. For details on creating hostlists, see Creating hostlist policies.
-
Click .
-
To display the details of the logspace, navigate to Log > Logspaces and click .
-
Select the share policy to use from the Sharing policy field.
Figure 154: Log > Logspaces > Policies — Setting the share policy of a logspace
-
Click .
-
Mount the shared logspace from your computer to access it.
This section describes how to access log files that are shared using a share policy. For details on sharing log files, see Accessing log files across the network.
Every shared logspace is available as a separate shared folder, even if they all use a single share policy. The name of the shared folder is the name of the logspace.
Within the shared folder, the log files are organized into the following directory structure: YEAR/MM-DD/. The files are named according to the filename template set for the logspace. The extension of logstore files is .store, while the extension of text files is .log. Note that the root directory of the share may also contain various files related to the logspace, like index files for logstores. All files are read-only.
When using NFS for sharing the logspace, the name of the shared folder will be the following: /exports/{logspace_id}/....
Mount a shared logspace
The following examples show how to mount a shared logspace.
On Linux NFS:
mount -t nfs {ssb_ip}:/exports/{logspace_id} {where_to_mount}
On Linux SMB:
From SSB version 5.2.0, SSB only supports SMB 2.1 and later. If you are using a Linux version that uses SMB protocol version earlier than 2.1, add the option -o vers=2.1 to ensure that SSB uses SMB 2.1. For example:
mount -t cifs //{ssb_ip}/{logspace_id} /path/to/mount/shared/logspace/ -o username={username},password={password},vers=2.1
On Windows NFS:
-
Make sure that you have the "Services for NFS" Windows component installed. If not, you can install the NFS client from the Windows interface.
-
Open regedit, and navigate to HKEY_LOCAL_MACHINE\SOFTWARE\Microsoft\ClientForNFS\CurrentVersion\Default
-
Create two new DWORD keys called AnonymousGID and AnonymousUID. Set their values to 0.
-
Restart the NFS client service from an elevated privilege command prompt. Use the following commands: nfsadmin client stop, then nfsadmin client start
-
Mount the share from the command prompt. (Alternatively, you can also use the 'Map network drive...' function of the File Explorer.)
mount {ssb_ip}://exports/{logspace_id} {drive_letter}:
For example, the following command mounts the local logspace as drive G:
mount 192.168.1.1://exports/local G:
After mounting the shared logspace, it is visible in the file explorer. If it is not visible in the file explorer, you have probably used a different user to mount the share. To avoid this problem, you can mount the share again with the same user. Otherwise, you can access it from the command prompt using the {drive_letter}: command, even if it is not visible in the file explorer.
On Windows SMB:
Map the share from the command prompt. (Alternatively, you can also use the 'Map network drive...' function of the file explorer.)
net use {drive_letter}: \\{ssb_ip}\{logspace_name} /user:{user_name} "{password}"
For example, the following command maps the local logspace as drive G:
net use G: \\192.168.1.1:\local /user:myuser "mypassword"
After mapping the shared logspace, it is visible in the File Explorer. If it is not visible in the file explorer, you have probably used a different user to mount the share. To avoid this problem, you can mount the share again with the same user. Otherwise, you can access it from the command prompt using the {drive_letter}: command, even if it is not visible in the file explorer.
NOTE: NOTE: In case of accessing shared files in domain mode, also include the domain name in the command: net use {drive_letter}: \\{ssb_ip}\{logspace_name} /user:{domain_name}\{user_name} "{password}"
For example, the following command maps the local logspace as drive G:
net use G: \\192.168.1.1:\local /user:mydomain\myuser "mypassword"
For information on viewing encrypted logspace files, see Viewing encrypted logs with logcat.
