Chat now with support
Chat with Support

syslog-ng Store Box 6.10.0 - Administration Guide

Preface Introduction The concepts of SSB The Welcome Wizard and the first login Basic settings User management and access control Managing SSB Configuring message sources Storing messages on SSB Forwarding messages from SSB Log paths: routing and processing messages Configuring syslog-ng options Searching log messages Searching the internal messages of SSB Classifying messages with pattern databases The SSB RPC API Monitoring SSB Troubleshooting SSB Security checklist for configuring SSB Glossary

General syslog-ng settings

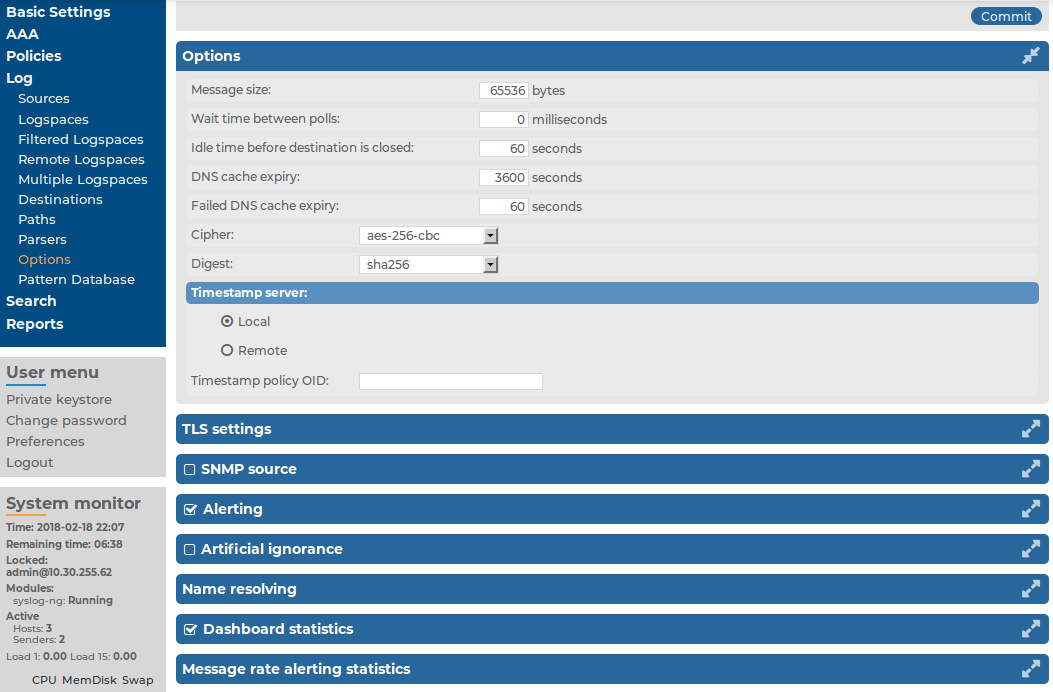
To configure the general options of the syslog-ng server running on the syslog-ng Store Box(SSB) appliance, navigate to Log > Options. The following options are available (note that options related to name resolution are discussed in Using name resolution on SSB):

Figure 199: Log > Options — Configuring syslog-ng options

  • Message size: Specifies the maximum length of incoming log messages in bytes. This option corresponds to the log-msg-size() parameter of syslog-ng. The maximum value of this parameter is 1000000 (1 MB).

    NOTE: To be able to edit the Message size, you must have write/perform permission for the Basic Settings > System page. For details on how to assign user rights, see Managing user rights and usergroups.

  • Wait time between polls: The time to wait in milliseconds before checking if new messages have arrived to a source. This option corresponds to the time-sleep() parameter of syslog-ng.

  • Idle time before destination is closed: The time to wait in seconds before an idle destination file is closed. This option corresponds to the time-reap() parameter of syslog-ng.

  • Cipher: Select the cipher method used to encrypt the logstore. The following cipher methods are available: aes-128-cbc, aes-128-cfb, aes-128-cfb1, aes-128-cfb8, aes-128-ecb, aes-128-ofb, aes-192-cbc, aes-192-cfb, aes-192-cfb1, aes-192-cfb8, aes-192-ecb, aes-192-ofb, aes-256-cbc, aes-256-cfb, aes-256-cfb1, aes-256-cfb8, aes-256-ecb, aes-256-ofb, aes128, aes192, aes256, bf, bf-cbc, bf-cfb, bf-ecb, bf-ofb, cast5-cbc, cast5-cfb, des-cbc, des-cfb, des-cfb1, des-cfb8, des-ecb, des-ede, des-ede-cbc, des-ede-cfb, des-ede-ofb, des-ede3, des-ede3-cbc, des-ede3-cfb, des-ede3-ofb, des-ofb, desx-cbc, rc2-40-cbc, rc2-64-cbc, rc2-cbc, rc2-cfb, rc2-ecb, rc2-ofb, rc4, and rc4-40.

    By default, SSB uses the aes-256-cbc method.

  • Digest: Select the digest method to use. The following digest methods are available: MD4, MD5, SHA-1, RIPEMD-160, SHA-224, SHA-256, SHA-384, and SHA-512.

    By default, SSB uses the SHA-256 method.

    Caution:

    The size of the digest hash must be equal to or larger than the key size of the cipher method. For example, to use the aes-256-cbc cipher method, the digest method must be at least SHA-256.

Time stamping configuration on SSB

To configure the time stamping options of syslog-ng Store Box(SSB), navigate to Log > Options. The following options are available:

  • Time stamp server: Select the time stamping server to use for signing encrypted logspaces. To use the built-in time stamp server of SSB, select Local.

    To use an external time stamping server, select Remote and enter the address of the server into the Server URL field in the following format:

    http://<IP address>:<port number>/

    For example:

    http://10.50.50.50:8080/

    Note that currently only plain HTTP services are supported, password-protected and HTTPS services are not supported.

    Caution:

    SSB currently supports only time stamping servers that use the Internet X.509 Public Key Infrastructure Time-Stamp Protocol (TSP) described in RFC 3161.

  • Time stamp policy OID: If the Time Stamping Server has time stamping policies configured, enter the OID of the policy to use into the Timestamping policy field. SSB will include this ID in the time stamping requests sent to the TSA.

NOTE: The time stamp requests are handled by a separate process in syslog-ng, message processing is not affected if the time stamping server is slow or cannot be accessed.

Using name resolution on SSB

The syslog-ng Store Box(SSB) appliance can resolve the hostnames of the clients and include them in the log messages. However, the performance of SSB can be severely degraded if the domain name server is unaccessible or slow. Therefore, SSB automatically caches the results of name resolution. If you experience performance problems under high load, it is recommended to disable name resolution. If you must use name resolution, consider the following:

  • If the IP addresses of the clients change only rarely, set the expiry of the DNS cache to a large value. By default, SSB caches successful DNS lookups for an hour, and failed lookups for one minute. These parameters can be adjusted under Log > Options > Options > DNS Cache expiry and Failed DNS cache expiry.

    Figure 200: Log > Options > Options > DNS Cache expiry — Configuring DNS options

  • Resolve the hostnames locally. Resolving hostnames locally enables you to display hostnames in the log files for frequently used hosts, without having to rely on a DNS server. The known IP address – hostname pairs are stored locally in a file. In the log messages, syslog-ng will replace the IP addresses of known hosts with their hostnames. To configure local name resolution, select Log > Options > Name resolving, and enter the IP Address - hostname pairs in (for example 192.168.1.1 myhost.example.com) into the Persistent hostname list field. Then navigate to Log > Sources, and set the Use DNS option of your sources to Only from persistent configuration.

    Figure 201: Log > Options > Name resolving — Configuring persistent name resolution

Setting the certificates used in TLS-encrypted log transport

This section describes how to set a custom certificate and a CA certificate for encrypting the transfer of log messages.

NOTE: If you do not upload a certificate to encrypt the TLS-communication (that is, the TLS certificate and TLS private key options are not set), syslog-ng Store Box(SSB) uses the certificate and CA certificate set for the web interface (set under Basic Settings > Management > SSL certificates) for this purpose as well.

One Identity recommends:

  • Using 2048-bit RSA keys (or stronger).

  • Using the SHA-256 hash algorithm (or stronger) when creating the public key fingerprint.

To set a custom certificate and a CA certificate for encrypting the transfer of log messages

  1. In your PKI system, generate and sign a certificate for SSB, then navigate to Log > Options > TLS settings.

  2. Click the 
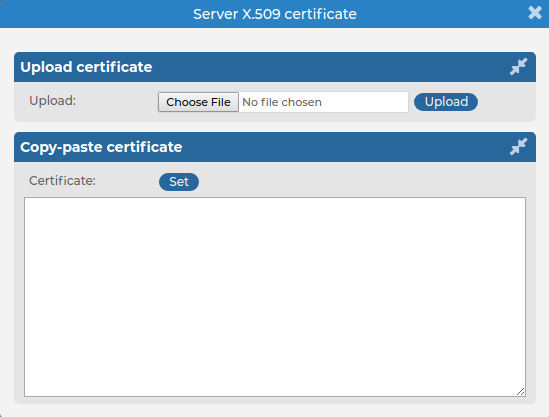
icon in the TLS certificate field to upload the certificate.

    Figure 202: Log > Options > TLS settings — Configuring TLS settings for syslog-ng

    To upload a certificate from a file, click Browse in the Upload key section, select the certificate file, and click Upload. Alternatively, you can copy/paste the certificate into the Key field of the Copy-paste key section and click Upload.

    You can choose to upload a single certificate or a certificate chain (that is, intermediate certificates and the end-entity certificate).

    After uploading a certificate or certificate chain, you can review details by clicking the name of the certificate, and looking at the information displayed in the pop-up window that comes up.

    Figure 203: Log > Options > TLS settings — X.509 certificate details

    The pop-up window allows you to:

    • Download the certificate or certificate chain.

      NOTE: Certificate chains can only be downloaded in PEM format.

    • View and copy the certificate or certificate chain.

    • Check the names and the hierarchy of certificates (if it is a certificate chain and there is more than one certificate present).

      On hovering over a certificate name, the subject of the certificate is displayed, describing the entity certified.

    • Check the validity dates of the certificate or certificates making up the chain.

      On hovering over a particular date, the exact time of validity is also displayed.

    After uploading the certificate or certificate chain, the presence or absence of the string (chain) displayed after the name of the certificate will indicate whether the certificate is a certificate chain or a single certificate.

  3. Click the icon in the TLS private key field and upload the private key corresponding to the certificate.

  4. To set the certificate of the Certificate Authority (CA) used to verify the identity of the peers, click 
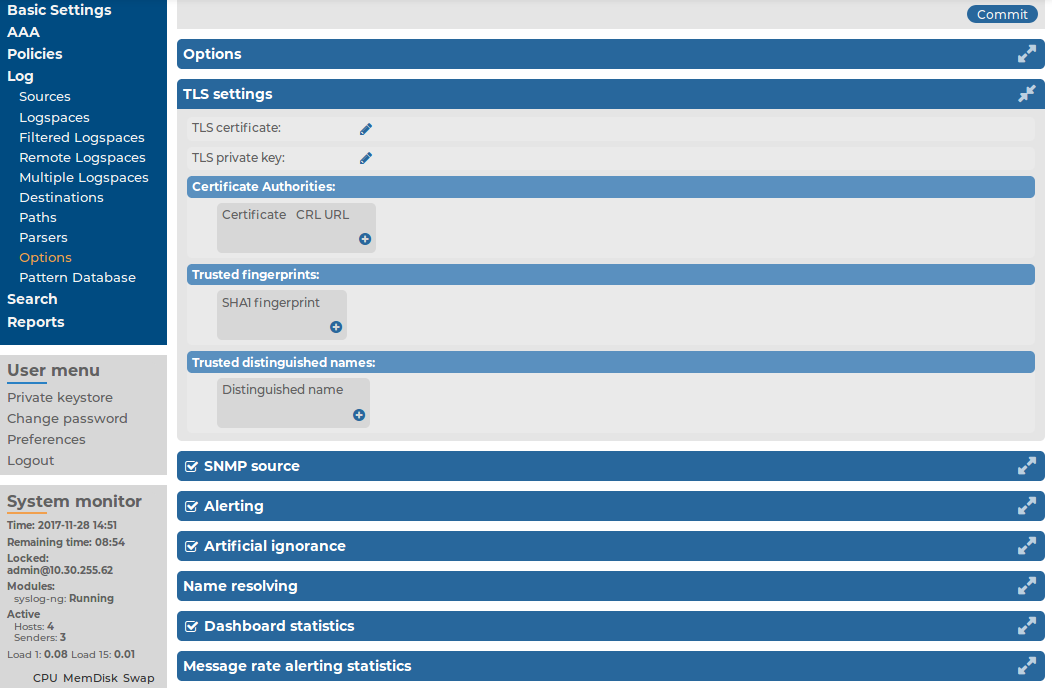
in the Certificate Authorities field, then click .

    Figure 204: Log > Options > TLS settings > Certificate Authorities — Uploading certificates

    To upload a certificate from a file, click Browse in the Upload key section, select the certificate file, and click Upload.

    Alternatively, you can copy/paste the certificate into the Key field of the Copy-paste key section and click Upload.

    Repeat this step to add more CA certificates if needed.

  5. If the CA issues a Certificate Revocation List (CRL), enter its URL into the CRL URL field. SSB periodically downloads the list and refuses certificates that appear on the list.

    NOTE: Note that only .pem format CRLs are accepted. CRLs that are in PKCS7 format (.crl) are not accepted.

  6. If you want to accept connections only from hosts using certain certificates signed by the CA, click in the Trusted distinguished names field and enter the distinguished name (DN) of the accepted certificates into the Distinguished name field. This option corresponds to the trusted-dn() parameter of syslog-ng.

    Example: *, O=Example Inc, ST=Some-State, C=* accepts only certificates issued for the Example Inc organization in Some-State state.

  7. If you want to accept connections only from hosts using certain certificates that have specific SHA-1 fingerprints, click in the Trusted fingerprints field and enter the SHA-1 fingerprint of the accepted certificates into the SHA-1 fingerprint field. This option corresponds to the trusted-keys() parameter of syslog-ng.

    Example: 00:EF:ED:A4:CE:00:D1:14:A4:AB:43:00:EF:00:91:85:FF:89:28:8F, 0C:42:00:3E:B2:60:36:64:00:E2:83:F0:80:46:AD:00:A8:9D:00:15 adds these specific SHA-1 fingerprints: 00:EF:ED:A4:CE:00:D1:14:A4:AB:43:00:EF:00:91:85:FF:89:28:8F and 0C:42:00:3E:B2:60:36:64:00:E2:83:F0:80:46:AD:00:A8:9D:00:15.

    NOTE: When using the trusted-keys() and trusted-dn() parameters at the same time, note the following:

    • If the fingerprint of the peer is listed in the trusted-keys() parameter and the DN of the peer is listed in the trusted-dn() parameter, then the certificate validation is performed.

    • If either the fingerprint of the peer is not listed in the trusted-keys() parameter or the DN of the peer is not listed in the trusted-dn() parameter, then the authentication of the peer fails and the connection is closed.

Related Documents

The document was helpful.

Select Rating

I easily found the information I needed.

Select Rating