There is a special control element for displaying the overview form in the user interface. The information to be displayed on the overview form is configured with menu items. The menu items are represented as form elements that are linked to each other on the overview form. A hierarchical structure of menu items is also included in the interface configuration.
The basis is formed by a menu item with the Main form element item type. This menu item specifies the main element on the overview form. An interface form that links to this menu item has to configured in order for it to be displayed in the application. The main form element is always displayed in the middle of the overview form.
The other menu item such as fixed, data-dependent, link, or statistic menu items are configured under the menu item for the main form element. These menu items are grouped around the main form element on the overview form as additional form elements.
The color and positioning of the form elements on the overview as well as the properties that are shown, are specified by layout information for the menu items.
Figure 15: Example of elements in an overview form
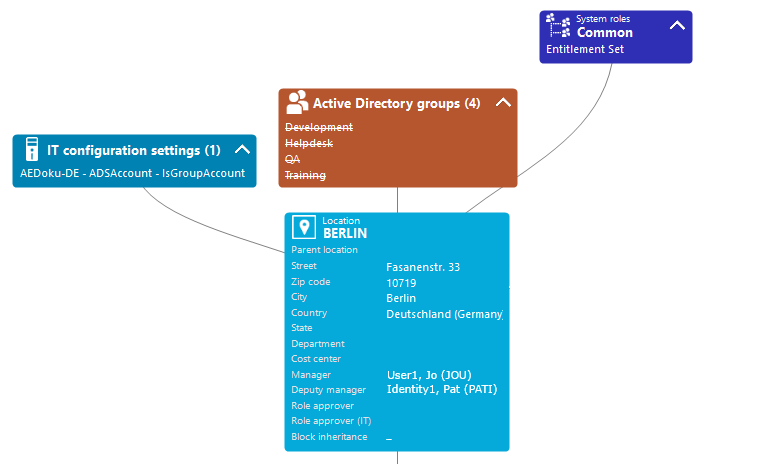
The display text of the menu item, the display text for the objects to be shown and the menu item icon are displayed in the header of a form element. Other data represents the object properties and values. There is a tooltip for each property showing a description for use. Some form element entries are highlighted in color when you click on them with the mouse. You can jump to the referenced object by clicking on the entry with the mouse.
If the form element is used for mapping lists, the items are displayed with their names. The number of items is shown in the form element header. There is also an icon in the form element header for showing and hiding the items. There is no tooltip for list items.
Table 49: Form element icon
 |
Show list items. |
 |
Hide list items. |
NOTE: Objects marker for deletion are struck through on the overview form.
Detailed information about this topic
The Overview Form Editor helps you to create overview forms. The Overview Form Editor performs the following steps to create the overview form.
-
Creating a menu item with the Main form element item type.
-
Creates other menu items under the main form element.
-
Creates a user interface form for the main form element.
Figure 16: Design view in the Overview Form Editor
To create a new overview form
-
In the Designer, select the User interface > Forms > Overview forms category.
-
Select the Create new overview form task.
-
Enter the basic properties for the overview form.
Table 50: Basic data for an overview form
|
Menu item |
Name of the menu item. Assign descriptive names here if possible. These are then propagated in the child structures. |
|
Caption |
Caption shown on the user interface form. The caption is used to represent the user interface form in the task view and in the form context menu of the user interface. Translate the given text using the  button. button. |
|
Object |
Object definition for which the form should be displayed. |
|
Parent menu item |
Parent menu item for grouping together the overview forms; usually a menu category. |
|
Product assignment |
Application in which the form will be shown. |
|
Group assignment |
Permissions group for which the form will be shown. |
|
Display columns |
Columns to be displayed on the main form element.
TIP: Use the Show column captions link to switch between column captions and technical names. |
-
To create the overview form, click OK.
This displays the overview form design in the Overview Form Editor. You can continue editing the overview form.
Related topics
To add more form elements to the overview form
-
In the Designer, select the User interface > Forms > Overview forms category.
-
Select the overview form, and then the Edit overview form task.
-
Select the view Object relations.
All the object foreign key relations (FK), object child relations (CR), and object member relations (M:N) are displayed.
-
Select the object relation that you want to display and drag and drop it on an element in the element area of the design view.
-
Select the type of menu item you want to create. You have the following options:
-
Create list element: A fixed menu item with predefined list properties is created.
-
Create data element: A data-dependent menu item is created.
-
Create list element reference: A menu item is created with the Link item type and a reference to a menu item for display as a list.
-
Create reference to data element: A menu item is created with the Link item type and a reference to a data-dependent menu item.
The menu item’s main data is automatically generated by the Overview Form Editor. The form element is display in the Overview Form Editor's design view.
The following special features apply when you create form elements using the Create list element reference and Create reference to data element context menus.
-
The reference entries under the InfoSheets.QIM.Links menu item are used.
-
If the required reference entries are not yet available, new reference entries are created with the names InfoSheet.List.<table> or InfoSheet.Node.<table>.
-
In the reference entry condition, a %<Table>WhereClause% variable is used.
-
A variable with the Text variable type is used on the form element. A condition formulated as a WHERE clause is assigned to these variables on the form element. You can further modify this condition as required. In the Overview Form Editor's edit view, edit the variable in the Variable definitions view.
TIP: Use the Create element context menu to create more menu items, links, or statistics as form elements in the Overview Form Editor's design view. In this case, enter the main data of the menu item, link, or statistics manually.
Related topics
Special features of a user interface form for the main form element of an overview form
-
The user interface form is created using the VI_ElementNavigation form definition. This form definition provides the control element for displaying the overview form in the user interface.
-
Enter the name of the main form element in the user interface form's configuration data in the Properties section.
Example:
<DialogSheetDefinition FormatVersion="1.0">
<Properties>
<Property Name="OverviewNode">VI_Person_Person_Overview</Property>
</Properties>
</DialogSheetDefinition>
Special features of mapping lists on an overview form
If a form element is used for mapping lists, the items are displayed with their names. You can jump to the referenced object by clicking on the entry with the mouse.
To prevent navigation to the referenced object, set the value of the configuration switch on the menu item to Ignore user interface forms in result list. This is useful if, for example, forms are not defined for some objects in the result list. Otherwise, an empty form is displayed.
Related topics
