
Rule Example Manipulating Threshold and Rule Weight
In the following example, you want to ensure that Rule 1 and at least one of the other rules matches for the category to be applied. The following diagram shows the settings on all of the elements:
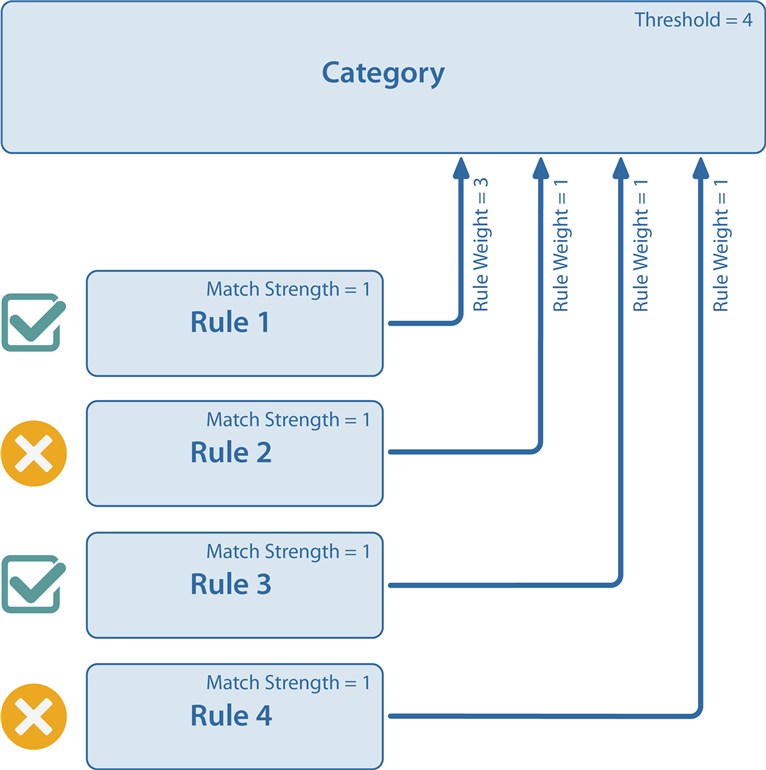 |
By manipulating the category threshold and the rule weights, you can meet your requirement. For example, if a resource was processed that only had matches with rules one and four:
| Resource Match Strength | Rule Weight | Rule Score (Match Strength x Rule Weight) | |
| Rule 1 | 1 | 3 | 3 |
| Rule 2 | 0 | 1 | 0 |
| Rule 3 | 1 | 1 | 1 |
| Rule 4 | 0 | 1 | 0 |
| Total | 4 |
To determine if categorization could occur, compare the total rule scores to the category threshold:
| Total rule scores | 4 |
| Category threshold | 4 |
Since the total rule scores are greater than or equal to the threshold, this is a potential category for the resource, as long as other category settings allow. Note that all rules matching would also result in potential categorization, but that categorization cannot occur without a match on the first rule.
Note that other settings on a category may affect categorization. For more information, see How Categories Work Together: Mutual Exclusivity, Strict Ordering and Inheritance.
Managing Rules in the Classification System
Contents
Rules do not impact your categorization until you associate them with a category, however all resources are always evaluated against all rules in the classification system once they are enabled.
You can work with rules using the following methods:
- Web Portal, under the Governed Data node. From here you can quickly manage the rules within the classification system from the Categorization Manager.
- Powershell snap-in (see Adding the PowerShell Snap-ins).
Creating a Rule
When you create a rule, by default it is disabled. Before a rule can affect categorization, it must be both enabled and associated with a category.
It is important to test a rule to ensure it is performing as desired before associating it with a category. If you plan to reuse rules across more than one category, ensure you take this into account when developing them. You should not refine it in a way that meets the needs of one situation but not all others. For more information, see Managing Rules in the Classification System.
A rule uses text extractors to identify text of interest, and then applies logic to define all necessary criteria for a rule to pass.
Quest One Identity Manager includes a number of text extractors, including some not referenced in the sample taxonomies. For a list of sample text extractors available for you to use in rules, see Sample Advanced Text Extractors Details.
To create a rule using the web portal
- Select Governed Data | Categorization Manager | Rules.
- Select Create new rule.
- Enter a unique identifier for the rule.
The identifier is used by the classification system. Once created, you cannot change this value. It is recommended you use a naming convention that reflects the purpose of the rule. - Enter a descriptive name and description.
You are ready to define the settings. You have the option of using an XML editor or a rule builder to define the settings.- If you use the rule builder:
- Select the required text extractor from the list.
- If required, click Add a text extractor to add additional text extractors.
- If you have added multiple text extractors, you can add a numerical value in the Within field to stipulate that the rule engine should look for matches within ‘x’ number of characters. (For example, when credit card numbers are found within 50 characters of a credit card provider.) Set this to zero, if you do not want to specify that the matches have to be within a certain value.
- If you use the XML rule editor:
- Enter the required XML. For details on the options, see Writing XML Rules.
- Save your changes.
- Select the General tab, and click Enable to add the rule to the classification system.
Once you enable a rule, it will run against all resources to make matches. Before it will affect classifications, it must be associated with categories.
To add a rule to the classification system with PowerShell
- Run the Add-QXmlRule command with the following mandatory parameters:
-
- ServerAddress
Provide the name of the computer hosting the Data Governance server, and the port. Enter in the form computername:port number. The default port is 8723. - Id
You cannot change the ID of a rule once you run the command. - Name
The name should reflect the purpose of the rule. - XmlFile
The full path to the location of the file containing your rule. If the file is not local, enter in the form \\computername\filename.
- ServerAddress
- If desired, use the following optional parameters:
- Description
Use this to describe the criteria of the rule. - IsEnabled
By default this is set to $false. When you are ready to use the rule in live categorizations, you can enabling it by editing the added rule.
- Description
Writing XML Rules
You can write rules using the format described here. The following example illustrates how to write a rule using XML. In this case, the rule is designed to use text extractors to find instances of “name” and “address” as well as “ssn” within a resource, with specified strength of match values.
<if>
<and within=”500”>
<find id=”name”/>
<find id=”address”/>
</and>
<match strength=”0.75”/>
</if”>
<if>
<find id=”ssn” mincount=”10”/>
<match strenth=”1.0”/>
</if>
This rule contains two <if> elements that are evaluated in order; if the first <if> applies, then the second is not evaluated. Each <if> has two sub-elements; the first is a condition, and the second is an action. If the condition matches, then the action is applied.The <find> element is used to invoke a text extractor. In the rule XML, the text extractor is referred to by its ID.The <match> action indicates that the rule is a match, and provides a strength-of-match representing the level of certainty. For information on how match strength affects categorization, see How Rules Affect Categorization.