General properties of mail templates
The following general properties are displayed for a mail template.
Table 76: Mail template properties
|
Mail template |
Name of the mail template. This name will be used to display the mail templates in the administration tools and in the Web Portal. Translate the given text using the  button. button. |
|
Base object |
Mail template base object. A base object only needs to be entered if the mail definition properties of the base object are referenced.
Use the PersonWantsOrg or PWOHelperPWO base object for notifications in the IT Shop. |
|
Report (parameter set) |
Report, made available through the mail template. |
|
Description |
Mail template description. Translate the given text using the button. |
|
Target format |
Format in which to generate email notification. Permitted values are:
-
HTML: The email notification is formatted in HTML. Text formats, for example, different fonts, colored fonts, or other text formatting, can be included in HTML format.
-
TXT: The email notification is formatted as text. Text format does not support bold, italics, or colored font, or other text formatting. Images displayed directly in the message are not supported. |
|
Design type |
Design in which to generate the email notification. Permitted values are:
-
Mail template: The generated email notification contains the mail body in accordance with the mail definition.
-
Report: The generated email notification contains the report specified under Report (parameter set) as its mail body.
-
Mail template, report in attachment: The generated email notification contains the mail body in accordance with the mail definition. The report specified under Report (parameter set) is attached to the notification as a PDF file. |
|
Importance |
Importance for the email notification. Permitted values are Low, Normal, and High. |
|
Confidentiality |
Confidentiality for the email notification. Permitted values are Normal, Personal, Private, and Confidential. |
|
Can unsubscribe |
Specifies whether the recipient can unsubscribe email notification. If this option is set, the emails can be unsubscribed through the Web Portal. |
|
Deactivated |
Specifies whether this mail template is disabled. |
|
Mail definition |
Selects the mail definition in a specific language.
NOTE: If the Common | MailNotification | DefaultCulture configuration parameter is set, the mail definition is loaded in the default language for email notifications when the template is opened. |
|
Language |
Language that applies to the mail template. The recipient's language preferences are taken into account when an email notification is generated. |
|
Subject |
Subject of the email message. |
|
Mail body |
Content of the email message. |
Creating and editing mail definitions
Mail texts can be defined in these different languages in a mail template. This ensures that the language of the recipient is taken into account when the email is generated.
To create a new mail definition
-
In the Manager, select the IT Shop > Basic configuration data > Mail templates category.
The result list shows all the mail templates that can be used for IT Shop requests.
-
Select a mail template in the result list and run the Change main data task.
-
In the result list, select the language for the mail definition in the Language menu.
All active languages are shown. To use another language, in the Designer, enable the corresponding countries. For more information, see the One Identity Manager Configuration Guide.
-
Enter the subject in Subject.
-
Edit the mail text in the Mail definition view with the help of the Mail Text Editor.
- Save the changes.
To edit an existing mail definition
-
In the Manager, select the IT Shop > Basic configuration data > Mail templates category.
The result list shows all the mail templates that can be used for IT Shop requests.
-
Select a mail template in the result list and run the Change main data task.
-
In the Mail definition menu, select the language for the mail definition.
NOTE: If the Common | MailNotification | DefaultCulture configuration parameter is set, the mail definition is loaded in the default language for email notifications when the template is opened.
-
Edit the mail subject line and the body text.
- Save the changes.
Using base object properties
In the subject line and body text of a mail definition, you can use all properties of the object entered under Base object. You can also use the object properties that are referenced by foreign key relation.
To access properties use dollar notation. For more information, see the One Identity Manager Configuration Guide.
Example:
An IT Shop requester should receive email notification about the status of the request.
Table 77: Email notification properties
|
Base object |
PersonWantsOrg |
|
Subject |
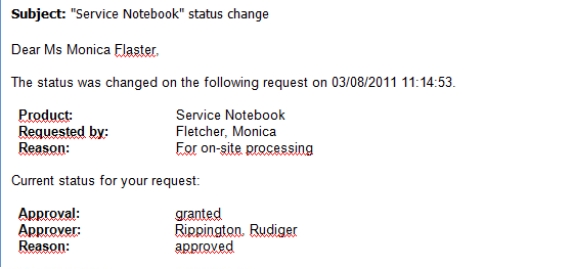
"$DisplayOrg[D]$" status change |
|
Mail body |
Dear $FK(UID_PersonOrdered).Salutation[D]$ $FK(UID_PersonOrdered).FirstName$ $FK(UID_PersonOrdered).LastName$,
The status was changed on the following request on $DateHead:Date$.
Requested by: $DisplayPersonInserted$
Requested by: $DisplayPersonInserted$
Reason: $OrderReason$
Current status of your request:
Approval: granted
Approver: $DisplayPersonHead[D]$
Reason: $ReasonHead[D]$ |
The generated email notification could look like the following, for example, once it has been formatted.
Use of hyperlinks to the Web Portal
You can add hyperlinks to the Web Portal in the mail text of a mail definition. If the recipient clicks on the hyperlink in the email, the Web Portal opens on that web page and further actions can be carried out. In the default version, this method is implemented for IT Shop requests.
Prerequisites for using this method
-
The QER | WebPortal | BaseURL configuration parameter is enabled and contains the URL path to the Web Portal. You edit the configuration parameter in the Designer.
http://<server name>/<application>
with:
<server name> = name of server
<application> = path to the Web Portal installation directory
To add a hyperlink to the Web Portal in the mail text
-
Click the position in the mail text of the mail definition where you want to insert a hyperlink.
-
Open the Hyperlink context menu and enter the following information.
-
Display text: Enter a caption for the hyperlink.
-
Link to: Select the File or website option.
-
Address: Enter the address of the page in the Web Portal that you want to open.
NOTE: One Identity Manager provides a number of default functions that you can use to create hyperlinks in the Web Portal.
- To accept the input, click OK.
