A simple rule example
The following examples show how rules can be created with the help of the Rule Editor and the effects of each option.
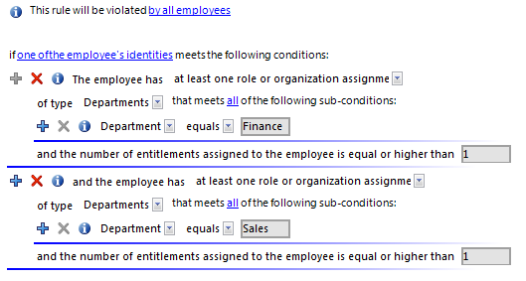
Example 1
Employees from department A may not belong to department B at the same time.
Define:
-
The option by all employees and the combination of all the employee's identities in the rule block for the affected employee group.
-
Two rule blocks for the affected entitlements with the option at least one role or organization assignment.
Figure 5: Rule condition for example 1
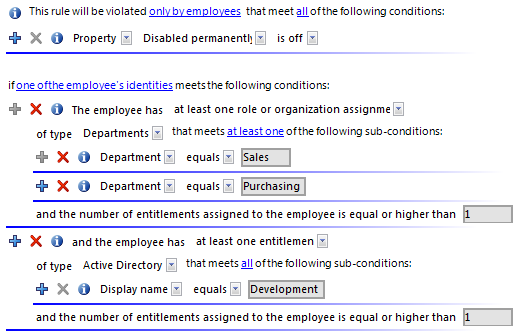
Example 2
Employees from the sales or purchasing department are not permitted to access the Active Directory group "Development". This rule is only checked for enabled employees.
Define:
-
The by all employees, all and one of the employee's identities options in the rule block for the affected employee group.
-
Two rule blocks for the affected entitlements with the options:
-
at least one role or organization assignment and
-
at least one entitlement.
Figure 6: Rule condition for example 2
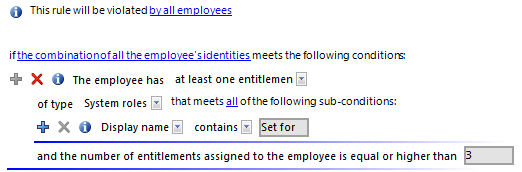
Example 3
All permitted entitlements are assigned to employees over system roles. One employee can have a maximum of two system roles. If an employee has more than one identity, the rule is also violated if the entitlements of all subidentities together result in a rule violation.
There are three system roles: Pool for finance, Pool for purchasing, Pool for sales
Jenny Basset has two subidentities. The main identity and both subidentities are respectively assigned to a system role.
Jenny Basset (HI): Pool for finance
Jenny Basset (SI1): Pool for purchasing
Jenny Basset (SI2): Pool for sales
Define:
-
The options by all employees and the combination of all the employee's identities in the rule block for the affected employee group.
-
One rule block for the affected entitlements with the option at least one entitlement of type System roles that fulfill all the following partial conditions
-
A partial condition: Display name contains "Pool for"
-
The number of entitlements assigned to the employee is larger or equal to 3.
Because Jenny Basset's main identity includes all three system roles due to her subidentities, the main identity violates this (and only this) rule.
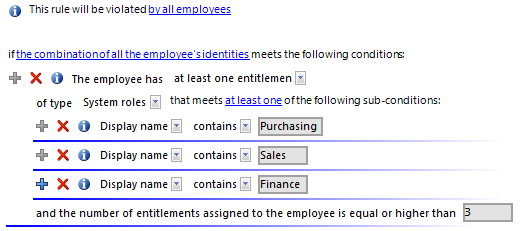
Rule checking finds the same result if the rule is formulated as follows:
Rule conditions in advanced mode
There are two ways of defining rule conditions, the simple definition and advanced mode. The simple definition is used as default to create rule conditions with the Rule Editor. For more information, see Basics for using the Rule Editor.
In advanced mode, employee's properties are defined in the rule condition that lead to a rule violation. The assignments are determined directly by the respective base tables, which contain the selected objects (for example, PersonHasSAPGRoup or Person).
To use advanced mode
-
In the Designer, set the QER | ComplianceCheck | SimpleMode | NonSimpleAllowed configuration parameter.
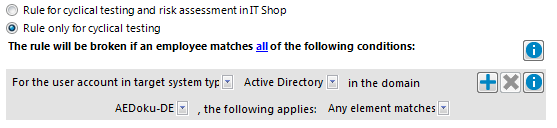
On the master data form for a rule, the options Rule for cyclical testing and risk assessment in IT Shop and Rule only for cyclical testing are displayed.
-
Set Rule only for cyclical testing.
-
Confirm the security prompt with Yes.
The filter designer is displayed.
NOTE: You cannot return to the simple definition once a rule condition has been entered in advanced mode!
NOTE: Rules in advanced mode are not taken into account by rule checks within IT Shop request approval processes. No IT Shop properties can be defined for these rules. The IT Shop properties tab does not appear on the master data form for this rule.
Figure 7: Advanced mode condition
Rule conditions in advanced mode are based on the Employees base object (Person table). The completed database query is put together internally:
Select Firstname, Lastname from Person where <Rule condition>order by 1,2
NOTE: If you select the For the account with the target system type or For the entitlement with target system type condition type in the filter designer, only columns that are mapped in Unified Namespace and for which the Display in the filter designer column property is enabled can be selected.
For detailed information about using the filter designer, see the One Identity Manager User Guide for One Identity Manager Tools User Interface.
Table 28: Permitted condition types
|
Property |
Employee object properties. The drop-down menu with permitted properties is already restricted to the most important employee properties. |
|
For the account with the target system type |
Employee’s user account. Valid user account properties depend on which target system is selected. |
|
For entitlements with the target system type |
Employee target system group. Valid group properties depend on which target system is selected. |
|
SQL Query |
Free choice of SQL query (WHERE clause). To use the WHERE clause wizard, click  . . |
Rule condition as SQL query
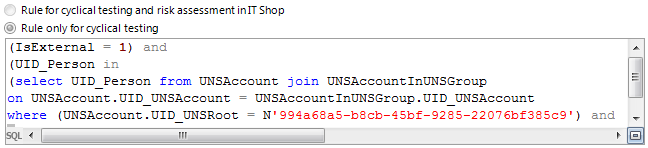
You can formulate rule conditions directly in advanced mode as a SQL query.
To formulate a rule condition directly as a SQL query
-
In the Designer, set the QER | ComplianceCheck | PlainSQL configuration parameter.
-
Select Rule only for cyclical testing.
-
Select the Enable SQL definition task for the working copy.
NOTE: Rule conditions can only be formulated through a SQL query if the QER | ComplianceCheck | SimpleMode configuration parameter is not set and the QER | ComplianceCheck | PlainSQL configuration parameter is set.
Figure 8: Direct SQL query input
Deleting rules
NOTE: All the information about a rule condition and rule violations is irrevocably deleted when the rule is deleted! The data cannot be retrieved at a later date.
Therefore, we advise you to write a report about the rule and its current violations before you delete it, if you want to retain the information (for example, audit security).
You can delete a rule if there are no rule violations attached to it.
To delete a rule
-
In the Manager, select the Identity Audit | Rules category.
-
Select the rule to delete in the result list.
-
Select the Disable rule task.
Existing rule violations are removed by the DBQueue Processor.
-
Click  in the toolbar.
The rule, the associated rule violation object and the working copy are all deleted.
