
Configuring your Kerberos environment
To integrate One Identity Safeguard for Privileged Sessions (SPS) with your Kerberos environment, so that your clients can authenticate on the target servers using Kerberos tickets, you have to configure your environment appropriately.
To configure your Kerberos environment
-
Configure your DNS server.
-
On your Domain Name Server (DNS), add SRV records that describe which Key Distribution Center (KDC) belongs to the domain. Add both TCP and UDP entries for each domain. For example, if your domain is example.com and the hostname of your KDC server is kdc.example.com, this entry looks like:
_kerberos_tcp_example.com 0 0 88 kdc.example.com
_kerberos_udp_example.com 0 0 88 kdc.example.com
-
If your environment uses multiple realms, repeat the previous step for every realm.
-
Verify that the servers that your clients will connect to via SPS have proper reverse-dns entries. Otherwise, your clients cannot access the target servers if you use the Inband destination selection feature of SPS.
-
-
Create a keytab file for SPS.
-
On your KDC server, create a principal for the SPS host, using the domain name of your SPS. For example:
host/scb.example.com@EXAMPLE.COM
-
If your environment uses multiple realms, repeat the previous step on the KDC of every realm.
-
Export the key of the principal into a keytab file.
-
If your environment uses multiple realms, merge the keytab files of the different realms into a single file, for example, using the ktadd or the ktutil utilities.
-
If your environment uses multiple realms, repeat the previous step on the KDC of every realm.
-
-
Configure the SSH application of your client hosts to enable Kerberos (GSSAPI) ticket forwarding. (In most applications this is disabled by default.)
Expected result
You have configured your environment to use Kerberos authentication with SPS, and created a keytab file for your SPS host. For details on uploading the keytab file and configuring SPS see Kerberos authentication settings.
Kerberos authentication settings
The following describes how to perform authentication with Kerberos.
|
|
NOTE:
If Kerberos authentication has been configured for the connection, it is not possible to fall back to other authentication methods. |

Prerequisites
Before configuring Kerberos authentication on One Identity Safeguard for Privileged Sessions (SPS), make sure you have configured your Kerberos environment correctly and have retrieved the keytab file. For details, see Configuring your Kerberos environment.
To perform authentication with Kerberos
-
Navigate to SSH Control > Authentication Policies.
-
Create a new Authentication Policy and enable GSSAPI-based single sign-on. This will disable all other authentication methods. Click
.
-
Navigate to SSH Control > Global Options > GSSAPI.
-
Browse for the Kerberos keytab file, and click Upload. The uploaded principals are displayed in Currently uploaded principals.
If a Connection Policy uses an SSH Authentication Policy with GSSAPI-based single sign-on together with a Usermapping Policy, then SPS stores the user principal as the gateway user, and the target username as the server username in the session database. If you want to allow your users to use a username on the target server that is different from their principal, configure a Usermapping Policy for your SSH connections. For details, see "Configuring usermapping policies" in the Administration Guide.
-
(Optional) If more than one realm is deployed on your network, you have to specify the mapping from the server's DNS domain name to the name of its realm. To map hostnames onto Kerberos realms, click
.
-
Navigate to SSH Control > Connections and configure the SSH connection as follows. For details on configuring connections in general, see Configuring connections.
-
Select Use fixed address or Inband destination selection as Target.
-
Select the Kerberos Authentication policy.
-
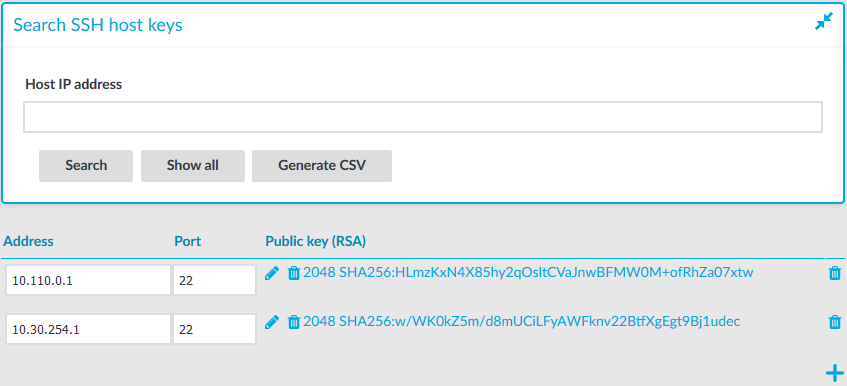
Server host keys
The host keys of the trusted servers can be managed on the SSH Control > Server Host Keys page. When a client tries to connect to a server, One Identity Safeguard for Privileged Sessions (SPS) verifies the host key of the server. SPS allows connections only to the servers listed on this page, unless the Accept key for the first time or the Accept certificate for the first time option is enabled in the connection policy.
-
To display the stored host keys of a host, enter its IP address into Host IP address field and click Search. Note that the search requires the exact IP address, and does not support wildcard characters.
You can use IPv4 and IPv6 addresses as well.
-
To display the list of stored host keys, click Show All. Note that this function does not work if there are more than 250 hosts in the database. In this case, use Generate CSV instead.
-
To export the entire list into as a comma-separated list, click Generate CSV.
Figure 194: SSH Control > Server Host Keys — Server host keys
Automatically adding the host keys of a server to One Identity Safeguard for Privileged Sessions (SPS)
The host keys of the servers can be added either automatically or manually.
To add the host key automatically
-
Navigate to the SSH Control > Connections.
-
Configure a connection: fill the From, To, and Port fields.
You can use IPv4 and IPv6 addresses as well.
-
To configure a transparent connection, enter the IP address of the server into the To field.
-
To configure a non-transparent connection, enter the IP address of SPS into the To field, and the address of the target server into the Target field.
-
-
Click
to display the advanced settings and verify that the Server side hostkey settings > Plain host key check option is set to Accept key for the first time.
Click
-
Initiate an SSH connection from the client to the server. SPS will automatically record the host key of the server — the server's IP address and the host key will be listed on the SSH Control > Server Host Keys page.