
Configuring the internal indexer
The following describes how to configure One Identity Safeguard for Privileged Sessions (SPS) to index the audit trails.
Indexing is a resource intensive (CPU and hard disk) operation, and depending on the number of processed audit trails and parallel connections passing SPS, may affect the performance of SPS. Test it thoroughly before enabling it in a production environment that is under heavy load. If your SPS appliance cannot handle the connections and the indexing, consider using external indexers (see "Configuring external indexers" in the Administration Guide) to decrease the load on SPS. For sizing recommendations, ask your One Identity partner or contact our Support Team.
Note that the minimum value of Backup & Archive/Cleanup > Archive/Cleanup policies > Delete data from SPS after is 30 days when using the indexer service. If you previously had a setting lower than this, it will still archive the index after 30 days when the indexer service is used.
|
|
NOTE:
Only those audit trails will be processed that were created after full-text indexing had been configured for the connection policy. It is not possible to process already existing audit trails. |

|
|
NOTE:
Using content policies significantly slows down connections (approximately 5 times slower), and can also cause performance problems when using the indexer service. |
To configure SPS to index the audit trails
-
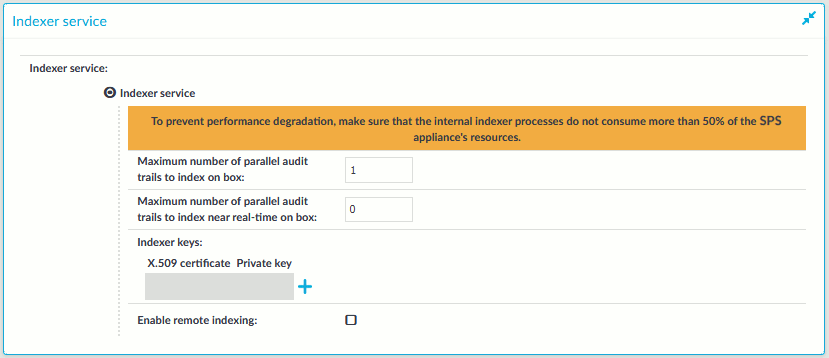
Navigate to Basic Settings > Local Services > Indexer service.
Figure 204: Basic Settings > Local Services > Indexer service > Configure the Indexer service of SPS
-
Define the Maximum number of parallel audit trails to index on box.
This option determines the maximum number of parallel indexing tasks that the SPS appliance performs. The default value is set to the number of detected CPU cores. Note that indexing audit trails requires about 50-100 Mbytes of memory for terminal sessions (SSH, Telnet, TN3270), and 150-300 Mbytes for graphical sessions (RDP, ICA, VNC, X11). Consider the memory usage of your SPS host before modifying this value.
-
Define the Maximum number of parallel audit trails to index near real-time on box.
This option determines the maximum number of parallel indexing tasks that the SPS appliance performs near real-time, meaning that indexing starts when sessions are still ongoing. The default value is set to 0.
NOTE: A connection policy configured with near real-time priority (Connection policy > Enable indexing > Priority) requires that you set Maximum number of parallel audit trails to index near real-time on box to a value other than 0.
-
(Optional) If you have encrypted audit trails and you want to index them, upload the necessary RSA keys (in PEM-encoded X.509 certificates).
NOTE: Certificates are used as a container and delivery mechanism. For encryption and decryption, only the keys are used.
-
Click
, and then click the first
icon to upload the new certificate. A pop-up window is displayed.
Select Browse, select the file containing the certificate, and click Upload. Alternatively, you can also copy-paste the certificate into the Certificate field and click Set.
-
To upload the private key corresponding to the certificate, click the second
Select Browse, select the file containing the private key, provide the Password if the key is password-protected, and click Upload. Alternatively, you can also copy-paste the private key into the Key field, provide the Password there, and click Set.
-
To add more certificate-key pairs, click
TIP: If you want to search in the trail content on the web interface: to view screenshots generated from encrypted audit trails, you also have to upload the necessary certificates to your private keystore. For more information, see Replaying encrypted audit trails in your browser.
-
-
Click
.
-
Navigate to Policies > Indexer Policies.
-
Two Indexer Policies are available by default, both with automatic language detection:
-
full_indexing: Slower, indexes the complete content of the screen, including all events.
-
lightweight_indexing: Significantly faster, but it extracts only the executed commands (Command event) and the window titles (Window title event) that appear on the screen. It does not index any other screen content (for example, text that is displayed in a terminal or that appears in an RDP window).
For example, in the case of an SSH protocol, lightweight_indexing will index a command with parameters, such as cat --help, but will not index terminal printouts such as the help content itself.
When you add a new Connection Policy, the lightweight_indexing Indexer Policy is assigned to it by default.
To create a new Indexer Policy, click
Figure 205: Policies > Indexer Policies > Indexing options and manual language selection
-
-
Select from the indexing options as follows:
-
Commands: Allows you to browse, search, and analyze the commands issued in SSH and Telnet sessions.
Caution: Do not disable unless you have a reason to do so.
-
Window titles: Allows you to browse, search, and analyze the window titles that appear on the screen in RDP, Citrix ICA, and VNC connections. It involves Optical Character Recognition (OCR) on parts of the screen, and is slightly resource-intensive.
Caution: Do not disable unless you have a reason to do so.
-
Full screen contents: Select this option if you want to search in the full screen content of the audited sessions.
Extract every text that appears on the screen in Telnet, SSH, RDP, Citrix ICA or VNC connections. For graphical protocols, extracting screen content involves Optical Character Recognition (OCR) that requires lots of CPU and disk (consider installing external indexers).
-
Pointing device biometrics: Select this option only if you are using One Identity Safeguard for Privileged Analytics (SPA)).
Extract biometric data to authenticate the users based on their pointing device (for example, mouse) usage patterns. It requires the SPA) module.
-
Typing biometrics: Select this option only if you are using One Identity Safeguard for Privileged Analytics (SPA)).
Extract biometric data to authenticate the users based on their typing dynamics. It requires the SPA) module.
-
-
To configure what languages to detect, select Select languages manually for character recognition. Select the language(s) to detect. Note the following:
-
Specifying only one language provides the best results in terms of performance and precision.
-
The English language is always detected along with the non-English languages that you have configured. However, if you want the OCR to only recognize the English language, you have to select it from the list of languages.
-
There are certain limitations in the OCR engine when recognizing languages with very different character sets. For this reason, consider the following:
-
When selecting Asian languages (Simplified Chinese, Traditional Chinese, Korean), avoid adding languages that use the Latin alphabet.
-
When selecting the Arabic language, avoid selecting any other languages.
-
The Thai language is currently not supported. If you are interested in using SPS to index Thai texts, contact our Sales Team.
-
-
-
Specify an accuracy level for Optical Character Recognition (OCR). Each accuracy level brings a different degree of speed and accuracy:
-
Fast: The fastest option with potentially less accurate results. Select this option if speed is more important to you than getting the most accurate results possible.
-
Balanced (default setting): Fairly accurate option with less than optimum speed. Select this option if you want results to be fairly accurate but you have more than a few sessions to process and processing time is less of a concern.
-
Accurate: The most accurate option with less optimal speed. Select this option if you must have the most accurate results possible and speed is less important or you only have a few sessions to process.
-
-
Configure the Indexing policy for the Connection policy that you want to index:
By default, the lightweight_indexing Indexing policy is enabled for every Connection policy with normal priority. If this is ideal for you, skip this step and continue with the next step. If you want to use a different policy, for example because you want to OCR the complete screen content, or because you have created a language-specific indexer policy, complete the following substeps.
-
Navigate to the Control > Connections page of the traffic type (for example SSH Control), and select the connection policy to index.
-
Figure 206: <Protocol name> Control > Connections > Enable indexing — Select Indexing Policy
Select the Indexing Policy to be used. Both built-in Indexer Policies feature automatic language detection. To specify a particular language detection configuration, select the Indexing Policy you have created before (in Step 6).
-
To determine the priority level of indexing this connection, select the appropriate Priority level. Selecting a high priority level means that the trails of this connection will be indexed first. Selecting a low priority level means that the trails of this connection will be indexed also, but there might be a delay in indexing if there are a lot of high-priority connections waiting to be indexed. Selecting near real-time means that the indexing of sessions starts when sessions are still ongoing.
-
Click
-
-
Check which channel policy is used in the connection, and navigate to the <Protocol name> Control > Connections page. Select the channel policy used in the connection to index.
-
On the <Protocol name> Control > Channel Policies page, verify that the Record audit trail option is selected for the channels you want to index (for example, the Session shell channel in SSH, or the Drawing channel in RDP).
-
Click
TIP: To verify that indexing works as configured, start a session that uses this connection policy (connect from a client to a server).
When the session is finished, navigate to the Indexer > Indexer status page to verify that the indexer service is processing the audit trail.
If the audit trails are encrypted, ensure that the required decryption keys have been uploaded to Basic Settings > Local Services > Indexer service > Indexer keys.


Configuring external indexers
If One Identity Safeguard for Privileged Sessions (SPS) audits lots of connections, processing and indexing the created audit trails requires significant computing resources, which may not be available in the SPS appliance. To decrease the load on the SPS appliance, you can install the indexer service on external Linux hosts. These external indexer hosts run the same indexer service as the SPS appliance, and can index audit trails, or generate screenshots and replayable video files from the audit trails as needed. The external indexers register on SPS, wait for SPS to send an audit trail to process, process the audit trail, then return the processed data to SPS. The external indexer hosts do not store any data, thus any sensitive data is available on the host while it is being processed.
To use external indexers to process your audit trails, you have to complete the following steps.
-
Read the conditions and limitations related to external indexers in Prerequisites and limitations.
-
Install and configure the hosts (physical or virtual) that will run the external indexer service. For details on the hardware requirements, see Hardware requirements for the external indexer host.
-
Configure SPS to use external indexers. For details, see Configuring One Identity Safeguard for Privileged Sessions (SPS) to use external indexers.
-
Install and configure the indexer application on the external hosts. For details, see Installing the external indexerConfiguring the external indexer.
-
If you enabled audit trail encrypting on SPS, you will also need to upload the necessary certificates to the external indexer to allow indexing the encrypted trails. For details, Uploading decryption keys to the external indexer.
Hardware requirements for the external indexer host
Configuring One Identity Safeguard for Privileged Sessions (SPS) to use external indexers
Installing the external indexer
Configuring the external indexer
Uploading decryption keys to the external indexer
Configuring a hardware security module (HSM) or smart card to integrate with external indexer
Setting up and testing the environment
Customizing the indexing of HTTP traffic
Disabling indexing on One Identity Safeguard for Privileged Sessions (SPS)
Prerequisites and limitations
Before starting to use One Identity Safeguard for Privileged Sessions (SPS) with external indexers, consider the following:
-
If there is a firewall between the host of the external indexer and SPS, enable two-way communication between them.
The default port is TCP/12345. To change the port number, you have to modify the indexer settings on SPS, and upload the new configuration to the external indexer(s).
-
To protect the sensitive data in the audit trails, ensure that the audit trails are encrypted. For details on encrypting audit trails, see Encrypting audit trails.
-
Make sure to permit indexer access only to the hosts that really run external indexers on the Basic Settings > Local Services > Indexer service page of the SPS web interface.
-
To process graphical audit trails that contain Asian characters, make sure that you have uploaded a license to SPS that enables indexing Asian characters.
NOTE: The current OCR engine cannot guarantee accurate character recognition for Asian characters smaller than 30 x 30 pixels. If you encounter problems with character recognition for Asian characters, increase resolution settings in your connection.
-
The external indexer can be installed on the following 64-bit operating systems: Red Hat Enterprise Linux Server 6.7, Red Hat Enterprise Linux Server 7, CentOS 6.7, and CentOS 7. The installer is a self-contained package that includes every required dependency of the indexer.
If your security policy does not permit the above limitations, or your environment does not make it possible to fulfill them, do not use external indexers with SPS.
Hardware requirements for the external indexer host
-
CPU: You can configure the number of audit trails that an indexer host processes at the same time. For optimal performance, each indexer process should have a dedicated CPU core.
-
Memory requirements: In addition to the memory requirements of the operating system of the host, the indexer requires about 300 MB memory for each worker process, depending on the protocol of the indexed audit trails. The audit trails of terminal connections require less memory.
-
Disk: The indexer requests the data from One Identity Safeguard for Privileged Sessions (SPS) in small chunks, it does not store the entire audit trail nor any temporary files. You will need only disk space for the operating system, and a few GB to store logs.
For example, if you want to have a host that can process 6 audit trails at the same time, you need 6 CPU cores and 1.8 GB of memory for the indexer service. If you install only a minimal operating system and the external indexer on the host, 6 GB disk space should be enough.