
Creating and editing user lists
User lists are white- or blacklists of usernames that allow fine-control over who can access a connection or a channel.
|
|
Caution:
User Lists are white- or blacklists of usernames that determine who can access the server remotely. However, this cannot prevent a user from accessing the server from a local terminal. |

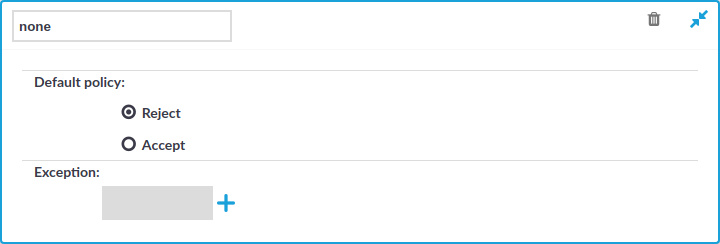
Figure 147: Policies > User Lists — Configuring user lists
To create a new user list or edit an existing one
-
Navigate to the User Lists tab of the Policies menu and click
to create a new user list. Enter a name for the list User List field (for example serveradmins).
Caution: Usernames, the names of user lists, and the names of usergroups are case sensitive.
-
Click
to display the list of users.
-
Select the default policy of the user list. Select Reject for a whitelist, that is, to allow access only to the members of the list. Select Accept for a blacklist, that is, to allow access to everyone except the members of the list.
-
Click
and enter a username into the displayed field. Repeat this step until all required usernames are listed.
Caution: Usernames, the names of user lists, and the names of usergroups are case sensitive.
-
Click
to save the list.
-
To actually restrict access to a channel based on the user list created in the previous steps:
-
Navigate to the Channel Policies tab of the type of connection you want to control and click
-
Click
Caution: Usernames, the names of user lists, and the names of usergroups are case sensitive.
NOTE: When listing more groups, users of any of the listed groups can access the channel. For details, see Creating and editing channel policies.
When listing both a whitelist and blacklist in the Group section and a username appears on both lists, the user will be able to access the channel.
-
Click
-

Authenticating users to an LDAP server
You can use the LDAP policy to set the details of the LDAP server you wish to use to:
-
authenticate gateway users (available in SSH and Telnet as Authentication Policy)
-
query gateway groups (available for RDP, Telnet, SSH, and ICA)
-
query remote groups (available for RDP, Telnet, SSH, ICA, and HTTP)
|
|
NOTE: This feature is not available for Virtual Network Computing (VNC) connections. |
To configure an LDAP policy for a connection
-
Navigate to Policies > LDAP Servers and click
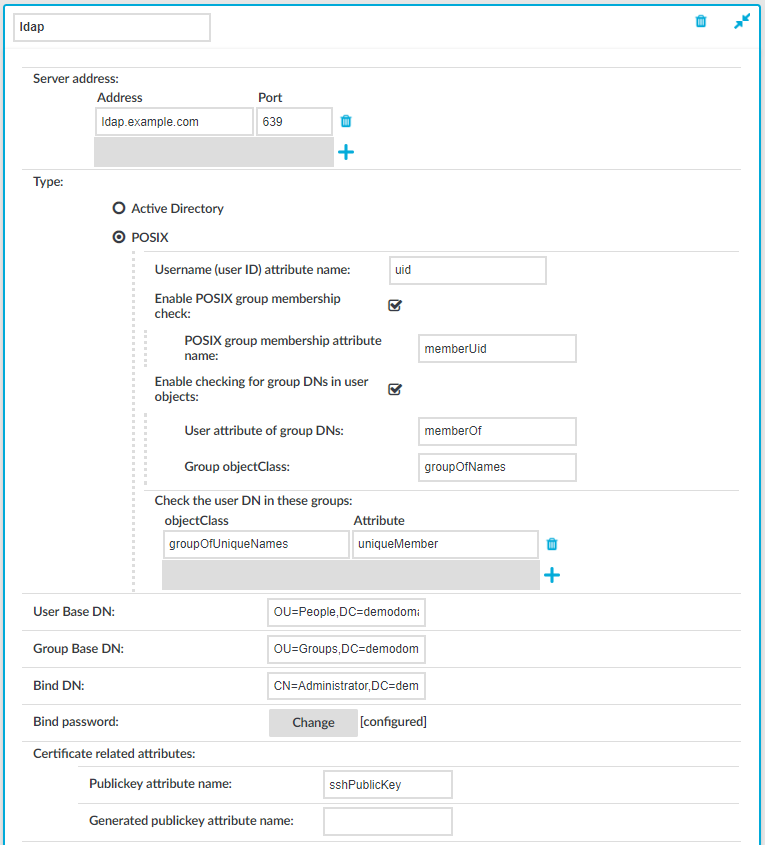
Figure 148: Policies > LDAP Servers — Configuring LDAP Server policies
-
Enter a name for the policy (for example ldapservers).
-
Enter the IP address or hostname and port of the LDAP server into the Server Address field. If you want to encrypt the communication between SPS and the LDAP server, in case of TLS, enter 636 as the port number, or in case of STARTTLS, enter 389 as the port number.
Use an IPv4 address.
To add multiple servers, click and enter the address of the next server. If a server is unreachable, SPS will try to connect to the next server in the list in failover fashion.
Caution: If you will use a TLS-encrypted with certificate verification to connect to the LDAP server, use the full domain name (for example ldap.example.com) in the Server Address field, otherwise the certificate verification might fail. The name of the LDAP server must appear in the Common Name of the certificate.
-
Select the type of your LDAP server in the Type field. Select:
-
Active Directory to connect to Microsoft Active Directory servers.
You can enable nested groups. Select Enable AD group membership check, then Enable nested groups.
Caution: Nested groups can slow down the query and cause the connection to timeout if the LDAP tree is very large. In this case, disable the Enable nested groups option.
To also check group membership based on group DNs in a user attribute, select Enable checking for group DNs in user objects and enter the name of the user attribute, for example, memberOf in the User attribute of group DNs field.
Caution: Using this option significantly slows down log on to the SPS web interface if you have too many groups.
Only use this option if you have an LDAP schema where the user groups can only be determined from a user attribute that contains the group DNs.
To check for group membership based on user DNs in group attributes, use the Check the user DN in these groups options.
For more information, see Active Directory LDAP backend.
-
POSIX to connect to servers that use the POSIX LDAP scheme.
If your LDAP server uses a custom POSIX LDAP scheme, you might need to set which LDAP attributes store the username, or the attributes that set group memberships. For example, if your LDAP scheme does not use the uid attribute to store the usernames, set the Username (user ID) attribute name option.
In addition to the primary group membership checking, you can allow checking for supplementary group memberships by selecting the Enable POSIX group membership check and specifying the POSIX group membership attribute name field.
To also check group membership based on group DNs in a user attribute, select Enable checking for group DNs in user objects and enter the name of the user attribute, for example, memberOf in the User attribute of group DNs field and objectClass, for example, groupOfNames in the Group objectClass field.
Caution: Using this option significantly slows down log on to the SPS web interface if you have too many groups.
Only use this option if you have an LDAP schema where the user groups can only be determined from a user attribute that contains the group DNs.
To check for group membership based on user DNs in group attributes, use the Check the user DN in these groups options.
For more information, see POSIX LDAP backend.
For an overview about LDAP user and group resolution in SPS, see Overview.
-
-
In the User Base DN field, enter the name of the DN to be used as the base of queries regarding users (for example: OU=People,DC=demodomain,DC=exampleinc).
NOTE: You must fill in this field. It is OK to use the same value for User Base DN and Group Base DN.
However, note that specifying a sufficiently narrow base for the LDAP subtrees where users and groups are stored can speed up LDAP operations.
-
In the Group Base DN field, enter the name of the DN to be used as the base of queries regarding groups (for example: OU=Groups,DC=demodomain,DC=exampleinc).
NOTE: You must fill in this field. It is OK to use the same value for User Base DN and Group Base DN.
However, note that specifying a sufficiently narrow base for the LDAP subtrees where users and groups are stored can speed up LDAP operations.
-
In the Bind DN field, enter the Distinguished Name that SPS should use to bind to the LDAP directory (for example: CN=Administrator,DC=demodomain,DC=exampleinc).
NOTE: SPS accepts both pre-win2000-style and Win2003-style account names (User Principal Names), for example administrator@example.com is also accepted.
-
To configure or change the password to use when binding to the LDAP server, click Change and enter the password. Click Update. Click .
NOTE: One Identity Safeguard for Privileged Sessions (SPS) accepts passwords that are not longer than 150 characters. The following special characters can be used: !"#$%&'()*+,-./:;<=>?@[\]^-`{|}
-
Skip this step if you use passwords to authenticate the users.
-
If you use public-key authentication and receive the public key of the users from the LDAP database, enter the name of the LDAP attribute that stores the public keys of the users into the Publickey attribute name field. For details on using public-key authentication with the LDAP database, see Configuring public-key authentication on One Identity Safeguard for Privileged Sessions (SPS).
-
If you use X.509 certificate for authentication and receive the certificates of the users from the LDAP database, enter the name of the LDAP attribute that stores the certificates of the users into the Certificate attribute name field.
-
-
Skip this step if you use passwords to authenticate the users.
-
If you use public-key authentication and want SPS to generate server-side encryption keys on-the-fly and store them in a separate attribute on the LDAP server, enter the name of the attribute into the Generated publickey attribute name field.
-
If you use certificate authentication and want SPS to generate server-side certificates on-the-fly and store them in a separate attribute on the LDAP server, enter the name of the attribute into the Generated certificate attribute name field.
-
-
If you want to encrypt the communication between SPS and the LDAP server, in Encryption, select the TLS or the STARTTLS option and complete the following steps:
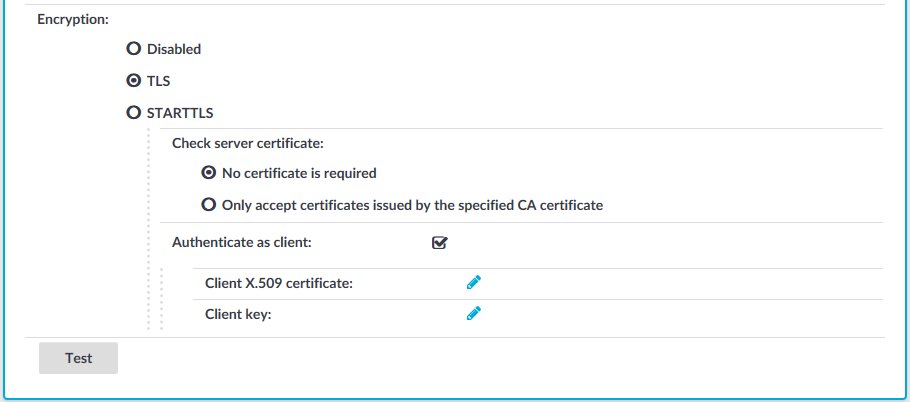
Figure 149: Policies > LDAP Servers — Configuring encryption
NOTE: TLS-encrypted connection to Microsoft Active Directory is supported only on Windows 2003 Server and newer platforms. Windows 2000 Server is not supported.
-
If you want SPS to verify the certificate of the server, select Only accept certificates issued by the specified CA certificate and click the icon in the CA X.509 certificate field. A pop-up window is displayed.
Click Browse, select the certificate of the Certificate Authority (CA) that issued the certificate of the LDAP server, then click Upload. Alternatively, you can paste the certificate into the Copy-paste field and click Set.
SPS will use this CA certificate to verify the certificate of the server, and reject the connections if the verification fails.
Caution: If you will use a TLS-encrypted with certificate verification to connect to the LDAP server, use the full domain name (for example ldap.example.com) in the Server Address field, otherwise the certificate verification might fail. The name of the LDAP server must appear in the Common Name of the certificate.
-
If the LDAP server requires mutual authentication, that is, it expects a certificate from SPS, enable Authenticate as client. Generate and sign a certificate for SPS, then click in the Client X.509 certificate field to upload the certificate. After that, click in the Client key field and upload the private key corresponding to the certificate.
One Identity recommends using 2048-bit RSA keys (or stronger).
-
-
To commit the changes, click
-
Click Test to test the connection.
NOTE: Testing TLS and STARTTLS-encrypted connections is not supported.
Audit policies
An audit trail is a file storing the recorded activities of the administrators. Audit trails are not created automatically for every connection: auditing must be enabled manually in the channel policy used in the connection. The available default channel policies enable auditing for the most common channels. Audit trails are automatically compressed, and can be encrypted, timestamped, and signed as well. Audit trails can be replayed using the Safeguard Desktop Player application (for details, see Safeguard Desktop Player User Guide), or directly in your browser (for details, see Replaying audit trails in your browser).
|
|
TIP:
By default, every connection uses the built-in default audit policy. Unless you use a custom audit policy, modifying the default audit policy will affect every audited channel of the connections passing through One Identity Safeguard for Privileged Sessions (SPS). |
|
|
Caution:
In RDP connections, if the client uses the Windows login screen to authenticate on the server, the password of the client is visible in the audit trail. To avoid displaying the password when replaying the audit trail, you are recommended to encrypt the upstream traffic in the audit trail using a separate certificate from the downstream traffic. For details, see "Encrypting audit trails" in the Administration Guide. |
-
For details on how to configure audit trail encryption, see Encrypting audit trails.
-
For details on how to configure timestamping, see Timestamping audit trails with built-in timestamping service and Timestamping audit trails with external timestamping service.
-
For details on how to configure audit trail signing, see Digitally signing audit trails.
Encrypting audit trails
To prevent unauthorized access to the audit trail files, One Identity Safeguard for Privileged Sessions (SPS) can encrypt:
-
The entire trail.
-
The entire trail, and the upstream part with an additional (set of) certificate(s).
-
Only the upstream part.
With upstream encryption, the passwords are visible only with the private key of the certificate used for encrypting the upstream traffic.
|
|
NOTE:
Even if the upstream traffic is encrypted with a separate certificate, only one audit trail file is created for a session. |
|
|
Caution:
One Identity Safeguard for Privileged Sessions (SPS) 5 F4 and later versions use a new encryption algorithm to encrypt the recorded audit trails (AES128-GCM). This change has the following effects:
|
Encrypting the upstream part has the following limitations:
-
During indexing, command detection does not work without the upstream encryption keys.
|
|
TIP:
For more information on uploading certificates for indexing and replaying audit trails, see:
|
Encrypting audit trails requires one or more X.509 certificate in PEM format that uses an RSA key, depending on the configuration.
|
|
NOTE:
Certificates are used as a container and delivery mechanism. For encryption and decryption, only the keys are used. |
One Identity recommends using 2048-bit RSA keys (or stronger).
Use every keypair or certificate only for one purpose. Do not reuse cryptographic keys or certificates (for example, do not use the certificate of the One Identity Safeguard for Privileged Sessions (SPS) webserver to encrypt audit trails, or the same keypair for signing and encrypting data).
The following encryption options are available:
-
Encrypt with a single certificate. This is the most simple approach: SPS uses one certificate to encrypt the audit trails, and anyone who has the private key of that certificate can replay the audit trails. If that key is lost, there is no way to open the audit trails.
-
Encrypt separately with multiple certificates. SPS uses two or more certificates separately to encrypt the audit trails, and anyone who has the private key of one of the encryption certificates can replay the audit trails.
-
Encrypt jointly with two certificates. SPS uses two certificates together (a certificate-pair) to encrypt the audit trails. The private keys of both encryption certificates are needed to replay the audit trails. This is a kind of "four-eyes in auditing".
You can combine the different encryption methods. For example, you can encrypt the audit trails with multiple certificate-pairs, and replay the trails only if the private keys of a certificate-pair are available. This is true for encrypting the upstream traffic as well. At the extreme, you will need four private keys to fully replay an audit trail: two to open the normal traffic, and two more to display the upstream traffic.
Note that SPS itself cannot create the certificates used to encrypt the audit trails.
|
|
TIP:
If two certificates are displayed in a row, they are a certificate-pair and you need the private key of both to replay the audit trails. If two certificates are displayed in separate rows, you need the one of the private keys to replay the audit trails. If there are multiple rows containing two certificates, you need the private keys of the certificate(s) listed in any of the rows. |
Figure 150: Policies > Audit Policies — Encrypting audit trails: joint encryption with a certificate pair

Each audit policy can have up to 8 lines of certificate pairs.
To encrypt audit trails
-
Navigate to Policies > Audit Policies and select the audit policy you will use in your connections.
TIP: By default, every connection uses the built-in default audit policy. Unless you use a custom audit policy, modifying the default audit policy will affect every audited channel of the connections passing through One Identity Safeguard for Privileged Sessions (SPS).
-
Select the Enable encryption option.
-
To upload a certificate for encrypting the entire trail:
-
Click the
-
Click on the left
icon and upload a certificate to SPS. This certificate will be used to encrypt the audit trails, and it must not include the private key.
NOTE: To replay the audit trails, you need the private key of the certificate on the computer running the Safeguard Desktop Player application.
-
(Optional) To encrypt the audit trails jointly with another certificate, click on the right
-
Repeat these steps to encrypt the audit trails separately with additional certificates.
-
-
To upload a certificate for encrypting the upstream traffic:
-
Select Encrypt upstream traffic with different certificates.
-
Click the
-
Click on the left
NOTE: To replay the upstream part of the audit trails, you need the private key of the certificate on the computer running the Safeguard Desktop Player application.
-
(Optional) To encrypt the audit trails jointly with another certificate, click on the right
-
Repeat these steps to encrypt the upstream separately with additional certificates.
-
-
Click