Creating report subchapters from search queries
|
|
NOTE:
Creating report subchapters from search queries is currently an experimental feature of One Identity Safeguard for Privileged Sessions (SPS), therefore One Identity recommends that only administrators use this feature and only at their own risk. |

You can turn any search query or statistics into a subchapter to add to your reports. This is an easy and flexible way of creating reports to monitor traffic, track certain parameters, or get alerted about particular events. The Search interface allows you to:
- Create search-based report subchapters from search results.
- Create search-based report subchapters from scratch.
Creating search-based report subchapters from search results
|
|
NOTE:
Creating report subchapters from search queries is currently an experimental feature of One Identity Safeguard for Privileged Sessions (SPS), therefore One Identity recommends that only administrators use this feature and only at their own risk. |
The following describes how to create a search-based report subchapter from search results.
To create a search-based report subchapter from search results
- Navigate to Search, and perform a query of your choice.
- Click Search. Search results are displayed.
- Click
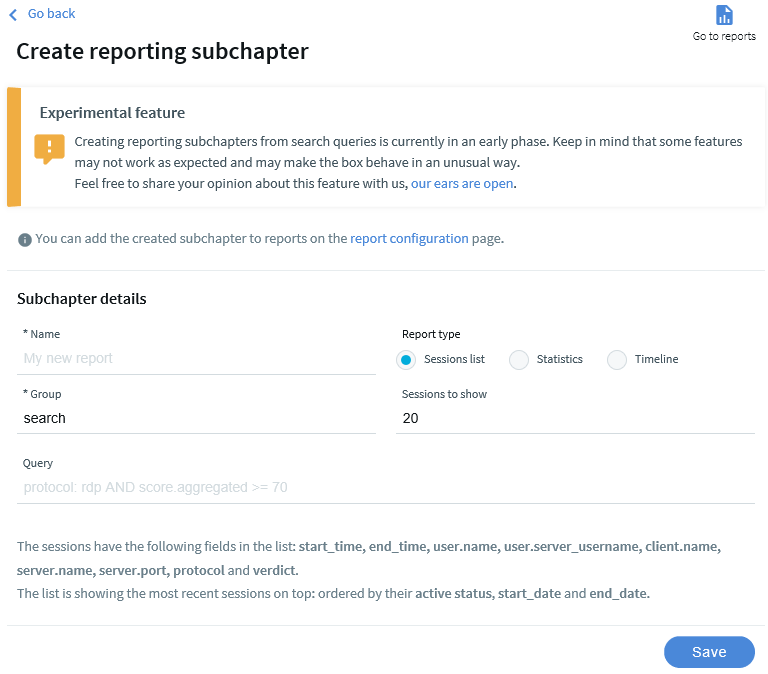
. The Create reporting subchapter page is displayed, with the query field populated with your query.
- In the name field, add a name to your report.
- In Report type, select the type that fits your query. You can choose from the following types:
- Sessions list: Displays a list of sessions.
Set the number of sessions to show in the report as required.
- Statistics: Visualizes the distribution of sessions based on the selected metadata.
Select a Statistic presentation for your report, such as Pie chart, List, Bar chart. Select the field (the metadata) to create your statistics on.
- Timeline: Visualizes the distribution of sessions within a day/week/month, depending on the time range chosen for the report under Reporting > Configuration > Generate this report every > Day/Week/Month.
- Sessions list: Displays a list of sessions.
- Click Save.
- Click
. Alternatively, navigate to Reporting > Configuration.
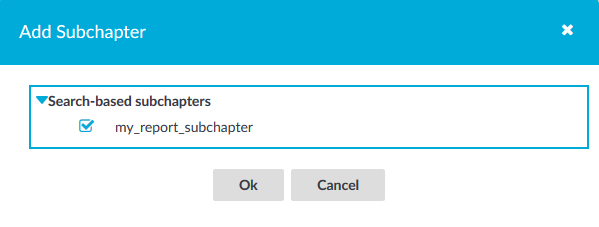
- Configure a custom report from scratch, or add the subchapter to an existing report. For details, see Configuring custom reports.
When adding the subchapter you created, look for it under Search-based subchapters.
Creating search-based report subchapters from scratch
|
|
NOTE:
Creating report subchapters from search queries is currently an experimental feature of One Identity Safeguard for Privileged Sessions (SPS), therefore One Identity recommends that only administrators use this feature and only at their own risk. |
The following describes how to create a search-based report subchapter from scratch.
To create a search-based report subchapter from scratch
-
If you have multiple SPS appliances and they are organized into a cluster where one of the nodes is the Search Master (or Central Search) node, log in to that node.
- Navigate to Reporting > Search subchapters.
- Click
. The Create reporting subchapter page is displayed.
Figure 240: Reporting > Search subchapters — Create reporting subchapter
- In the name field, add a name to your report.
- In the query field, type the query that you want to create a report from.
- In Report type, select the type that fits your query. You can choose from the following types:
- Sessions list: Displays a list of sessions.
Set the number of sessions to show in the report as required.
- Statistics: Visualizes the distribution of sessions based on the selected metadata.
Select a Statistic presentation for your report, such as Pie chart, List, Bar chart. Select the field (the metadata) to create your statistics on.
- Timeline: Visualizes the distribution of sessions within a day/week/month, depending on the time range chosen for the report under Reporting > Configuration > Generate this report every > Day/Week/Month.
- Sessions list: Displays a list of sessions.
- Click Save.
- Click
- Configure a custom report from scratch, or add the subchapter to an existing report. For details, see Configuring custom reports.
When adding the subchapter you created, look for it under Search-based subchapters.
Creating statistics from custom database queries
The following describes how to create statistics from any custom queries from the
|
|
Caution:
Hazard of denial of service (DoS). This feature of SPS allows the user to execute read-only queries on the database of SPS. If the database is large |

To create statistics from any custom queries from the
-
Navigate to the Reporting > Advanced statistics page and click
.
-
Enter a name for the statistics. The created statistics will be available for reports under this name as a subchapter.
-
Enter the SQL query that returns the data you need into the Query field. Note the following important points:
-
The query must be a full PostgreSQL query.
-
SQL queries used for pie and bar charts must return a title and a cnt column, in this order. For example:
select
  remote_username as title,
  count(*) as cnt
from channels
group by title
-
The query can be executed on the database tables and views that contain metadata about the audited connections, as well as the content of the audited connections (for example, the commands executed in a session) if indexing is used. Note that these tables do not contain any data from the upstream traffic, that is, passwords entered by the users are not available in the database.
-
Limit the query to avoid unnecessarily long results, for example, LIMIT = 5000. Note that SPS automatically limits the results to 10000 entries (this is a hard limit, you cannot increase it).
Caution: Generating a report that includes an Advanced statistics chapter that returns several thousands of entries requires significant CPU and memory resources from One Identity Safeguard for Privileged Sessions (SPS). While generating such a partial report, the web interface of SPS can become slow or unresponsive.
-
The structure of the accessible tables may change in future versions of SPS. For details about the tables and their contents, see Database tables available for custom queries.
The query can include the following macros: :range_start, :range_end. When including the statistics in a report, these macros will refer to the beginning and end dates of the reported interval. When clicking Preview, the macros will refer to the start and end of the current day.
Example
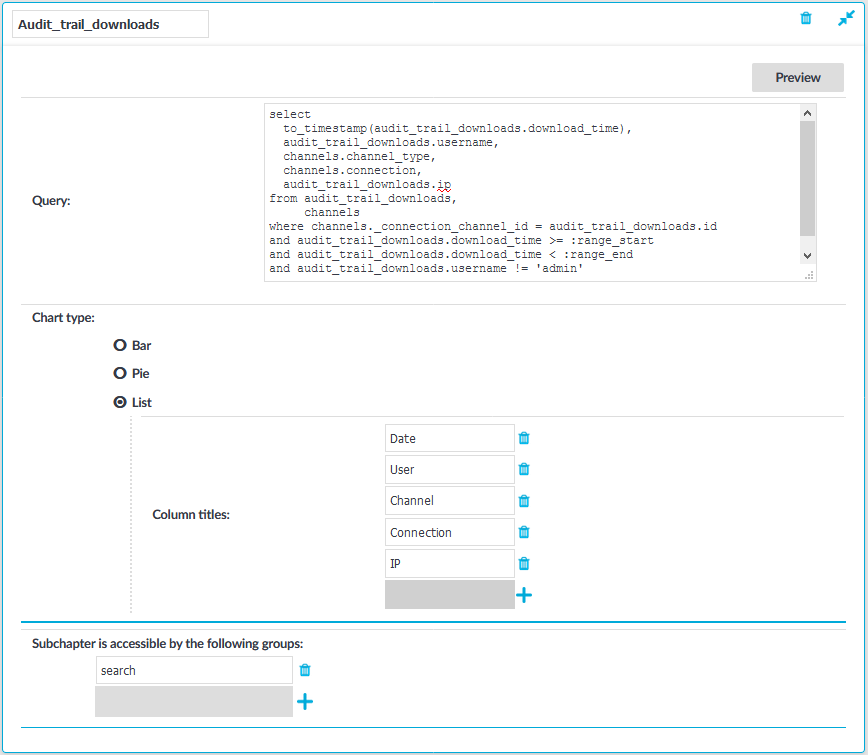
The following query generates a list of audit trail downloads within the reported interval (using standard date formatting), excluding administrator downloads:
Example
select
  to_timestamp(audit_trail_downloads.download_time),
  audit_trail_downloads.username,
  channels.channel_type,
  channels.connection,
from audit_trail_downloads,
     channels
where channels._connection_channel_id = audit_trail_downloads.id
and audit_trail_downloads.download_time >= :range_start
and audit_trail_downloads.download_time < :range_end
and audit_trail_downloads.username != 'admin'
order by audit_trail_downloads.download_time;
Figure 268: Reporting > Advanced statistics — Creating custom database queries
-
-
Select the type of chart to display, that is, Bar, Pie or List.
-
For bar charts, enter the name of the Y axis into the Y axis title field.
-
For lists, you can customize the name of the columns in the list by clicking
-
-
Click Preview to test the query.
-
(Optional) By default, users of the search group can add these statistics to reports. To specify other groups, select Subchapter is accessible by the following groups and click
NOTE: Accessing advanced statistics subchapters requires the Reporting > Advanced statistics privilege.
-
Click
to save the query.
-
Add this new subchapter to a report. For details on how to add this subchapter to a selected report, see Configuring custom reports