
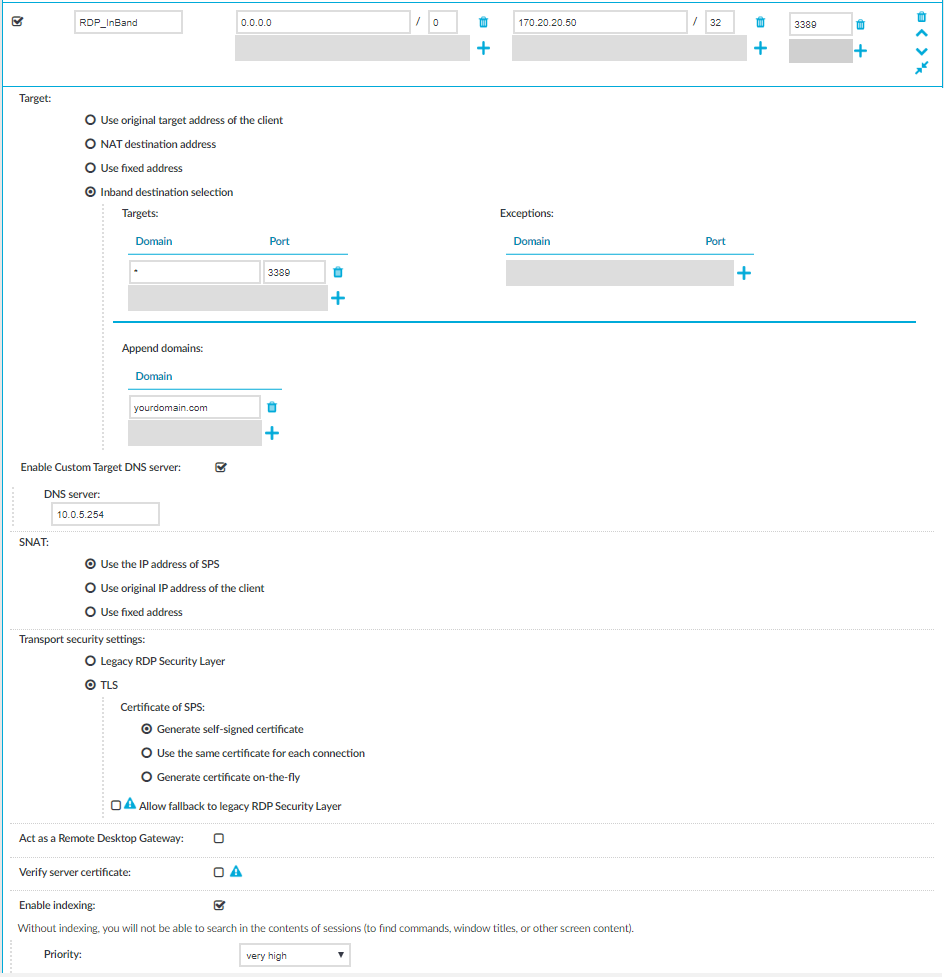
Configuring inband destination selection without RD Gateway
The following describes how to configure a Connection Policy to extract the address of the server from the username.
To configure a Connection Policy to extract the address of the server from the username
-
Navigate to the Connection policy you want to modify, for example, to RDP Control > Connections.
-
Select Inband destination selection.
Figure 11: Configuring inband destination selection for Windows connections
-
Enter the addresses of the servers that the users are permitted to access into the Targets field.
-
If the clients can access only a specified port on the server, enter it into the Port field. If the Port is not set, the clients may access any port on the server.
-
If there are any servers that the users cannot target using inband destination selection, add them to the Exceptions field.
-
To use inband destination selection with RDP connections without using SPS as a Remote Desktop Gateway, you must use SSL-encrypted RDP connections.
For details, see Using TLS-encrypted RDP connections.
-
Click
.
-
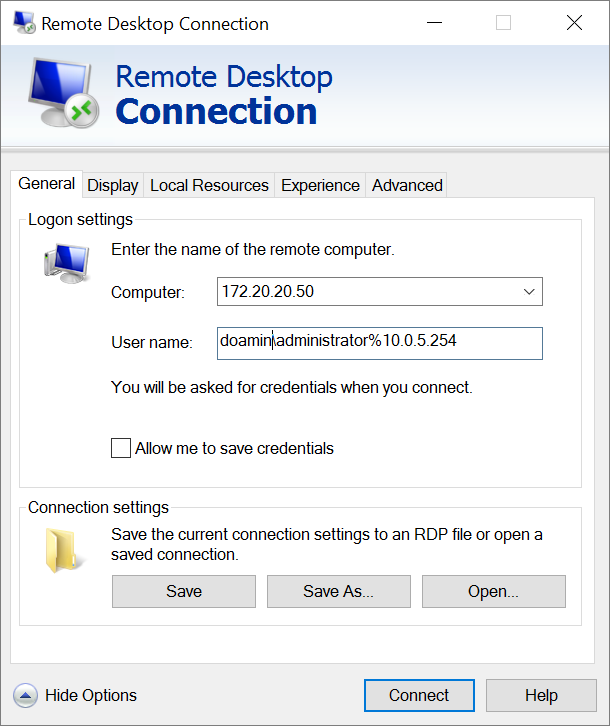
Start an RDP session from a Windows machine to SPS.
Also, your users have the option to encode the address of the destination server in their username, in the username field of their client application. Note that SPS automatically displays a login screen if it cannot determine the username used in the connection, or you have not encoded a destination server in the username field. You can specify the destination address in the login screen when prompted.
When encoding the address of the destination server in the username, there are a few points to keep in mind. Since most RDP client applications limit which special characters can be used in usernames, this is not always intuitive.
For the Microsoft Remote Desktop application (mstsc) and the login screen that SPS displays, note the following points:
-
Use the % character to separate the fields, for example: username%my-targetserver
-
Do not use the @ character.
-
To specify the port number of the server (if it does not use the default port), use the caret ^ character, for example: username%my-targetserver^6464
-
To specify an IPv6 address, replace the colons with carets, and enclose the address in parentheses. For example, to target the ::1 IP address, use username%(^^1). To target port 6464 of the same server, use username%(^^1)^6464.
In the following example, a % symbol is passing the destination IP address to SPS, which redirects the connection to the proper client.
Figure 12: Configuring inband destination selection for Windows connections
-
Real-time content monitoring with Content Policies
You can monitor the traffic of certain connections in real time, and execute various actions if a certain pattern (for example, a particular command or text) appears in the command line or on the screen, or if a window with a particular title appears in a graphical protocol. Since content-monitoring is performed real-time, SPS can prevent harmful commands from being executed on your servers. SPS can also detect numbers that might be credit card numbers. The patterns to find can be defined as regular expressions. In case of ICA, RDP, and VNC connections, SPS can detect window title content.
The following channels support content policies:
-
SSH Session shell (event type: Commands/Screen Content/Credit card)
-
Telnet (event type: Commands/Screen Content/Credit card)
-
RDP Drawing (event type: Window title detection)
-
VNC (event type: Window title detection)
-
ICA Drawing (event type: Window title detection)
For details, see Real-time content monitoring with Content Policies.
NOTE: Using content policies significantly slows down connections (approximately 5 times slower), and can also cause performance problems when using the indexer service.
The following describes how to create a new content policy that performs an action if a predefined content appears in a connection.
For details, see Creating a new content policy.
To create a new content policy that performs an action if a predefined content appears in a connection
-
Navigate to Policies > Content Policies, click
and enter a name for the policy.
-
Select the Event type that you want to monitor.
-
Select Match, click
-
To add an exception to the Match rule, select Ignore, click
-
Select the action to perform.
-
Click
-
To use the content policy created in the previous steps, select the policy in the channel policy that is used to control the connections.
Indexing service
One Identity Safeguard for Privileged Sessions (SPS) can index the contents of audit trails using its own indexer service or external indexers. Indexing extracts the text from the audit trails and segments it to tokens. A token is a segment of the text that does not contain whitespace: for example words, dates (2009-03-14), MAC or IP addresses, and so on. The indexer returns the extracted tokens to SPS, which builds a comprehensive index from the tokens of the processed audit trails.
Once indexed, the contents of the audit trails can be searched from the web interface. SPS can extract the commands typed and the texts seen by the user in terminal sessions, and text from graphical protocols like RDP, Citrix ICA, and VNC. Window titles are also detected.
SPS has an internal indexer, which runs on the SPS appliance. In addition to the internal indexer, external indexers can run on Linux hosts.
Processing and indexing audit trails requires significant computing resources. If you have to audit lots of connections, or have a large number of custom reports configured, consider using an external indexer to decrease the load on SPS. For sizing recommendations, ask your One Identity partner or contact our Support Team.
For details, see Indexing audit trails.
Using the content search
To most effectively search in the contents of the audit trails, make sure that the following prerequisites are met:
-
Indexing was enabled in the connection policy related to the audit trail during the session, and
-
the audit trail has already been indexed.
For details, see "Indexing audit trails" in the Administration Guide.