
Creating and editing channel policies
The Channel policy lists the channels (for example, terminal session and SCP in SSH, or Drawing and Clipboard in RDP) that can be used in the connection, and also determines if the channel is audited or not. The Channel policy can also restrict access to each channel based on the IP address of the client or the server, a user list, user group, or a time policy. For example, all clients may access the servers defined in a connection via SSH terminal, but the channel policy may restrict SCP access only to a single client. The policies set in the channel policy are checked when the user attempts to open a particular channel type in the connection.
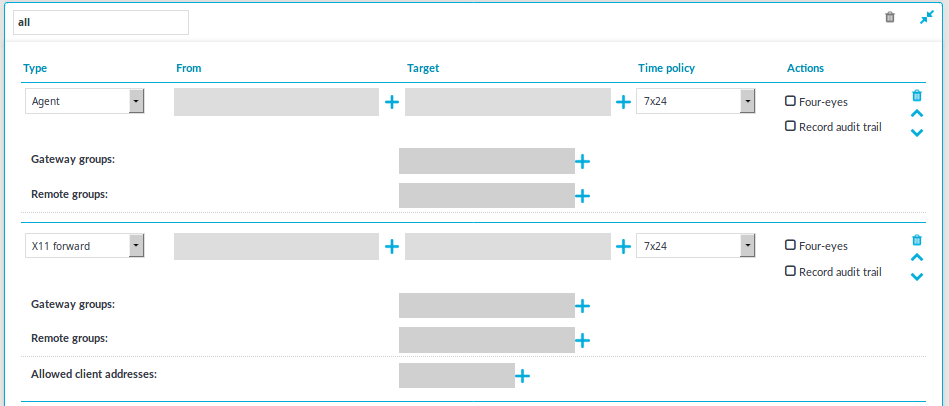
Figure 144: <Protocol name> Control > Channel Policies — Configuring channel policies
To create a new channel policy or edit an existing one
-
Channel policies are configured individually for every protocol. Navigate to the Channel Policies tab of the respective protocol (for example, SSH Control > Channel Policies) and click
to create a new channel policy. Enter a name for the policy (for example, shell_and_backup).
-
Click
to add a new channel.
-
Select the channel to be enabled in the connection from the Type field. All restrictions set in the following steps will be effective on this channel type. The available channels are different for every protocol. For their descriptions, see the following sections:
-
The HTTP protocol has only one channel type with no special configuration options.
-
Supported ICA channel types for the Independent Computing Architecture protocol.
-
Supported RDP channel types for the Remote Desktop Protocol.
-
Supported SSH channel types for the Secure Shell protocol
-
The Telnet protocol has only one channel type with no special configuration options.
-
The VNC protocol has only one channel type with no special configuration options.
-
-
To restrict the availability of the channel only to certain clients, click
You can also enter a hostname instead of the IP address, and One Identity Safeguard for Privileged Sessions (SPS) automatically resolves the hostname to IP address. Note the following limitations:
-
SPS uses the Domain Name Servers set Basic Settings > Network > Naming > Primary DNS server and Secondary DNS server fields to resolve the hostnames.
-
If the Domain Name Server returns multiple IP addresses, SPS selects randomly from the list.
-
-
To restrict the availability of the channel only to certain servers, click
NOTE: Use the real IP address of the server, which may be different from the one addressed by the clients, specified in the Target field of the connection policy.
You can also enter a hostname instead of the IP address, and One Identity Safeguard for Privileged Sessions (SPS) automatically resolves the hostname to IP address. Note the following limitations:
-
SPS uses the Domain Name Servers set Basic Settings > Network > Naming > Primary DNS server and Secondary DNS server fields to resolve the hostnames.
-
If the Domain Name Server returns multiple IP addresses, SPS selects randomly from the list.
-
-
To restrict the availability of the channel only to certain users, click
To restrict the availability of the channel when using gateway authentication, click
You may list local user lists as defined in Creating and editing user lists, or LDAP groups (for details on accessing LDAP servers from SPS, see Authenticating users to an LDAP server). Note the following behavior of SPS:
-
If you list multiple groups, members of any of the groups can access the channel.
NOTE: When listing both a whitelist and blacklist in the Remote Group section and a username appears on both lists, the user will be able to access the channel.
-
If you do not list any groups, anyone can access the channel.
NOTE: When the channel opens, there are certain cases when the remote group is not known yet. For example, in case of an RDP or ICA login screen, the drawing channel has to be opened first to properly display the logon screen. Only those channel rules will apply, where the Remote group field is empty. In case of network level authentication, all required information is present already so this limitation does not apply.
-
If a local user list and an LDAP group has the same name and the LDAP server is configured in the connection that uses this channel policy, both the members of the LDAP group and the members of the local user list can access the channel.
NOTE: User lists and LDAP support is currently available only for the SSH and RDP protocols. For other protocols, see Configuring gateway authentication.
-
-
Select a time policy to narrow the availability of the channel. If the time policy of the channel policy is set to 7x24, the channel is always available. For details, see Configuring time policies.
-
Some channel types require additional parameters, for example port forwarding in SSH needs the IP addresses and ports of the source and destination machines. Click
-
Select the Record audit trail option to record the activities of the channel into audit trails. Typically large file-transfers (for example system backups, SFTP channels) are not audited because they result in very large audit trails. Check regularly the free hard disk space available on SPS if you do audit such channels. You can also receive alerts about disk space fill-up if you set these. For details, see Preventing disk space fill-up and System related traps.
-
Select the 4 eyes option to require four-eyes authorization to access the channel. For details, see Configuring four-eyes authorization.
-
Repeat Steps 2-10 to add other channels to the policy.
NOTE: The order of the rules matters. The first matching rule will be applied to the connection. Also, note that you can add the same channel type more than once, to fine-tune the policy.
-
Click
to save the list.
