立即与支持人员聊天
与支持团队交流

Active Roles On Demand Hosted - Administration Guide

Introduction About Active Roles Getting Started Rule-based Administrative Views Role-based Administration
Access Templates as administrative roles Access Template management tasks Examples of use Deployment considerations Windows claims-based Access Rules
Rule-based AutoProvisioning and Deprovisioning
About Policy Objects Policy Object management tasks Policy configuration tasks
Property Generation and Validation User Logon Name Generation Group Membership AutoProvisioning E-mail Alias Generation Exchange Mailbox AutoProvisioning AutoProvisioning for SaaS products OneDrive Provisioning Home Folder AutoProvisioning Script Execution Office 365 and Azure Tenant Selection User Account Deprovisioning Office 365 Licenses Retention Group Membership Removal Exchange Mailbox Deprovisioning Home Folder Deprovisioning User Account Relocation User Account Permanent Deletion Group Object Deprovisioning Group Object Relocation Group Object Permanent Deletion Notification Distribution Report Distribution
Deployment considerations Checking for policy compliance Deprovisioning users or groups Restoring deprovisioned users or groups Container Deletion Prevention policy Picture management rules Policy extensions
Workflows
Understanding workflow Workflow activities overview Configuring a workflow
Creating a workflow definition Configuring workflow start conditions Configuring workflow parameters Adding activities to a workflow Configuring an Approval activity Configuring a Notification activity Configuring a Script activity Configuring an If-Else activity Configuring a Stop/Break activity Configuring an Add Report Section activity Configuring a Search activity Configuring CRUD activities Configuring a Save Object Properties activity Configuring a Modify Requested Changes activity Enabling or disabling an activity Enabling or disabling a workflow Using the initialization script
Example: Approval workflow E-mail based approval Automation workflow Activity extensions
Temporal Group Memberships Group Family Dynamic Groups Active Roles Reporting Management History
Understanding Management History Management History configuration Viewing change history
Workflow activity report sections Policy report items Active Roles internal policy report items
Examining user activity
Entitlement Profile Recycle Bin AD LDS Data Management One Identity Starling Management One Identity Starling Two-factor Authentication for Active Roles Managing One Identity Starling Connect Azure AD, Office 365, and Exchange Online management
Configuring Active Roles to manage hybrid AD objects Managing Hybrid AD Users Unified provisioning policy for Azure O365 Tenant Selection, Office 365 License Selection, and Office 365 Roles Selection, and OneDrive provisioning Office 365 roles management for hybrid environment users Managing Office 365 Contacts Managing Hybrid AD Groups Managing Office 365 Groups Managing Azure Security Groups Managing cloud-only Azure users Managing cloud-only Azure guest users Managing cloud-only Azure contacts Changes to Active Roles policies for cloud-only Azure objects Managing room mailboxes
Managing Configuration of Active Roles
Connecting to the Administration Service Adding and removing managed domains Using unmanaged domains Evaluating product usage Creating and using virtual attributes Examining client sessions Monitoring performance Customizing the console Using Configuration Center Changing the Active Roles Admin account Enabling or disabling diagnostic logs Active Roles Log Viewer
SQL Server Replication Appendix A: Using regular expressions Appendix B: Administrative Template Appendix C: Communication ports Appendix D: Active Roles and supported Azure environments Appendix E: Enabling Federated Authentication Appendix F: Active Roles integration with other One Identity and Quest products Appendix G: Active Roles integration with Duo Appendix H: Active Roles integration with Okta

Scenario: Creating and assigning home folders

In this scenario, you configure a policy to create home folders when creating user accounts. The policy assigns home folders to newly created accounts and grants the users change access to their home folders.

To implement this scenario, you must perform the following actions:

  1. Verify that the network file share on which you want the policy to create home folders is listed in the Home Folder Location Restriction policy.
  2. Create and configure a Policy Object that defines the appropriate policy.
  3. Apply the Policy Object to a domain, OU, or Managed Unit.

As a result, when creating a user account in the container you selected in Step 3, Active Roles creates the user home folder and assigns that folder to the user account.

The following sub-sections elaborate on the steps to implement this scenario.

Step 1: Verifying the Home Folder Location Restriction policy

Step 1: Verifying the Home Folder Location Restriction policy

The network file share to hold home folders must be listed in the Home Folder Location Restriction policy. Use the Configuring the Home Folder Location Restriction policy instructions to verify that the policy allows creation of home folders on the network file share.

Step 2: Creating and Configuring the Policy Object

Step 2: Creating and Configuring the Policy Object

You can create and configure the Policy Object you need by using the New Provisioning Policy Object wizard. For information about the wizard, see Creating a Policy Object in the Policy Object management tasks section earlier in this chapter.

To configure the policy, click Home Folder AutoProvisioning on the Policy to Configure page of the wizard. Then, click Next.

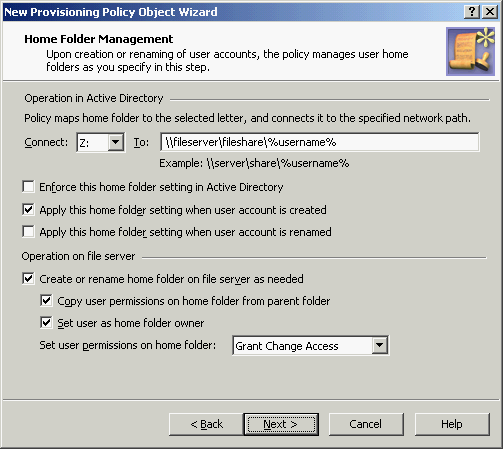
On the Home Folder Management page, set up the following options:

  • In the Connect box, select the drive letter to assign to the home folder (for example, Z:).
  • In the To box, type the path in the form \\server\share\%username% where \\server\share is a valid UNC path to a network file share. For example, if you have a network file share set up on the comp server, with the share name set to home, you may specify the following path: \\comp\home\%username%
  • Select the Apply this home folder setting when user account is created check box.

As a result, the Home Folder Management page should look like the following figure.

Figure 61: Policy Object: Home folder management

Click Next and follow the steps in the wizard to create the Policy Object.

Step 3: Applying the Policy Object

Step 3: Applying the Policy Object

You can apply the Policy Object by using the Enforce Policy page in the New Provisioning Policy Object wizard, or you can complete the wizard and then use the Enforce Policy command on the domain, OU, or Managed Unit where you want to apply the policy.

For more information on how to apply a Policy Object, see Applying Policy Objects and Managing policy scope earlier in this chapter.

相关文档

The document was helpful.

选择评级

I easily found the information I needed.

选择评级