To enable the Microsoft Azure AD Connector of the Active Roles read and write data in Microsoft Azure Active Directory (Azure AD), you must configure the connector as an Azure application in your Microsoft Azure AD environment.
To configure Microsoft Azure AD Connector as an Azure application
-
In the Azure Portal, register a new application in the domain of your Microsoft Azure AD environment where you want to perform data synchronization. For more information, see Register an application with the Microsoft identity platform in the Microsoft Azure documentation.
-
Assign the required permissions to the application via a Windows PowerShell script, so that the Microsoft Azure AD Connector of the Active Roles can read and write data in Microsoft Azure AD. To do so, adapt and run the following Windows PowerShell script.
Example PowerShell Script to assign permissions to Microsoft Azure AD Connector
# Replace <ClientId> with the Client ID of the Active Roles Azure AD Connector application (example format: 455ad643-332g-32h7-q004-8ba89ce65ae26)

$Id = “<ClientId>”

# Prompt for Microsoft Azure AD Global Admin credentials.

# Save the supplied credentials to the $creds variable.

$creds=get-credential

# Connect to Azure AD using the credentials stored in $creds.

Connect-AzureAD -credential $creds

# Get the Principal ID of the Active Roles Azure AD Connector Application and save it to the $servicePrincipal variable

$servicePrincipal = Get-AzureADServicePrincipal -All $true | Where-Object {$_.AppId -eq $Id}

# Get the required role ID from the Active Roles Azure AD Connector Application and save it to the $roleId variable

$roleId = (Get-AzureADDirectoryRole | Where-Object {$_.displayName -eq 'Company Administrator'}).ObjectId

# Assign the required permissions to the Active Roles Azure AD Connector application

Add-AzureADDirectoryRoleMember -ObjectId $roleId -RefObjectId $servicePrincipal.ObjectId
- In the Azure Portal, open the application you created and take note of the following information:
These information will be required when configuring the Microsoft Azure AD Connector as described in Creating a connection with the Microsoft Azure AD Connector.
You can configure an Active Roles connection to your Microsoft Azure Active Directory (Azure AD) environment with the Microsoft Azure AD Connector.
Prerequisites
An Azure application with the required permissions for Microsoft Azure AD Connector must exist in the Azure AD environment where you want to perform data synchronization. For more information on configuring an Azure application and the required permissions, see Configuring the Microsoft Azure AD Connector as an Azure application for data synchronization.
To create a new Microsoft Azure AD Connector connection
-
-
-
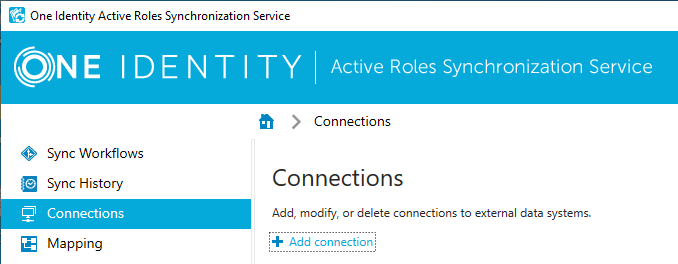
In the Active Roles Console, navigate to Connections > Add Connection.
Figure 5: Active Roles Console – Adding a new connection via Connections > Add connection

-
In the Name connection and select connector step, specify a custom Connection name. Then from the Use the specified connector drop-down list, select Microsoft Azure AD Connector and click Next.
- On the Specify connection settings page, configure the following options:
-
To verify that the specified authentication settings are correct, click Test Connection. If testing fails, then:
-
Check your network connectivity.
-
Check if the Microsoft Azure service is available.
-
Make sure that the specified Azure AD domain, Client ID and Key settings are correct.
-
If testing completed successfully, create the new Microsoft Azure AD connection by clicking Finish.
You can view or modify an existing connection based on the Microsoft Azure AD Connector with the Active Roles Console. Modifying a Microsoft Azure AD Connector connection is typically required if any change occurs in the Azure application or the Azure AD environment to which the Active Roles connection was originally configured.
To view or modify an existing Microsoft Azure AD Connector connection
-
In the Active Roles Console, click Connections.
-
In the Connections page, search for the connection that uses the Microsoft Azure AD Connector, and click Connection settings.
- On the Connection Settings tab, click Specify connection settings and view or modify the following settings as required:
-
To verify that the specified authentication settings are correct, click Test Connection. If testing fails, then:
-
Check your network connectivity.
-
Check if the Microsoft Azure service is available.
-
Make sure that the specified Azure AD domain, Client ID and Key settings are correct.
- To apply your changes, click Save.
The Microsoft Azure AD Connector supports several user and group object attributes for data synchronization. The following tables list the all supported user and group objects, along with the operations you can perform on them.
Table 113: Supported objects and operations
|
User |
Yes |
Yes |
Yes |
Yes |
|
Group |
Yes |
Yes |
Yes |
Yes |
NOTE: When configuring a data synchronization mapping rule with the Microsoft Azure AD Connector, consider that the following User and Group attributes are currently not supported and cannot be queried via the Microsoft Graph API:
-
User attributes:
-
aboutMe
-
birthday
-
contacts
-
hireDate
-
interests
-
mySite
-
officeLocation
-
pastProjects
-
preferredName
-
responsibilites
-
schools
-
skills
-
Group attributes:
This means that although these user and group attributes are visible, they cannot be set in a mapping rule.

