
Elements of Rule XML
By understanding the rule elements, and examining the sample rules included in Quest One Identity Manager Data Governance Edition, you can write your own rules, or edit existing ones. The following are the elements in the rule XML.
<rule>
<rule> is the root element. It has the following format:
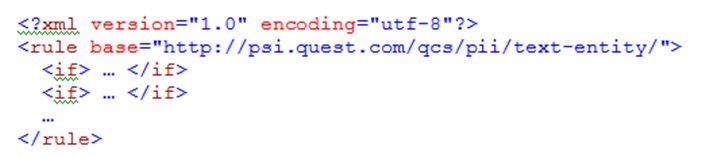
The base attribute is optional. It is a logical container for rule elements, and makes it easier to refer to these elements when rule writing. If you do not include a base URI, you must use an absolute path when referring to elements within a rule. The <rule> element has one or more <if> sub-elements, each of which represents a condition to be evaluated and an action to be applied if the condition evaluates to true. The rules engine evaluates <if> blocks in order; when it discovers an <if> whose condition returns true, no further <if> blocks are evaluated against that content.
<if>
<if> represents a condition to be evaluated against some content, and an action to be taken if the condition evaluates to true.
The <if> must contain exactly two sub-elements. The first is the condition to be evaluated; the second is the action to be taken. The following condition elements are supported:<and/>
<find/>
<true/>
<false/>The following action elements are supported:<match/>
<stop/>
<and>
<and> represents a compound condition. It has one or more sub-elements, each of which is itself a condition. 
The <and> evaluates to true if every one of its sub-elements evaluates to true. If one sub-element evaluates to false, then no further sub-elements are evaluated.
<find>
<find> invokes a text extractor. You can use any extractor available in your system. For a list of extractors included in Quest One Identity Manager, see Sample Text Extractors Details.
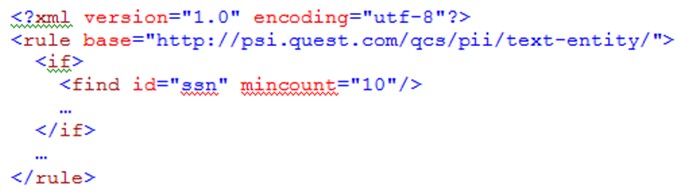
The id attribute is required. Use the id defined in the text extractor XML. If the URI of the extractor is the same as your rule, you can use the id alone; if it is different, use the full path of URI/extractor ID. For example, in the above example, the extractor “ssn” is assumed to be contained in the URI “http://psi.quest.com/qcs/pii/text-entity/.
The rules engine returns detailed information about the number of matches, and the position of each match within the text. If the referenced entity does not exist, there is no match.
The mincount attribute is optional. If provided, then the <find> evaluates to true if the named text extractor found at least that many matches in the text. If the attribute is not provided, a default value of 1 is assumed.
The maxcount attribute is also optional. If provided, then the <find> evaluates to false if the named text extractor found more than that many matches in the text.
<true>
<true> is a condition that always evaluates to true. It is useful in expressing an “otherwise” action.
<false>
<false> is a condition that always evaluates to false. It may be used to disable an <if> during development and testing of a rule.
<match>
<match> is an action that causes a rule to match the content being processed. The strength attribute is optional. It provides the strength of match for the content being processed. If the attribute is missing, a value of one is assumed. Match strength works with the rule weight on a category, and the category threshold to determine if there is a potential categorization. For more information, see How Rules Affect Categorization.
<stop>
<stop> is an action that causes the rule to fail. No further conditions or actions are evaluated for the current text fragment.
Modifying Rule XML
You edit rule XML directly in an XML file, outside of the classification system. There are two approaches you can take:
- Export your taxonomy, edit the rule XML directly in the taxonomy XML. Rules are located inline within the category with which it is associated. Import the modified taxonomy. For more information, see Importing and Exporting Taxonomies.
- Edit the rule in the system using the Set-XmlRule cmdlet. See Managing Rules in the Classification System.
Managing Rules in the Classification System
Once you have created your rules, you can add them to the system. For more information, see Writing XML Rules. Rules do not impact your categorization until you associate them with a category, however all resources are always evaluated against all rules in the system. This step is necessary before you can make the association with a category. You must know the location of your XML file in order to add it.
You can work with taxonomies using the following methods:
- Powershell snap-in (see Adding the PowerShell Snap-ins)
- Editing the template XML directly (see Working with a Taxonomy XML File)
Rules require a rule ID, which you will use when you associate rules with categories. It is recommended you use a naming convention for your rule IDs. You cannot change the ID of a rule. To rename a rule in the system, you can remove the rule from the system, and add it with the correct name. However, if the old rule was associated with any categories, you will need to associate the new rule to get the same results.
When you add a rule, by default it is disabled. A rule must be both enabled, and associated with a category before it affects categorization. You can enable or disable a rule according to your needs.
To add a rule to your classification system
- Run the Add-QXmlRule cmdlet with the following mandatory parameters:
-
- ServerAddress
Provide the name of the computer hosting the Data Governance server, and the port. Enter in the form computername:port number. The default port is 8723. - Id
You cannot change the ID of a rule once you run the cmdlet. - Name
The name should reflect the purpose of the rule. - XmlFile
The full path to the location of the file containing your rule. If the file is not local, enter in the form \\computername\filename.
- ServerAddress
- If desired, use the following optional parameters:
- Description
Use this to describe the criteria of the rule. - IsEnabled
By default this is set to $false. When you are ready to use the rule in live categorizations, you can enabling it by editing the added rule.
- Description
To view a list of all XML rules in the classification system
- Run the Get-QXmlRules cmdlet with the following mandatory parameter:
- ServerAddress
Provide the name of the computer hosting the Data Governance server, and the port. Enter in the form computername:port number. The default port is 8723.
- ServerAddress
To view the parameters of a specific rule
- Make sure you know the ID of the rule you want.
You can use the Get-QXmlRules cmdlet for a full listing of all rules in the system. - Run the Get-QXmlRule cmdlet with the following mandatory parameter:
- ServerAddress
Provide the name of the computer hosting the Data Governance server, and the port. Enter in the form computername:port number. The default port is 8723. - Id
- ServerAddress
To edit the parameters of an added rule
- Make sure you know the ID of the rule you want.
You can use the Get-QXmlRules cmdlet for a full listing of all rules in the system. - Run the Set-QXmlRule cmdlet with the following mandatory parameters:
- ServerAddress
Provide the name of the computer hosting the Data Governance server, and the port. Enter in the form computername:port number. The default port is 8723. - Id
- ServerAddress
- Modify any of the following optional parameters:
- Name
- XmlFile
When you import a new rule XML file, the old rule is overwritten with the contents of this file. - Description
- IsEnabled
A rule must be set to $true in order to be used in categorization.
To remove a rule from the classification system
- Make sure you know the ID of the rule you want.
You can use the Get-QXmlRules cmdlet for a full listing of all rules in the system. - Run the Remove-QXmlRule cmdlet with the following mandatory parameters:
- ServerAddress
Provide the name of the computer hosting the Data Governance server, and the port. Enter in the form computername:port number. The default port is 8723. - Id
- ServerAddress
Associating Rules to Categories
Rules do not affect categorization until they are associated with a category and given a weight. The default category weight is one, and the value must be between zero and one. Make sure you understand the impact you expect the rule to have on potential categorization. For more information see How Rules Affect Categorization.
To associate a rule with a category
- Make sure you know the ID of the category.
For more information, see Finding a Taxonomy or Category ID using PowerShell. - Make sure you know the ID of the rule.
For more information, see Managing Rules in the Classification System. - Run the Add-QRuleToCategory cmdlet with the following mandatory parameters:
- ServerAddress
Provide the name of the computer hosting the Data Governance server, and the port. Enter in the form computername:port number. The default port is 8723. - RuleId
- CategoryId
- ServerAddress
- If you want to change the weight, use the optional parameter -Weight.