Advanced settings for the Exchange Online connector
You can specify whether want to set advanced options in the Synchronization Editor project wizard on the Connect Exchange Online page. These settings allow you to change the following options for communicating with Exchange Online:
- The number of concurrent connections per connection parameter set
- The definition of Windows PowerShell commands
Number of concurrent connections per connection parameter set
IMPORTANT: You should only make changes to this option with the help of support desk staff. Changes to this setting will have wide ranging effects on synchronization and must be made carefully.
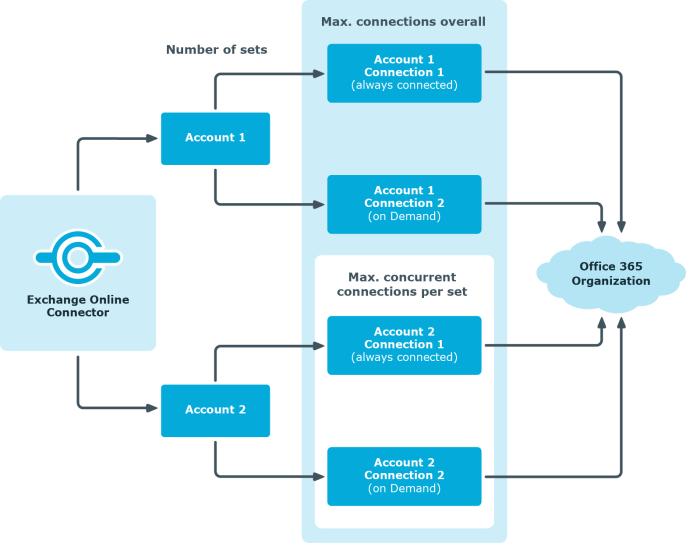
Use this option to set the number of concurrent connections for each connection parameter set or for each user account for synchronization. The setting specifies how many concurrent connections will be created for each user account. The default value is 2. Exchange Online currently allows three connections per user account on the server side.
When the Exchange Online connector creates the connection, it creates one Windows PowerShell session per connection parameter set regardless of the number of queries that follow. Further connections are created on demand, for example, when loading multiple objects during the synchronization.
The maximum number of sessions established to Exchange Online can be calculated with the following formula:
Maximum number of Windows PowerShell sessions = Number of parameter sets * Value of concurrent connection per connection parameter set
The minimum number of sessions established to Exchange Online is the same as the number of connection parameter sets.
To change the number of concurrent connections
- On the Connect to Exchange Online page in the Synchronization Editor connection wizard, select Show advanced options and click Next.
- Enter a value between 1 and 3 in concurrent connections per connection parameter set.
- On the Connection parameters page, enter the login data for connecting to Exchange Online. For more information, see Creating a synchronization project for initial synchronization of an Exchange Online environment.
- Click Finish to complete.
Customizing the connection definition
You can use this setting to adjust the definition used by the connector in order to convert inputs and outputs between the Exchange Online Cmdlets and the schema of the Synchronization Engine.
IMPORTANT: You should only make changes to the connector definition with the help of support desk staff. Changes to this setting will have wide ranging effects on synchronization and must be made carefully.
NOTE: A customized connection definition is not overwritten by default and must be made with careful consideration.
To customize the connector definition
-
Open the synchronization project in the Synchronization Editor.
-
Select Configuration | Target system.
-
Click Edit connection.
This starts the system connection wizard.
-
Enable Show advanced options on the system connection wizard's start page.
-
Customize the connector definition as required on the Advanced options page.
-
Select Customize connector definition.
-
Edit the definition according to the instructions given by the support desk staff. You take the following action:
-
Choose  to load the definition from a file.
-
Use  to test the definition for errors.
-
Choose  to display the differences to the standard version.
- Save the changes.
Displaying synchronization results
Synchronization results are summarized in the synchronization log. You can specify the extent of the synchronization log for each system connection individually. One Identity Manager provides several reports in which the synchronization results are organized under different criteria.
To display a synchronization log
-
Open the synchronization project in the Synchronization Editor.
-
Select the Logs category.
-
Click  in the navigation view toolbar.
Logs for all completed synchronization runs are displayed in the navigation view.
-
Select a log by double-clicking it.
An analysis of the synchronization is shown as a report. You can save the report.
To display a provisioning log
-
Open the synchronization project in the Synchronization Editor.
-
Select the Logs category.
-
Click  in the navigation view toolbar.
Logs for all completed provisioning processes are displayed in the navigation view.
-
Select a log by double-clicking it.
An analysis of the provisioning is shown as a report. You can save the report.
The log is marked in color in the navigation view. This mark shows you the status of the synchronization/provisioning.
TIP: The logs are also displayed in the Manager under the <target system> | synchronization log category.
Synchronization logs are stored for a fixed length of time.
To modify the retention period for synchronization logs
Exchange Online synchronization features
There are a number of features for synchronizing Exchange Online environments, which are described here.
Dependency resolution
By default, automatic synchronization step dependency resolution is turned off in the synchronization workflow. This reduces the number of calls required to Exchange Online. This can lead to unresolved references during synchronization that are handled in the maintenance phase at the end of synchronization.
Multiple organizations are not supported
Due to the dynamic number of used login accounts, variable sets cannot be used to parametrize the connection. For this reason, creating more base objects in one synchronization project is not supported.
Changing mailbox types in the Exchange Online portal
The default template for Exchange Online supports conversion of mailbox types as follows:
NOTE: In performing an unsupported change, for example, a room mailbox to a shared mailbox, the synchronization will mark the room mailbox as "missing" and fail to create the shared mailbox due to naming violations. This scenario can only be resolved manually.
NOTE: One Identity Manager does not support handling of mailbox types.
Synchronization of mailbox usage information
Synchronization of mailbox usage information is done in a separate synchronization step. Loading this information from Exchange Online is potentially very time consuming. Therefore, it make sense to create a separate workflow that includes a synchronization step for loading this data. You can run this workflow at longer intervals than the workflow without usage data.
The following usage information is synchronized:
| AssociatedItemCount |
Number of elements assigned to this mailbox. |
| DeletedItemCount |
Number of deleted elements. |
| DumpsterMessagesPerFolderCountReceiveQuota |
Maximum number of messages allowed in a folder in the "Recoverable items" folder. |
| DumpsterMessagesPerFolderCountWarningQuota |
Number of item a folder in the "Recoverable items" folder can contain before a warning is sent to the user. |
| ItemCount |
Number of messages in this mailbox (for example, email, calendar, or contacts) that are visible to the user. |
| LastLoggedOnUserAccount |
Name of the last logged on user. |
| LastLogOffTime |
Last log off time |
| LastLogonTime |
Last log on time |
| StorageLimitStatus |
Information about the current storage state with respect to the specified limits. |
| TotalDeletedItemSize |
Size of items in the "Recoverable Items" mailbox. |
| TotalItemSize |
Size of items in mailbox in KB. |
NOTE: The mailbox usage information is only available for users or shared mailboxes.
Number of external slots for the Job server configuration
Since the number of concurrent connections for Exchange Online is limited to three, you should use a dedicated Job server with a reduced number of external execution slots (not more then two). You will get an error message if to many connections are open at the same time.
You can set the number of connections for each connection parameter set and customize the connector definition. For more information, see Advanced settings for the Exchange Online connector.
Customizing the synchronization configuration
Having used the Synchronization Editor to set up a synchronization project for initial synchronization of Exchange Online, you can use the synchronization project to load Exchange Online objects into the One Identity Manager database. When you manage mailboxes, email users, email contacts, mail-enabled distribution groups, and Office 365 groups with One Identity Manager, modifications are provisioned in the Exchange Online system.
You must customize the synchronization configuration in order to compare the One Identity Manager database with the Exchange Online regularly and to synchronize changes.
- You can use variables to create generally applicable synchronization configurations that contain the necessary information about the synchronization objects when synchronization starts. Variables can be implemented in base objects, schema classes, or processing method, for example.
- To specify which Exchange Online objects and database objects are included in synchronization, edit the scope of the target system connection and the One Identity Manager database connection. To prevent data inconsistencies, define the same scope in both systems. If no scope is defined, all objects will be synchronized.
- Update the schema in the synchronization project if the One Identity Manager schema or target system schema has changed. Then you can add the changes to the mapping.
IMPORTANT: As long as a synchronization process is running, you must not start another synchronization process for the same target system. This especially applies, if the same synchronization objects would be processed.
-
If another synchronization process is started with the same start up configuration, the process is stopped and is assigned Frozen status. An error message is written to the One Identity Manager Service log file.
-
Starting another synchronization process with different start up configuration that addresses same target system may lead to synchronization errors or loss of data. Specify One Identity Manager behavior in this case, in the start up configuration.
For more detailed information about configuring synchronization, see the One Identity Manager Target System Synchronization Reference Guide.
Detailed information about this topic
