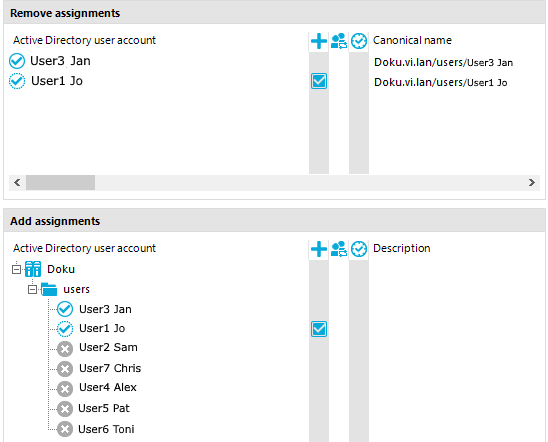
The membership tree shows the direct and indirect assignments to a base object. It also shows the source of the indirectly assigned objects. This means that the object was assigned to a base object through a dynamic role, for example, or through inheritance.
-
Only the assigned elements are displayed in the Remove assignments pane. You can remove the assignments here.
-
Under Add assignments you can see all the elements.
Make new assignments or remove existing ones here. If allowed, you can use a filter to further restrict the selection of elements you want to show.
NOTE: Objects marked for deletion and outstanding objects are struck through on the overview form.
To activate or deactivate an assignment
Figure 24: Displaying assignments

Table 30: Meaning of icons in the membership tree
|

|
Object is assigned directly to the selected base object. |
|

|
Object is assigned indirectly to the selected base object. |
|

|
Object is assigned directly and indirectly to the selected base object. |
|

|
Object is not assigned to a base object. |
|

|
Inheritance interruption. Only when objects are assigned in hierarchical structures. |
|

|
Indirect assignment. |
|

|
Assignment through dynamic roles. |
|

|
Assignment not yet effective. The DBQueue Processor has not yet calculated the assignment. |
|

|
The change in value is planned for a specific date and time. |
NOTE: The list displays assigned elements before unassigned elements.
Table 31: Entries in the membership tree context menu
|
Assign |
Directly assign the selected object to the base object. |
|
Remove |
Remove the assignment of the selected object to the base object. |
|
Assign child objects |
In a hierarchical structure, assign the selected object and its child objects to the base object. |
|
Remove child objects |
In a hierarchical structure, remove the assignments of the selected object and its child object to the base object. |
|
Assign all objects |
Directly assign all existing objects to the base object. |
|
Remove all assignments |
Remove all direct assignments to the base object. |
|
Search |
Opens the search dialog. |
|
Go to object |
Go to the selected object. |
|
Extended properties |
Switches to the detailed form for the selected object, where you can make additional assignments. A prerequisite for this is that the selected object is assigned and this assignment has been saved. |
NOTE: Use the Search function to search the entire assignment tree for the occurrence of specific texts. The search sequence does not follow the displayed hierarchical structure of the tree, but instead the internal structures of the control element. As such, the search seems to jump through the tree at random. All records are searched to find the requested object.
General configuration settings are specified in the Manager.exe.config configuration file. The configuration file is kept in the program directory. For more information, see the One Identity Manager Process Monitoring and Troubleshooting Guide.
To change the program settings in the Manager
Detailed information about this topic
On the User tab, configure your user-specific program settings. These settings are stored in the One Identity Manager database user configuration.
General
-
Show balloon tips: Specifies whether speech bubbles, which provide information about program functionality, are shown in the program.
-
Show large images in navigation panes: Specifies whether smaller or larger icons are displayed on the categories.
-
Show additional icons: Specifies whether icons are shown in the task list in addition to the descriptions.
-
Use single clicks: Specifies whether objects are loaded with a single click or by double-clicking.
-
Use technical display values: Specifies whether display names or technical names are used when collating data exports.
Behavior
-
Enable quick edit mode: Specifies whether quick editing is enabled.
By default, an object‘s overview form is displayed first. You can, however, configure the program to show the edit form for the object first, which allows faster editing. In order to do this quick edit mode has to be enabled. Quick edit mode is indicated by an additional icon in the program’s status bar.
-
Enable expert mode: Specifies whether expert mode is used. Setting this option switches the program from standard view mode to advanced mode.
-
Enable list limit: Specifies whether the number of elements shown in the result list and list items in controls should be limited.
If this option is enabled, the number of elements must be entered. To do this, you can choose between the global system settings or the local, personal setting for the user.
-
Use system settings: Specifies whether the system settings should be used for the list limit.
If this option is activated, then the global system settings from the Common | DBConnection | ListLimit parameter is used. If the number of results is greater than the defined number, a filter dialog opens.
-
Objects: Personal setting for the object list limit. If the number of results is greater than the defined number, a filter dialog opens.
Usage
-
Form history length: Number of forms available to browse through in the form history. You find the form history in the menus attached to the <Back> and <Forward> buttons in the main toolbar.
-
Show recently used objects: Specify whether or not the most recently used objects are displayed. If this option is set, the objects used last are shown in a separate node in the result list.
-
Object type count: This number specifies how many objects per object type are shown per menu entry when the option Show recently used objects is enabled.
After starting
Related topics


