Chat now with support
Chat mit Support

Active Roles 8.2 - Administration Guide

Introduction Getting started with Active Roles Configuring rule-based administrative views Configuring role-based administration Configuring rule-based autoprovisioning and deprovisioning
Configuring Provisioning Policy Objects
User Logon Name Generation E-mail Alias Generation Exchange Mailbox AutoProvisioning Group Membership AutoProvisioning Home Folder AutoProvisioning Property Generation and Validation Script Execution O365 and Azure Tenant Selection AutoProvisioning in SaaS products
Configuring Deprovisioning Policy Objects
User Account Deprovisioning Group Membership Removal User Account Relocation Exchange Mailbox Deprovisioning Home Folder Deprovisioning User Account Permanent Deletion Office 365 Licenses Retention Group Object Deprovisioning Group Object Relocation Group Object Permanent Deletion Script Execution Notification Distribution Report Distribution
Configuring entry types Configuring a Container Deletion Prevention policy Configuring picture management rules Managing Policy Objects Checking for policy compliance Deprovisioning users or groups Restoring deprovisioned users or groups Configuring policy extensions
Using rule-based and role-based tools for granular administration Workflows
About workflow processes Workflow processing overview Workflow activities overview Configuring a workflow
Creating a workflow definition for a workflow Configuring workflow start conditions Configuring workflow parameters Adding activities to a workflow Configuring an Approval activity Configuring a Notification activity Configuring a Script activity Configuring an If-Else activity Configuring a Stop/Break activity Configuring an Add Report Section activity Configuring a Search activity Configuring CRUD activities Configuring a Save Object Properties activity Configuring a Modify Requested Changes activity Enabling or disabling an activity Enabling or disabling a workflow Using the initialization script
Approval workflow Email-based approval Automation workflow Activity extensions
Temporal Group Memberships Group Family Dynamic groups Active Roles Reporting Management History Entitlement profile Recycle Bin AD LDS data management One Identity Starling Join and configuration through Active Roles Managing One Identity Starling Connect Configuring linked mailboxes with Exchange Resource Forest Management Configuring remote mailboxes for on-premises users Migrating Active Roles configuration with the Configuration Transfer Wizard Managing Skype for Business Server with Active Roles
About Skype for Business Server User Management Active Directory topologies supported by Skype for Business Server User Management User Management policy for Skype for Business Server User Management Master Account Management policy for Skype for Business Server User Management Access Templates for Skype for Business Server Configuring the Skype for Business Server User Management feature Managing Skype for Business Server users
Exchanging provisioning information with Active Roles SPML Provider Monitoring Active Roles with Management Pack for SCOM Configuring Active Roles for AWS Managed Microsoft AD Azure AD, Microsoft 365, and Exchange Online Management
Azure tenant types and environment types supported by Active Roles Using Active Roles to manage Azure AD objects Unified provisioning policy for Azure M365 Tenant Selection, Microsoft 365 License Selection, Microsoft 365 Roles Selection, and OneDrive provisioning Changes to Active Roles policies for cloud-only Azure objects
Managing the configuration of Active Roles
Connecting to the Administration Service Managed domains Using unmanaged domains Evaluating product usage Creating and using virtual attributes Examining client sessions Monitoring performance Customizing the Console Using Configuration Center Changing the Active Roles Admin account Enabling or disabling diagnostic logs Active Roles Log Viewer
SQL Server replication Using regular expressions Administrative Template Configuring federated authentication Communication ports and URLs used by Active Roles Integrating Active Roles with other products and services Active Roles Language Pack Active Roles Diagnostic Tools Active Roles Add-on Manager

User Logon Name Generation

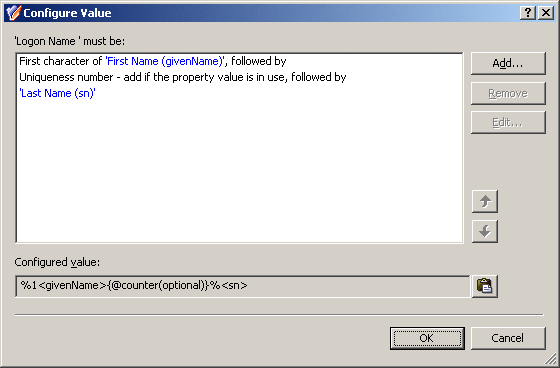
The User Logon Name Generation provisioning Policy Object type is used to automate the assignment of pre-Windows 2000 user login names when creating or modifying a user account, with flexible options to ensure the uniqueness of the policy-generated name.

For a detailed description of this policy, see Concept: User Logon Name Generation in the Active Roles Feature Guide.

Configuring a User Logon Name Generation policy

You can configure a new User Logon Name Generation policy with the New Provisioning Policy Object Wizard of the Active Roles Console.

To configure a User Logon Name Generation policy

  1. In the Active Roles Console, right-click the Configuration > Policies > Administration node.

  2. In the context menu, select New > Provisioning Policy.

  3. In the title screen, click Next. Then, in the Name and Description step, specify a name (and optionally, a description) for the policy.

  4. On the Policy to Configure page, select User Logon Name Generation, then click Next.

  5. On the User Logon Name (pre-Windows 2000) Generation Rules page, configure the generation rules:

    1. Under the list of Generation rules, to open the Configure Value window, click Add.

    2. To start configuring a value, to open the Add Entry window, click Add.

    3. In the Add Entry window, select the entry type and specify its value. The value of the generation rule will be a concatenation of one or more entries. The available types of and their values are the following:

      For more information on how to configure these entry types, see Configuring entry types. After you configured the entry type(s) that you want to include in your generation rule, click OK in the Add Entry window, then in the Configure Value window.

  6. (Optional) In the Advanced menu, set additional options that apply to all generation rules in your list:

    • Maximum length, in characters: Specifies the maximum length of the generated name. The default value is 20 characters, the maximum value is 99 characters.

    • Adjust the case of characters: You can set character case formatting. All UPPERCASE and all lowercase options are available.

    • Uniqueness scope: Specifies the realm (domain-level, forest-level or the realm of all managed domains) where the name generated by the policy must be unique.

    • Restricted characters: Specifies the characters that will be excluded from the generated names besides the default list of excluded characters. By default, the policy always excludes the following characters: " @ * + | = \ : ; ? [ ] , < > /

    If you are ready, apply your changes by clicking OK.

  7. (Optional) To allow the manual editing of login names, select Allow manual edits of pre-Windows 2000 logon name, then select one of the following options:

    • Always: Allows administrators and helpdesk users who create or update user accounts to modify the pre-Windows 2000 login name.

    • Only if a unique name cannot be generated by this policy: Allows manual changes only if the policy-generated name is already assigned to a different user account.

  8. Click Next, then follow the instructions in the wizard to create (and optionally, immediately apply) the Policy Object.

  9. To apply the Policy Object:

    • Use the Enforce Policy page in the New Policy Object Wizard.

    • Alternatively, complete the New Policy Object Wizard, then use the Enforce Policy command on the domain, OU, or Managed Unit where you want to apply the policy.

    For more information on how to apply a Policy Object, see Linking Policy Objects to directory objects.

Example: Using a uniqueness number in a User Logon Name Generation policy

The policy that is described in this example scenario generates the pre-Windows 2000 user login name as follows:

  1. It takes the first character of the user's first name.

  2. Optionally, it adds a uniqueness number.

  3. It adds the user's last name.

  4. The length of the generated name cannot be longer than 8 characters. If the name is longer than 8 characters, the trailing characters are truncated as needed.

The policy that is following this naming rule generates names as follows for users named "Jordan Smithson":

  • JSmithso

  • J1Smiths (if JSmithso is already in use)

  • J2Smiths (if both JSmithso and J1Smiths are in use)

For the steps of creating this policy, see Creating and configuring a User Logon Name Generation Policy Object for a Uniqueness number policy. When ready, the Active Roles user interface displays a Generate button to create login names that meet the configured policy rule.

Creating and configuring a User Logon Name Generation Policy Object for a Uniqueness number policy

You can create the User Logon Name Generation policy that is described in Example: Using a uniqueness number in a User Logon Name Generation policy with the New Provisioning Policy Object Wizard.

To create a User Logon Name Generation policy with a Uniqueness number policy rule

  1. In the Console tree, navigate to Configuration > Policies > Administration.

  2. To open the New Provisioning Policy Object Wizard dialog, right-click Administration, then select New > Provisioning Policy.

  3. On the Name and Description page, provide a unique Name for the new Policy Object. Optionally, also provide a Description. To continue, click Next.

  4. Select the User Logon Name Generation policy type for configuration. Click Next.

    For more information, see Configuring a User Logon Name Generation policy.

  5. In the User Logon Name (pre-Windows 2000) Generation Rules step, click Add.

  6. To configure the policy so that it includes the first character of the user's first name, set the Configure Value dialog with the following steps:

    1. To open the Add Entry window, click Add.

    2. Under Entry type, click User Property, then click Select.

    3. In the Select Object Property window, in the Object property list, click First Name, then click OK.

    4. Under Entry properties, select The first, and in the field enter 1.

    5. To apply the value setting for the entry, click OK.

  7. To configure the policy so that it includes a uniqueness number in a new user name if it otherwise matched an existing user name, set the Configure Value dialog with the following steps:

    1. To open the Add Entry window, click Add.

    2. Under Entry type, click Uniqueness Number.

    3. Under Entry properties, click Add if the property value is in use, and make sure the Fixed-length number, with leading zeroes is cleared.

    4. To apply the value setting for the entry, click OK.

  8. To configure the policy so that it includes the user's last name, set the Configure Value dialog with the following steps:

    1. Under Entry type, click User Property.

    2. Under Entry properties, click Select.

    3. In the Select Object Property window, in the Object property list click Last Name, then click OK.

    4. To apply the value setting for the entry, click OK.

    After you complete these steps, the list of entries in the Configure Value dialog must look like as the following image.

    Figure 24: Configure Value

  9. To close the Configure Value dialog, click OK.

  10. To set up the 8-character limit for the user name, perform the following steps:

    1. On the User Logon Name (pre-Windows 2000) Generation Rules page, click Advanced.

    2. In the Advanced dialog, in the Maximum length, in characters field, type 8, then click OK.

  11. Click Next, then follow the instructions in the wizard to create (and optionally, immediately apply) the Policy Object.

  12. To apply the Policy Object:

    • Use the Enforce Policy page in the New Policy Object Wizard.

    • Alternatively, complete the New Policy Object Wizard, then use the Enforce Policy command on the domain, OU, or Managed Unit where you want to apply the policy.

    For more information on how to apply a Policy Object, see Linking Policy Objects to directory objects.

Verwandte Dokumente

The document was helpful.

Bewertung auswählen

I easily found the information I needed.

Bewertung auswählen