
Safeguard for Privileged Passwords version 2.7 introduced the ability to link Safeguard for Privileged Sessions for session recording and auditing.
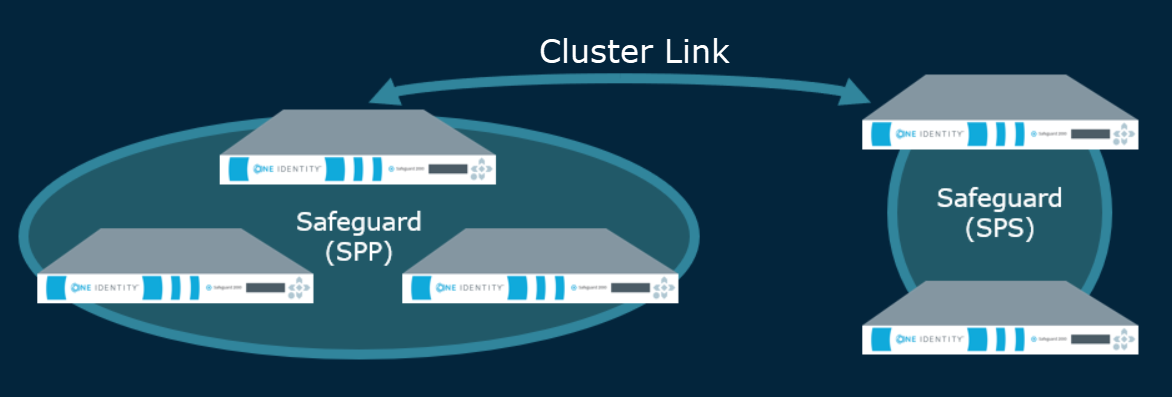
The Asset Administrator can link a Safeguard for Privileged Sessions (SPS) cluster to a Safeguard for Privileged Password (SPP) cluster of one appliance or more for session recording and auditing. The actual link must be between the SPP primary and the SPS cluster master. This means that the Safeguard for Privileged Sessions (SPS) cluster is aware of each node in an SPP cluster and vice-versa.
Once linked, all sessions are initiated by the SPP appliance via an access request and managed by the SPS appliance and sessions are recorded via the Sessions Appliance.
|
|
CAUTION: When linking your One Identity Safeguard for Privileged Sessions (SPS) deployment to your One Identity Safeguard for Privileged Passwords (SPP) deployment, ensure that the SPS and SPP versions match exactly, and keep the versions synchronized during an upgrade. For example, you can only link SPS version 6.6 to SPP version 6.6, and if you upgrade SPS to version 6.7, you must also upgrade SPP to 6.7. Make sure that you do not mix Long Term Supported (LTS) and feature releases. For example, do not link an SPS version 6.0 to an SPP version 6.1. |

NOTE: If you have a single node SPS cluster where the Central Management node is also the Search Master, SPP will be unable to launch sessions. There has to be at least one SPS appliance in the cluster that is capable of recording sessions. See the SPS Administration Guide, Managing Safeguard for Privileged Sessions (SPS) clusters.
Additional overview information can be found in the Safeguard for Privileged Sessions Administration Guide, Using SPS with SPP.
Session recording, playback, and storage after the link
- Sessions recorded after the link are playable through SPP and are stored on the SPS appliance. An archive server can be set up through SPS.
- Sessions recorded prior to linking the Safeguard Sessions Appliances are not migrated to the SPS appliance. For that reason, it is recommended that the SPP sessions be migrated to an archive server prior to the link.
Functionality in SPS after the link
The following functionality handled in SPP's user interface is available in SPS after the link.
- Session certificate assignment is handled by SPS. The certificate is available for audit by the Auditor.
- After the link, you will set the following configurations in SPS. There is no migration of the SPP settings added via Administrative Tools | Entitlements | Access Request Policies | Session Settings. These include:
- Session recording
- SSH related command detection and controls (such as SFTP, SCP, and X11 forwarding)
- RDP related command detection and controls (such as Windows title detection and allowing the clipboard)
- In SPS, you will:
- Set the SSH banner text that is shown to session users when they initiate a privileged session notifying them the session will be recorded.
- Identify the SSH host key presented to the user's SSH client when an SSH session is started.
- (Optional) Configure the SPS SSH connection policy to control how both SPS and SPP handle host key checking. If the SPS SSH connection policy is set to Only accept trusted keys, SPP will detect the setting and not allow a session to be initialized without a host key. However, if the SPS SSH connection policy is set to Accept key for the first time or Disable SSH host key checking, SPP will allow the session to be initialized without a host key and defer the host key checking to SPS.
- Identify the status of the session module, such as session module health.
- Edit the default policy.
The primary provider names must match for a SPS initiated RDP connection with SPP. See KB article 311852.
Functionality in SPP after the link
- During the link, SPP sets the SPS Connection Policy to safeguard_default for SSH or safeguard_rdp for RDP, as appropriate and may need to be changed. This default is nothing more than SSH or RDP connection policy.
- Other configuration set via the Access Request Policies dialog, are not affected by the link. These include: General, Scope, Requester, Approver, Reviewer, Access Config, Time Restrictions, and Emergency tabs.
- The Activity Center shows all old sessions and new sessions per the configuration. You can play back a session from SPP. Starting with session player 1.9.4, sessions can be played in SPP with full indexing (which makes the privileged users' activity searchable). However, if you are using an earlier version of the sessions player then indexing is only available in SPS.
- Entitlement reports have not changed.
- On the Dashboard, administrators can still view and manage access requests and accounts failing tasks as usual.
- After the link, Administrative Tools | Settings | Sessions functionality is no longer available and is handled via SPS. This includes session recording management, sessions module, SSH banner, and SSH host key.
Step 1: Prepare for the link
Move all session recording files from Safeguard for Privileged Passwords to an archive server.
- SPP embedded sessions module was remove in SPP 6.0 LTS so this step should have been completed earlier. If not, move the SPP embedded sessions recordings from local SPP to an archive server.
- Prior to moving to SPP 6.0: If the link has not been started, you can use the SPP user interface to archive existing SPP sessions:
- Set up the archive server. Navigate toFor more information, see Archive servers.
- Assign the archive server to the SPP appliances. SPP moves the files and deletes the local file storage.
- Verify the recordings have been archived by comparing the session events in the Activity Center with the actual recording files on the archive server.
- Test the playback of a recording stored on the archive server. You will need to download it before you can play it. For more information, see Replaying a session.
-
After moving to SPP 6.0 or if the link is complete, use the API to archive existing SPP sessions.
- Use the API PUT Core/v3/SessionArchiveConfigs/{id}. Call this API giving it the ID of the archive server (GET Core/v3/ArchiveServers) and the ID of the appliance (GET Core/SessionArchiveConfigs). Calling the above POST API will assign an archive server to archive session recordings. Within a few minutes, all remaining recordings will be moved to the archive server and removed from the local SPP storage.
- Starting with SPP 6.7, you must call POST /core/v3/SessionArchiveConfigs/ArchiveRecordings to push the recording files to the assigned archive server and POST /core/v3/SessionArchiveConfigs/RemovedArchivedRecordings to delete the recording files from the SPP appliance local storage.
- Test the playback of a recording stored on the archive server. You will need to download it before you can play it. For more information, see Replaying a session.
- Prior to moving to SPP 6.0: If the link has not been started, you can use the SPP user interface to archive existing SPP sessions:
-
Ensure the link is performed when open access requests are not pending, if possible.
When the SPS session connection is linked, open access requests are automatically closed. When you double-click the event in the Activity Center, the event details Action is Evicted.
- Back up your appliances and archive servers. For more information, see Backup and Retention settings.
Step 2: Link SPS and SPP
The link is initiated from Safeguard for Privileged Sessions. For details about the link steps and issue resolution, see the One Identity Safeguard for Privileged Sessions Administration Guide.
NOTE: SPP can target a specific SPS appliance or network interface by IP address. This is done by configuring the SPS connection policy to specify an explicit TO address (for example, CIDR notation /32). When that connection policy is selected as the SPS connection policy for the access policy, SPP will construct a connection string that targets that specific IP address.
Pay attention to the roles assigned to the SPS nodes. The following caution is offered to avoid losing session playback from SPP.
|
|
CAUTION: Do not switch the role of an SPS node from the Search Local role to Search Minion role. If you do, playback of the sessions recorded while in the Search Local role may not be played back from the SPP appliance, and may only be played back via the SPS web user interface. Recordings made with the node in Search Minion role are pushed to the Search Master node and are available for download to SPP. For details about SPS nodes and roles, see the One Identity Safeguard for Privileged Sessions Administration Guide: One Identity Safeguard for Privileged Sessions - Technical Documentation. |
Step 3: Perform post link activities in SPP and SPS
Steps to perform in SPP
-
The Appliance Administrator assigns the managed networks for sessions management.
Navigate to Appliance Management | Cluster | Managed Networks. For more information, see Managed Networks.
-
The Appliance Administrator can view, delete, or edit link connections, as needed.
Go to Appliance Management | Cluster | Session Appliances. For more information, see Session Appliances with SPS link.
If you soft delete a session connection, then reconnect, the access policies remain available. If you hard delete, the Security Policy Administrator will need to relink and reestablish the SPS Connection Policy. For more information, see Connection deletion: soft delete versus hard delete.
-
The Security Policy Administrator identifies the session settings on the entitlements access request policy.
Perform the following steps to ensure each policy's session setting is correctly assigned.
- Navigate to Security Policy Management | Entitlements, select an entitlement, and open Access Request Policies.
- Double-click a policy, or select a policy and click
Edit Access Policy.
-
On the Security tab, go to the SPS Connection Policy. The host name of the cluster master is displayed first followed by the IP address: safeguard_default.
-
If needed, select the cluster or appliance to which the policy applies.
For more information, see Session Settings tab on page 1.
- While on the Access Request Policies dialog, the Security Policy Administrator checks any other tab, as needed. The link does not affect the settings on the tabs including the General, Scope, Requester, Approver, Reviewer, Access Config, Time Restrictions, and Emergency tabs.
Steps to perform in SPS
Complete any set up in SPS required (such as setting up an archive server, the SSH banner, the SSH host key, as well as SSH-related or RDP-related command detection and controls). For details, see the One Identity Safeguard for Privileged Sessions Administration Guide: One Identity Safeguard for Privileged Sessions - Technical Documentation.
Standard operating procedure after the initial link
If you add another SPS cluster after the initial link, follow these standard operating procedures:
- Add link connections. For more information, see Session Appliances with SPS link.
- Identify the session settings on the entitlements access request policy (SPS Connection Policy that is the IP address of the cluster master). For more information, see Creating an access request policy (desktop client).
- Assign the managed networks. For more information, see Managed Networks.