How do I add an external federation user account
It is the responsibility of either the Authorizer Administrator or the User Administrator to add an associated external federation Safeguard for Privileged Passwords user.
Preparation
You must add external federation service providers to Safeguard for Privileged Passwords before you can add external federation users.
No user information, such as first name, last name, phone number, email address, is ever imported from the STS claims token. You must enter that information manually when creating the user in Safeguard for Privileged Passwords if you need it.
To add a user
- Navigate to User Management | Users.
- In Users, click
 New User from the toolbar.
-
In the User dialog, provide information in each of the tabs:
How do I manage accounts on unsupported platforms
Safeguard for Privileged Passwords makes it possible for you to manage passwords and SSH keys for accounts on unsupported platforms and not addressed by a Custom platforms.
You will use a profile with a manual change password or an SSH key setting.
For example, you may have an asset that is not on the network. The manual change password or SSH key setting allows you to comply with your company policies to change account passwords on a regular schedule without using the Safeguard for Privileged Passwords automatic change password or SSH key settings. Safeguard for Privileged Passwords notifies you by email, toast notification, or both on a set schedule to change account passwords manually. You can then reset the password or SSH key yourself, or allow Safeguard for Privileged Passwords to generate a random password or SSH key according to the password rule selected in the profile.
IMPORTANT: After you change the password or SSH key in Safeguard for Privileged Passwords you must remember to change the password or SSH key on the account; Safeguard for Privileged Passwords does not do that automatically for you.
The following summarizes the general workflow for managing accounts on unsupported platforms.
To manage account passwords or SSH key manually
- Configure a profile with a manual change password or SSH key setting and assign asset accounts to it. See: Adding change password settings and Adding SSH key change settings.
- Ensure toast notifications or email notifications are properly configured. For more information, see Enabling email notifications.
- When notified to change an account password or SSH key, choose:
How do I modify the appliance configuration settings
NOTE: This topic assumes you have already performed the initial appliance installation and configuration steps in the One Identity Safeguard for Privileged Passwords Appliance Setup Guide provided in the box with your hardware equipment.
 (web client) To modify the appliance configuration settings
- Log in to the Safeguard for Privileged Passwords web client using the Appliance Administrator account.
- Click Appliance Management | Appliance page.
- Click Networking
 to configure the appliance. For more information, see Networking.
-
On the Appliance Configuration page, configure the following:
- Network (X0): Enter the DNS Server address information for your primary interface.
- Click Save.
- Click Time to enable and view information about the Network Time Protocol (NTP):
- Select Enable NTP.
- Set the primary and secondary NTP servers, if desired.
- The Last Sync Time is displayed. To view or hide details, click Show Last Sync Details or Hide Last Sync Details. For more information, see Time.
- Click Save.
 (desktop client) To modify the appliance configuration settings
- Log in using the Appliance Administrator account.
- Navigate to Administrative Tools | Settings | Appliance.
- Expand the Time pane to enable NTP and set the primary and secondary NTP servers. Click OK. For more information, see Time.
-
Expand the Appliance Information pane to change the appliance name.
- To change the appliance's name, click
 Edit next to the Appliance Name.
-
Expand the Networking pane to add or modify DSN suffixes. For more information, see Networking.
-
To change the DNS suffixes for your primary interface, click Edit next to the Network Interface X0 heading.
- Enter the DSN suffixes to be used.
- Click OK.
How do I prevent Safeguard for Privileged Passwords messages when making RDP connections
When making an RDP connection, you may encounter two different certificate messages.
-
Unsigned RDP file message

This message occurs when Remote Desktop Connection opens the RDP file that is downloaded when you click  Play in the Safeguard for Privileged Passwords user interface.
We are currently working on a solution that will allow Safeguard for Privileged Passwords to sign this RDP file to avoid this message.
-
Untrusted server certification message
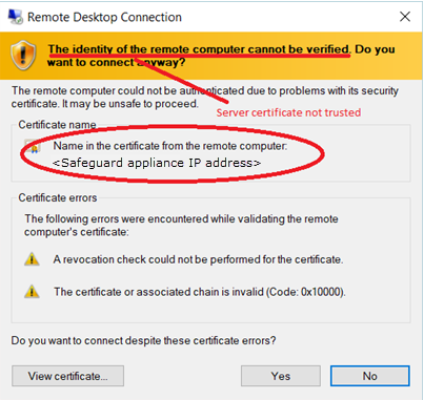
This message occurs when the workstation has not trusted the Safeguard for Privileged Passwords RDP Connection Signing Certificate.
NOTE: The IP address of the connecting server is that of the Safeguard appliance.
To avoid this message, you must trust the RDP Connection Signing Certificate and certificates in its chain of trust or replace the current certificate with an enterprise certificate and chain of trust that is trusted.
One Identity recommends that you replace the entire configuration with your own trusted enterprise PKI. This would result in a structure such as:
- Your Root CA
- Your Issuing CA
- Your RDP Signing Certificate (from Safeguard CSR)
- <Sessions module generated certificate>
The Root CA, Issuing CA, and RDP Signing Certificates can be distributed via Group Policy, Active Directory, or other distribution means.
