High availability (HA) clusters can stretch across long distances, such as nodes across buildings, cities or even continents. The goal of HA clusters is to support enterprise business continuity by providing location-independent failover and recovery.
To set up a high availability cluster, connect two SSB units with identical configurations in high availability mode. This creates a primary-secondary (active-backup, sometimes called master-slave) node pair. Should the primary node stop functioning, the secondary node takes over the functionality of the primary node. This way, the SSB servers are continuously accessible.
|
|
NOTE:
To use the management interface and high availability mode together, connect the management interface of both SSB nodes to the network, otherwise you will not be able to access SSB remotely when a takeover occurs. |
The primary node shares all data with the secondary node using the HA network interface (labeled as 4 or HA on the SSB appliance). The disks of the primary and the secondary node must be synchronized for the HA support to operate correctly. Interrupting the connection between running nodes (unplugging the Ethernet cables, rebooting a switch or a router between the nodes, or disabling the HA interface) disables data synchronization and forces the secondary node to become active. This might result in data loss. You can find instructions to resolve such problems and recover an SSB cluster in Troubleshooting an SSB cluster.
|
|
NOTE:
HA functionality was designed for physical SSB units. If SSB is used in a virtual environment, use the fallback functionalities provided by the virtualization service instead. On virtual SSB appliances, or if you have bought a physical SSB appliance without the high availability license option, the Basic Settings > High Availability menu item is not displayed anymore. |
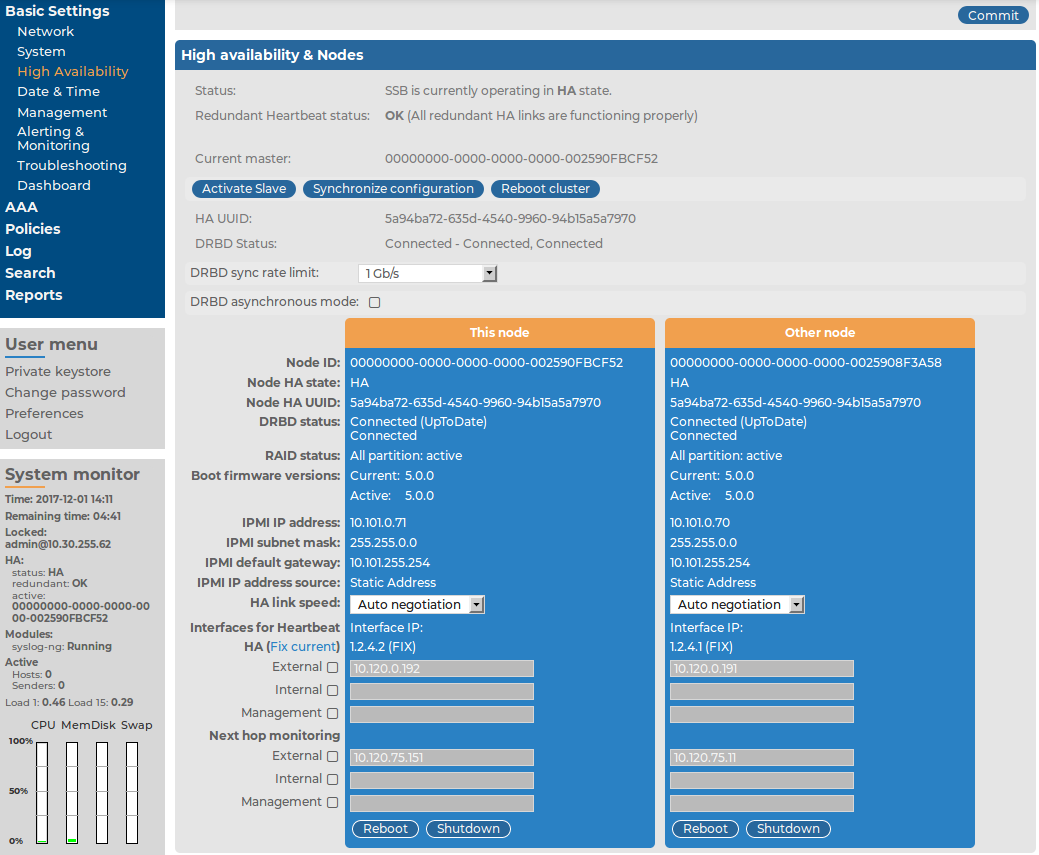
The Basic Settings > High Availability page provides information about the status of the HA cluster and its nodes.
Figure 55: Basic Settings > High Availability — Managing a high availability cluster

The following information is available about the cluster:
-
Status: Indicates whether the SSB nodes recognize each other properly and whether those are configured to operate in high availability mode.
You can find the description of each HA status in Understanding SSB cluster statuses.
-
Current master: The MAC address of the high availability interface (4 or HA) of the node.
-
HA UUID: A unique identifier of the HA cluster. Only available in High Availability mode.
-
DRBD status: Indicates whether the SSB nodes recognize each other properly and whether those are configured to operate in high availability mode.
You can find the description of each DRBD status in Understanding SSB cluster statuses.
-
DRBD sync rate limit: The maximum allowed synchronization speed between the master and the slave node.
You can find more information about configuring the DRBD sync rate limit in Adjusting the synchronization speed.
The active (primary) SSB node is labeled as This node, this unit receives the incoming log messages and provides the web interface. The SSB unit labeled as Other node is the secondary node that is activated if the primary node becomes unavailable.
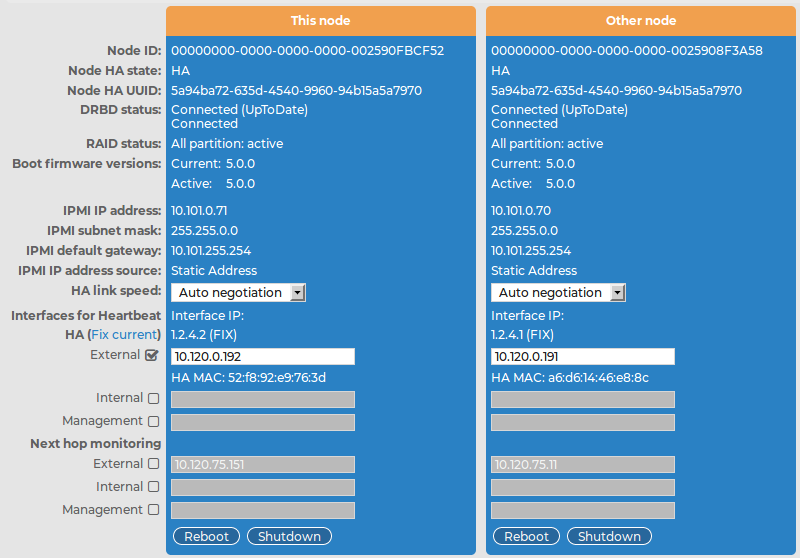
The following information is available about each node:
-
Node ID: The universally unique identifier (UUID) of the physical or virtual machine.
NOTE: Due to backward compatibility, in the case of upgrades, the Node ID is the MAC address of the node's HA interface.
For SSB clusters, the IDs of both nodes are included in the internal log messages of SSB.
-
Node HA state: Indicates whether the SSB nodes recognize each other properly and whether those are configured to operate in high availability mode.
You can find the description of each HA status in Understanding SSB cluster statuses.
-
Node HA UUID: A unique identifier of the cluster. It is a software-generated identifier. Only available in High Availability mode.
-
DRBD status: The status of data synchronization between the nodes.
You can find the description of each DRBD status in Understanding SSB cluster statuses.
-
Raid status: The status of the RAID device of the node.
-
Boot firmware version: Version number of the boot firmware.
You can find more information about the boot firmware in Firmware in SSB.
-
HA link speed: The maximum allowed speed between the master and the slave node. The HA link's speed must exceed the DRBD sync rate limit, else the web UI might become unresponsive and data loss can occur.
Leave this field on Auto negotiation unless specifically requested by the support team.
-
Interfaces for Heartbeat: Virtual interface used only to detect that the other node is still available, it is not used to synchronize data between the nodes (only heartbeat messages are transferred).
You can find more information about configuring redundant heartbeat interfaces in Redundant heartbeat interfaces.
-
HA (Fix current): The IP address of the high availability (HA) interface. Clicking Fix current will set the IP address in question as a permanent IP address. This can be useful when automatic configuration is slow or fails to function properly for some reason.
NOTE: When both nodes of a cluster boot up in parallel, the node with the 1.2.4.1 HA IP address will become the master node.
-
Next hop monitoring: IP addresses (usually next hop routers) to continuously monitor from both the primary and the secondary nodes using ICMP echo (ping) messages. If any of the monitored addresses becomes unreachable from the primary node while being reachable from the secondary node (in other words, more monitored addresses are accessible from the secondary node) then it is assumed that the primary node is unreachable and a forced takeover occurs – even if the primary node is otherwise functional.
You can find more information about configuring next-hop monitoring in Next-hop router monitoring.
The following configuration and management options are available for HA clusters:
-
Set up a high availability cluster: You can find detailed instructions for setting up a HA cluster in "Installing two SSB units in HA mode" in the Installation Guide.
-
Adjust the DRBD (master-slave) synchronization speed: You can change the limit of the DRBD synchronization rate.
You can find more information about configuring the DRBD synchronization speed in Adjusting the synchronization speed.
-
Enable asynchronous data replication: You can compensate for high network latency and bursts of high activity by enabling asynchronous data replication between the master and the slave node with the DRBD asynchronous mode option.
You can find more information about configuring asynchronous data replication in Asynchronous data replication.
-
Configure redundant heartbeat interfaces: You can configure virtual interfaces for each HA node to monitor the availability of the other node.
You can find more information about configuring redundant heartbeat interfaces in Redundant heartbeat interfaces.
-
Configure next-hop monitoring: You can provide IP addresses (usually next hop routers) to continuously monitor from both the primary and the secondary nodes using ICMP echo (ping) messages. If any of the monitored addresses becomes unreachable from the primary node while being reachable from the secondary node (in other words, more monitored addresses are accessible from the secondary node) then it is assumed that the primary node is unreachable and a forced takeover occurs – even if the primary node is otherwise functional.
You can find more information about configuring next-hop monitoring in Next-hop router monitoring.
-
Reboot the HA cluster: To reboot both nodes, click Reboot Cluster. To prevent takeover, a token is placed on the secondary node. While this token persists, the secondary node halts its boot process to make sure that the primary node boots first. Following reboot, the primary removes this token from the secondary node, allowing it to continue with the boot process.
If the token still persists on the secondary node following reboot, the Unblock Slave Node button is displayed. Clicking the button removes the token, and reboots the secondary node.
-
Reboot a node: Reboots the selected node.
When rebooting the nodes of a cluster, reboot the other (secondary) node first to avoid unnecessary takeovers.
-
Shutdown a node: Forces the selected node to shutdown.
When shutting down the nodes of a cluster, shut down the other (secondary) node first. When powering on the nodes, start the primary node first to avoid unnecessary takeovers.
-
Manual takeover: To activate the other node and disable the currently active node, click Activate slave.
Activating the secondary node terminates all connections of SSB and might result in data loss. The secondary node becomes active after about 60 seconds, during which SSB cannot accept incoming messages. Enable disk-buffering on your syslog-ng clients and relays to prevent data loss in such cases.


 .
.