Managing logspaces
Logspaces are mostly managed automatically using backup and archiving policies, as described in Data and configuration backups and Archiving and cleanup. However, backup and archiving can be started manually as well. To display the details of a logspace, click  . A number of action buttons is shown in the top row.
|

|
NOTE:
These options are not available for filtered and remote logspaces. |
Figure 100: Log > Logspaces > Get current size — Managing logspaces

|

|
TIP:
The size of the logspace is displayed in the Size row of the logspace details. To refresh the data, select Get current size. |
-
To start the backup process manually, click Backup.
-
To restore the log files from the backup server to SSB click Restore.
|

|
Caution:
Restoring the backup replaces every log file of the logspace with the files from the backup. Any log message saved into the logspace since the backup is irrevocably lost. |
-
To start the archiving and the cleanup process manually, click Archive/Cleanup.
|

|
Caution:
If the archiving policy selected for the logspace is set to perform only cleanup, log messages older than the Retention Time are deleted and irrevocably lost. For details, see Archiving and cleanup. |
-
To delete every log file in the logspace, click Empty. This option can be useful if you have to quickly free up space on SSB, or if you want to delete a logspace.
|

|
Caution:
This action deletes every file of the logspace. Any log message not archived or backed up is irrevocably lost. |
You can still search archived logs of the logspace.
Similar action buttons are available at the top of the Log > Logspaces page to backup, archive, or delete the contents of every logspace. These actions are performed on every logspace with their respective settings, that is, clicking Backup All creates a backup of every logspace using the backup policy settings of the individual logspace.
Creating filtered logspaces
Filtered logspaces allow you to create a smaller, filtered subset of the logs contained in an existing local, remote or multiple logspace. Assigning a user group to a filtered logspace enables fine grained access control by creating a group which sees only a subset of the logs from a logspace.
You can use the same search expressions and logic as on the Search interface to create a filtered logspace. In the following example, we have configured a filtered logspace that only contains messages from syslog-ng:
|

|
NOTE:
The filtered logspace is only a view of the base logspace. The log messages are still stored in the base logspace (if the base logspace is a remote logspace, the log messages are stored on the remote SSB). Therefore you cannot alter any configuration parameters of the logspace directly. To do this, navigate to the base logspace itself. |
Figure 101: Log > Filtered Logspaces — Filtered logspaces

To create filtered logspaces
-
Navigate to Log > Filtered Logspaces and click  .
.
-
Enter a name for the logspace into the top field. Use descriptive names that help you to identify the source easily. Note that the name of the logspace must begin with a number or a letter.
-
Choose which logspace to filter in Base logspace.
-
Enter the search expression in the Filter field.
You can create complex searches using wildcards and boolean expressions. For more information and practical examples, see Using complex search queries.
|

|
NOTE:
SSB only indexes the first 59 characters of every name-value pair (parameter). This has two consequences:
-
If the parameter is longer than 59 characters, an exact search might deliver multiple, imprecise results.
Consider the following example. If the parameter is: .sdata.security.uid=2011-12-08T12:32:25.024+01:00-hostname-12345
SSB indexes it only as: .sdata.security.uid=2011-12-08T12:32:25.024+01:00-hostname-
This corresponds to the first 59 characters. As a result, searching for: nvpair:.sdata.security.uid=2011-12-08T12:32:25.024+01:00-hostname-12345
returns all log messages that contain: .sdata.security.uid=2011-12-08T12:32:25.024+01:00-hostname-
-
Using wildcards might lead to the omission of certain messages from the search results.
Using the same example as above, searching for the value: nvpair:*=2011-12-08T12:32:25.024+01:00-hostname-12345
does not return any results (as the 12345 part was not indexed). Instead, you have to search for: nvpair:*=2011-12-08T12:32:25.024+01:00-hostname-*
This, as explained above, might find multiple results.
|
-
By default, members of the search group can view the stored messages online. Use the Access control option to control which usergroups can access the logspace. For details, see also Managing user rights and usergroups.
-
Click  .
.
Creating remote logspaces
SSB can access and search logspaces (including filtered logspaces) on other SSB appliances. To configure SSB to access a logspace on another (remote) SSB, set up a remote logspace.
Once configured, remote logspaces can be searched like any other logspace on SSB. You can also create filtered logspaces that are based on the remote logspace.
|

|
NOTE:
Note that you cannot alter the configuration, archive, back up, or empty the contents of the logspace on the remote SSB. |
|

|
NOTE:
If the remote logspace becomes inaccessible, you will not be able to view the contents of that logspace. |
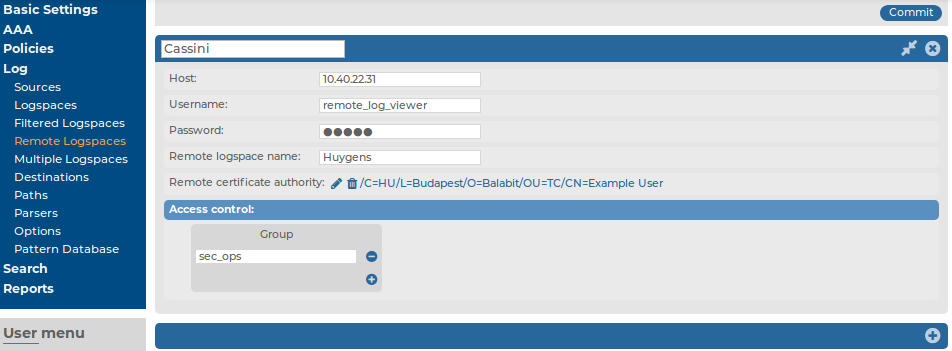
Figure 102: Log > Remote Logspaces — Remote logspaces

Prerequisites
-
You have verified that the version number of the remote SSB equals (or exceeds) the version number of the SSB where the remote logspace is created.
-
You have configured a user on the remote SSB that can access the logspace you want to reach.
-
If the logspace is encrypted, you have verified that the user has the necessary certificates.
-
You have downloaded the CA X.509 certificate of the remote SSB.
To download the server certificate, navigate to Basic Settings > Management > SSL certificate > CA X.509 certificate, and click on the certificate.
To create remote logspaces
-
Navigate to Log > Remote Logspaces and click  .
.
-
Enter a name for the logspace into the top field. Use descriptive names that help you to identify the source easily. Note that the name of the logspace must begin with a number or a letter.
-
Enter the IP address or hostname of the remote SSB in the Host field.
-
Enter the username of the user configured for accessing the logspace on the remote SSB in the Username field.
-
Enter the password of the same user in the Password field.
-
Enter the name of the logspace as it appears on the remote SSB in the Remote logspace name field.
-
In the Remote certificate authority section, click  to upload the server certificate of the remote SSB. A pop-up window is displayed.
NOTE:
It is not possible, nor required to upload a certificate chain to Remote certificate authority. The certificate chain is used by the server, not the remote logspace.
If you want to use a certificate chain when authenticating to a remote logspace, do the following:
-
Upload the root CA to Log > Remote Logspaces > Remote certificate authority.
-
Upload the intermediate CA and end-entity (server) certificate to Basic Settings > Management > SSL certificate > Server X.509 certificate.
Click Browse, select the certificate of the remote SSB, then click Upload.
-
By default, members of the search group can view the stored messages online. Use the Access control option to control which usergroups can access the logspace. For details, see also Managing user rights and usergroups.
-
Click  .
.
Creating multiple logspaces
If you have several SSBs located at different sites, you can view and search the logs of these machines from the same web interface without having to log on to several different interfaces.
Creating multiple logspaces can also be useful if you want to pre-filter log messages based on different aspects and then share these filtered logs only with certain user groups.
The multiple logspace aggregates the messages that arrive from the member logspaces. The new log messages are listed below each other every second.
Once configured, multiple logspaces can be searched like any other logspace on SSB. You can also create filtered logspaces that are based on the multiple logspace.
|

|
NOTE:
The multiple logspace is only a view of the member logspaces. The log messages are still stored in the member logspaces (if the member logspace is a remote logspace, the log messages are stored on the remote SSB). Therefore you cannot alter any configuration parameters of the logspace directly. To do this, navigate to the member logspace itself. |
|

|
NOTE:
If a remote member logspace becomes inaccessible, you will not be able to view the contents of that logspace. |
|

|
NOTE:
Using multiple logspaces can decrease the performance of the appliance. If possible, manage your logspaces without using multiple logspaces (for example instead of including several filtered logspaces into a multiple logspace, use several search expressions in a filtered logspace). |
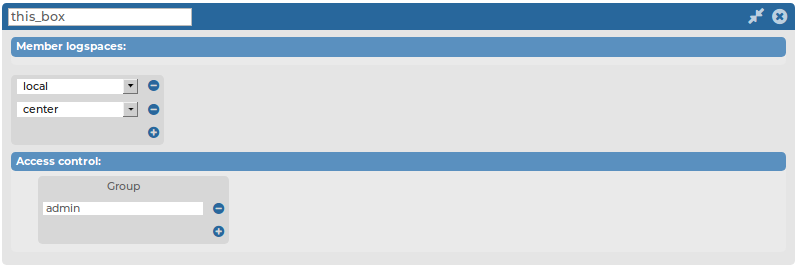
Figure 103: Log > Multiple Logspaces — Multiple logspaces

To create multiple logspaces
-
Navigate to Log > Multiple Logspaces and click  .
.
-
Enter a name for the logspace into the top field. Use descriptive names that help you to identify the source easily. Note that the name of the logspace must begin with a number or a letter.
-
Select the Member Logspaces from the list. To add a new member logspace, click  and select another logspace. Note that you can only select member logspaces that already exist.
-
By default, members of the search group can view the stored messages online. Use the Access control option to control which usergroups can access the logspace. For details, see also Managing user rights and usergroups.
-
Click  .
.
 . A number of action buttons is shown in the top row.


 .
. .
.
