지금 지원 담당자와 채팅
지원 담당자와 채팅

Active Roles 8.2 - Administration Guide

Introduction Getting started with Active Roles Configuring rule-based administrative views Configuring role-based administration Configuring rule-based autoprovisioning and deprovisioning
Configuring Provisioning Policy Objects
User Logon Name Generation E-mail Alias Generation Exchange Mailbox AutoProvisioning Group Membership AutoProvisioning Home Folder AutoProvisioning Property Generation and Validation Script Execution O365 and Azure Tenant Selection AutoProvisioning in SaaS products
Configuring Deprovisioning Policy Objects
User Account Deprovisioning Group Membership Removal User Account Relocation Exchange Mailbox Deprovisioning Home Folder Deprovisioning User Account Permanent Deletion Office 365 Licenses Retention Group Object Deprovisioning Group Object Relocation Group Object Permanent Deletion Script Execution Notification Distribution Report Distribution
Configuring entry types Configuring a Container Deletion Prevention policy Configuring picture management rules Managing Policy Objects Checking for policy compliance Deprovisioning users or groups Restoring deprovisioned users or groups Configuring policy extensions
Using rule-based and role-based tools for granular administration Workflows
About workflow processes Workflow processing overview Workflow activities overview Configuring a workflow
Creating a workflow definition for a workflow Configuring workflow start conditions Configuring workflow parameters Adding activities to a workflow Configuring an Approval activity Configuring a Notification activity Configuring a Script activity Configuring an If-Else activity Configuring a Stop/Break activity Configuring an Add Report Section activity Configuring a Search activity Configuring CRUD activities Configuring a Save Object Properties activity Configuring a Modify Requested Changes activity Enabling or disabling an activity Enabling or disabling a workflow Using the initialization script
Approval workflow Email-based approval Automation workflow Activity extensions
Temporal Group Memberships Group Family Dynamic groups Active Roles Reporting Management History Entitlement profile Recycle Bin AD LDS data management One Identity Starling Join and configuration through Active Roles Managing One Identity Starling Connect Configuring linked mailboxes with Exchange Resource Forest Management Configuring remote mailboxes for on-premises users Migrating Active Roles configuration with the Configuration Transfer Wizard Managing Skype for Business Server with Active Roles
About Skype for Business Server User Management Active Directory topologies supported by Skype for Business Server User Management User Management policy for Skype for Business Server User Management Master Account Management policy for Skype for Business Server User Management Access Templates for Skype for Business Server Configuring the Skype for Business Server User Management feature Managing Skype for Business Server users
Exchanging provisioning information with Active Roles SPML Provider Monitoring Active Roles with Management Pack for SCOM Configuring Active Roles for AWS Managed Microsoft AD Azure AD, Microsoft 365, and Exchange Online Management
Azure tenant types and environment types supported by Active Roles Using Active Roles to manage Azure AD objects Unified provisioning policy for Azure M365 Tenant Selection, Microsoft 365 License Selection, Microsoft 365 Roles Selection, and OneDrive provisioning Changes to Active Roles policies for cloud-only Azure objects
Managing the configuration of Active Roles
Connecting to the Administration Service Managed domains Using unmanaged domains Evaluating product usage Creating and using virtual attributes Examining client sessions Monitoring performance Customizing the Console Using Configuration Center Changing the Active Roles Admin account Enabling or disabling diagnostic logs Active Roles Log Viewer
SQL Server replication Using regular expressions Administrative Template Configuring federated authentication Communication ports and URLs used by Active Roles Integrating Active Roles with other products and services Active Roles Language Pack Active Roles Diagnostic Tools Active Roles Add-on Manager

Configuring OneDrive for an Azure tenant

Use the Azure AD Configuration > Modify (Tenant details) window of the Active Roles Configuration Center to enable OneDrive storage for the cloud-only and hybrid users of your selected Azure tenant.

Prerequisites

Before beginning the configuration, make sure that the selected Azure tenant meets the requirements listed in Prerequisites of enabling OneDrive in an Azure tenant.

To enable OneDrive storage for Azure users in an Azure tenant

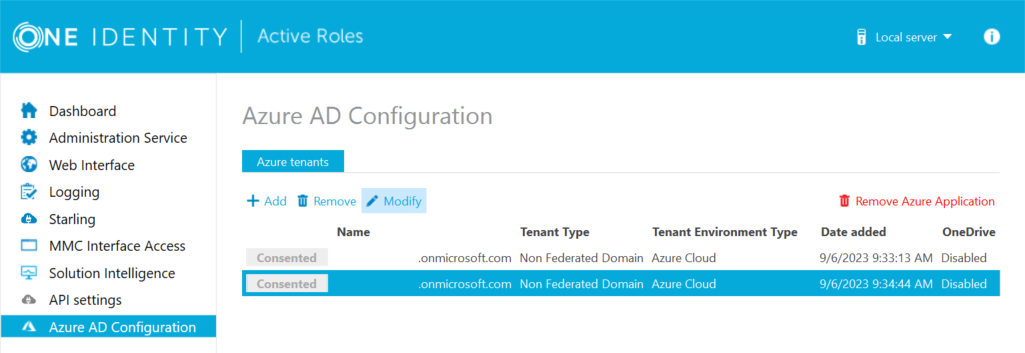
  1. In the Active Roles Configuration Center, click Azure AD Configuration.

  2. Select the Azure tenant for which you want to enable OneDrive storage, and click Modify. The Tenant details window appears.

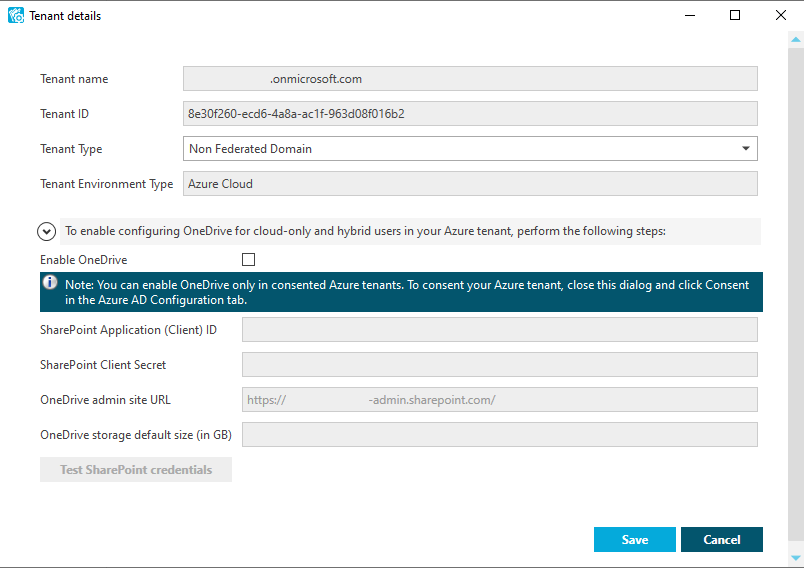
    Figure 153: Active Roles Configuration Center > Azure AD Configuration > Modify

  3. To start the configuration of the OneDrive storage, select Enable OneDrive.

  4. To register Active Roles as a SharePoint App-Only for OneDrive authentication, open the SharePoint App-Only configuration site of your Azure tenant in your web browser:

    <azure-tenant-name>.sharepoint.com/_layouts/15/appregnew.aspx

    TIP: To quickly open the SharePoint App-Only configuration site from the Tenant details window, expand the procedure overview above Enable OneDrive to access a clickable link.

  5. On the SharePoint App-Only configuration site, configure the following settings:

    • Client ID: Generate a new client ID.

    • Client Secret: Generate a new client secret.

    • Title: Provide a name for the configuration (for example, Active Roles SharePoint app).

    • App Domain: Specify a custom application domain for the configuration.

      NOTE: Make sure that the specified App Domain is not a reserved domain (for example, the domain of your Azure tenant), otherwise the SharePoint App-Only cannot be created. One Identity recommends specifying www.localhost.com as App Domain.

    • Redirect URI: Specify a custom redirect URI for the configuration (for example, https://localhost/).

  6. To apply your changes and create the SharePoint App-Only, click Create. Upon successful configuration, the SharePoint App-Only configuration site displays the configured settings with the following message:

    The app identifier has been successfully created.

    NOTE: Due to Microsoft security measures in app registration, registering and creating the SharePoint App-Only could fail with the following message:

    Your SharePoint tenant admin doesn't allow site collection admins to create an Azure Access Control (ACS) principal. Please contact your SharePoint tenant administrator.

    To solve this problem, perform the following steps:

    1. In Windows PowerShell, install the SharePoint Online PowerShell module:

      Install-Module Microsoft.Online.SharePoint.PowerShell

    2. Connect to SharePoint Online service with the global admin user of the Azure tenant:

      Connect-SPOService -Url https://<azure-tenant-domain>-admin.sharepoint.com

    3. To allow site collection admins to manage the Azure Access Control (ACS) service principal, run the following cmdlet:

      Set-SPOTenant -SiteOwnerManageLegacyServicePrincipalEnabled $true

    4. To retry creating the SharePoint App-Only, click Create again in the SharePoint App-Only configuration site.

    For more information about this error, see SharePoint site collection admins can't register apps or update permissions in the Microsoft 365 documentation.

  7. Copy the Client ID and Client Secret values to your clipboard or elsewhere, as they will be required for the next step.

  8. Grant the required permissions for the configured SharePoint App-Only. To do so, open the application invitation page of the SharePoint administration site of your Azure tenant in your web browser with a Global Administrator user:

    <azure-tenant-name>-admin.sharepoint.com/_layouts/15/appinv.aspx

    TIP: To quickly open the SharePoint administration site from the Tenant details window, expand the procedure overview above Enable OneDrive to access a clickable link.

  9. On the SharePoint administration site, configure the following settings:

    • App ID: Paste the client ID generated on the SharePoint App-Only configuration site here.

      TIP: To quickly fill the Title, App Domain and Redirect URL fields, click Lookup after pasting the client ID into the App ID field.

    • Title: Provide the name that you specified for the configuration on the SharePoint App-Only configuration site.

    • App Domain: Specify the custom application domain that you specified on the SharePoint App-Only configuration site.

    • Redirect URL: Specify the custom redirect URI that you specified on the SharePoint App-Only configuration site.

    • Permission Request XML: Paste the following XML code into the text box:

      <AppPermissionRequests AllowAppOnlyPolicy="true">
        <AppPermissionRequest Scope="http://sharepoint/content/tenant" Right="FullControl" />
        <AppPermissionRequest Scope="http://sharepoint/social/tenant" Right="FullControl" />
      </AppPermissionRequests>
  10. To apply your changes and grant the application permissions, click Create.

  11. In the Tenant details window of the Active Roles Configuration Center, configure the following settings:

    • SharePoint Application (Client) ID: Paste the client ID generated on the SharePoint App-Only configuration site.

    • SharePoint Client Secret: Paste the client secret generated on the SharePoint App-Only configuration site.

    • OneDrive admin site URL: Specify the URL of the SharePoint administration site of your Azure tenant. The URL has the following syntax: <azure-tenant-name>-admin.sharepoint.com

    • OneDrive storage default size (in GB): Specify the default OneDrive storage size allocated for each Azure user in the Azure tenant. This field accepts only an integer and its value must be within the range of the storage size allowed by the OneDrive subscription in use within your organization.

      NOTE: The OneDrive admin site URL and OneDrive storage default size (in GB) settings of the Tenant details window are applicable to cloud-only Azure users only, and do not affect OneDrive provisioning for hybrid users in your Azure tenant. To configure the OneDrive admin site URL and the default OneDrive storage size for hybrid users, you must set these settings in the Active Roles Console (also known as the MMC Interface) by configuring an O365 and Azure Tenant Selection policy for your Azure tenant, after configuring OneDrive in the Active Roles Configuration Center. For more information, see Configuring an O365 and Azure Tenant Selection policy.

  12. To check the SharePoint authentication configuration, click Test credentials.

    TIP: If the test fails for any reason, Active Roles indicates it with an error message. Typically, testing can fail for the following reasons:

    • The specified client ID and/or client secret is incorrect. To resolve the problem, double-check that they were copied correctly from the SharePoint App-Only configuration site.

    • The required application permissions were not granted in the SharePoint administration site of your Azure tenant. To resolve the problem, open the application invitation page of the SharePoint administration site of your Azure tenant, and copy the permission request XML code indicated in this procedure.

    • The Azure tenant is not consented. To resolve the problem, make sure that the Azure tenant is consented. For more information, see Configuring a new Azure tenant and consenting Active Roles as an Azure application.

    • If the Azure tenant for which you configure OneDrive has already been used in Active Roles versions earlier than 7.5, then the Azure tenant may not have the Sites.FullControl.All SharePoint permission granted. To resolve the problem, verify that the Sites.FullControl.All permission is granted for the Azure tenant. For more information, see Checking and adding the Sites.FullControl.All permission for Active Roles.

    • The specified OneDrive admin URL is incorrect. To resolve the problem, double-check that the specified admin URL is correct and belongs to the Azure tenant for which OneDrive is configured.

    • The specified OneDrive storage default size is incorrect (that is, the field is left empty, does not contain a numeric value, or the specified value is outside the storage size range available by the Microsoft 365 plan of your organization). To resolve the problem, specify a valid storage size.

    • A problem occurred in your internet connection. To resolve the problem, check your internet connection and try again.

  13. Once testing completed successfully, to apply your settings, click Save.

    NOTE: You can save the OneDrive configuration only if the test completes successfully.

  14. (Optional) If you want to provision OneDrive storage for hybrid Azure users as well in your Azure tenant, then set up a new O365 and Azure Tenant Selection policy in the Active Roles Console (also known as the MMC Interface). For more information, see Configuring an O365 and Azure Tenant Selection policy.

NOTE: When creating a new hybrid or cloud-only Azure user in the Active Roles Web Interface after completing this procedure, make sure that you grant them the SharePoint Online license in the Licenses step. Otherwise, the configured OneDrive storage cannot be provisioned for the new Azure user. For more information, see Creating a new cloud-only Azure user in the Active Roles Web Interface User Guide.

Removing an Azure tenant

You can use the Active Roles Configuration Center to delete an Azure tenant. This is typically required when an Azure tenant and its directory objects become obsolete because of organizational reasons.

To remove an Azure tenant

  1. In the Active Roles Configuration Center, on the left pane, click Azure AD Configuration.

    The list of existing Azure tenants appears.

  2. On the Azure AD Configuration page, from the list of Azure tenants, select the tenant that you want to remove.

  3. Click Remove.

  4. Authenticate your Azure AD administrator account.

    • If you already used one or more Azure AD administrator accounts on your PC, select your account from the Pick an account list, then provide the account password. If you do not find your account in the list, specify your account by clicking Use another account.

    • If you have not used any Azure AD administrator accounts yet on the PC (for example, because you are configuring a fresh Active Roles installation), specify your account user name in the Sign in field, then provide your password.

    NOTE: Make sure to specify the account used for adding the Azure tenant (that is, the account name listed under the Name column of the Azure tenant). Authenticating with another account will result in an error.

  5. The Azure tenant and all the related domains and applications are then deleted upon successful login.

  6. To apply the changes, you must restart the Administration Service. To restart the Administration Service, open the Configuration Center, click Administration Service on the left pane, then either click Restart, or first click Stop and then Start.

  7. (Optional) If you want to force the deletion of the Active Roles Azure application on the Azure Portal for the removed Azure tenant, click Remove Azure Application and log in with the credentials of the removed Azure tenant.

    This is typically recommended as an extra housekeeping and security measure if the removed Azure tenant has been previously managed either in earlier Active Roles versions or on other machines as well, but the Azure tenant has not been removed from those Active Roles installations prior to uninstalling them (leaving their client secret intact on the Azure Portal).

    CAUTION: Using the Remove Azure Application option will result in all Active Roles installations losing access to the specified Azure tenant. If this happens, users managing the Azure tenant in another Active Roles installation (for example, on a different machine) can regain access to the Azure tenant if they:

    1. Remove the Azure tenant in the Azure AD Configuration tab of the Active Roles Configuration Center.

    2. Add the Azure tenant again, as described inConfiguring a new Azure tenant and consenting Active Roles as an Azure application.

  8. To confirm removal, check if the removed Azure tenant has disappeared from the list of Azure tenants in the Azure AD Configuration page of the Active Roles Configuration Center, and from the Directory Management > Tree > Azure node of the Active Roles Web Interface.

Viewing the Azure Health status for Azure tenants and applications

You can view the Azure Health Check status of your configured Azure tenants and Azure applications in the Active Roles Web Interface. This informs you about the connection status of Active Roles to your Azure AD deployment, and the health status of your Azure AD deployment itself.

To view the Azure AD health status in Active Roles

  1. On the Active Roles Web Interface, navigate to Directory Management > Views > Azure > Azure Configuration > Azure Health Check.

  2. In the Tenant drop-down list, select the Azure tenant for which you want to view the Azure health status.

Active Roles then shows the following health status information:

  • Graph Connectivity: Indicates if Active Roles is connected to the Microsoft Graph API. Successful connection is indicated with a green status.

  • Tenant Connectivity Indicates if the Azure tenant user name and password credentials are validated. Successful connection is indicated with a green status.

    NOTE: Active Roles can establish Tenant Connectivity only if Graph Connectivity is established successfully.

  • Azure Application Connectivity Indicates if Active Roles is consented, validated and verified as an Azure AD application. Successful connection is indicated with a green status.

    NOTE: Active Roles can establish Azure Application Connectivity only if Tenant Connectivity and Graph Connectivity are established successfully.

Viewing the Azure Licenses Report of an Azure tenant

You can view the Azure Licenses Report of an Azure tenant in the Active Roles Web Interface. Use this feature to check the Microsoft 365 (M365) licenses available in an Azure tenant and assigned to the users and guest users of the Azure tenant.

To view the Azure AD licenses report of an Azure tenant

  1. On the Active Roles Web Interface, navigate to Directory Management > Views > Azure > Azure Configuration > Azure Licenses Report.

  2. In the Tenant drop-down list, select the Azure tenant for which you want to view the Azure licenses report.

Active Roles then shows the list of M365 licenses available in the Azure AD domain with the following information:

  • Valid: The total number of a specific M365 license available for the Azure AD domain.

  • Expired: The number of licenses for a specific M365 license that are in renewal period or have expired.

  • Assigned: The number of licenses for a specific M365 license that have been assigned to any users in the domain.

관련 문서

The document was helpful.

평가 결과 선택

I easily found the information I needed.

평가 결과 선택